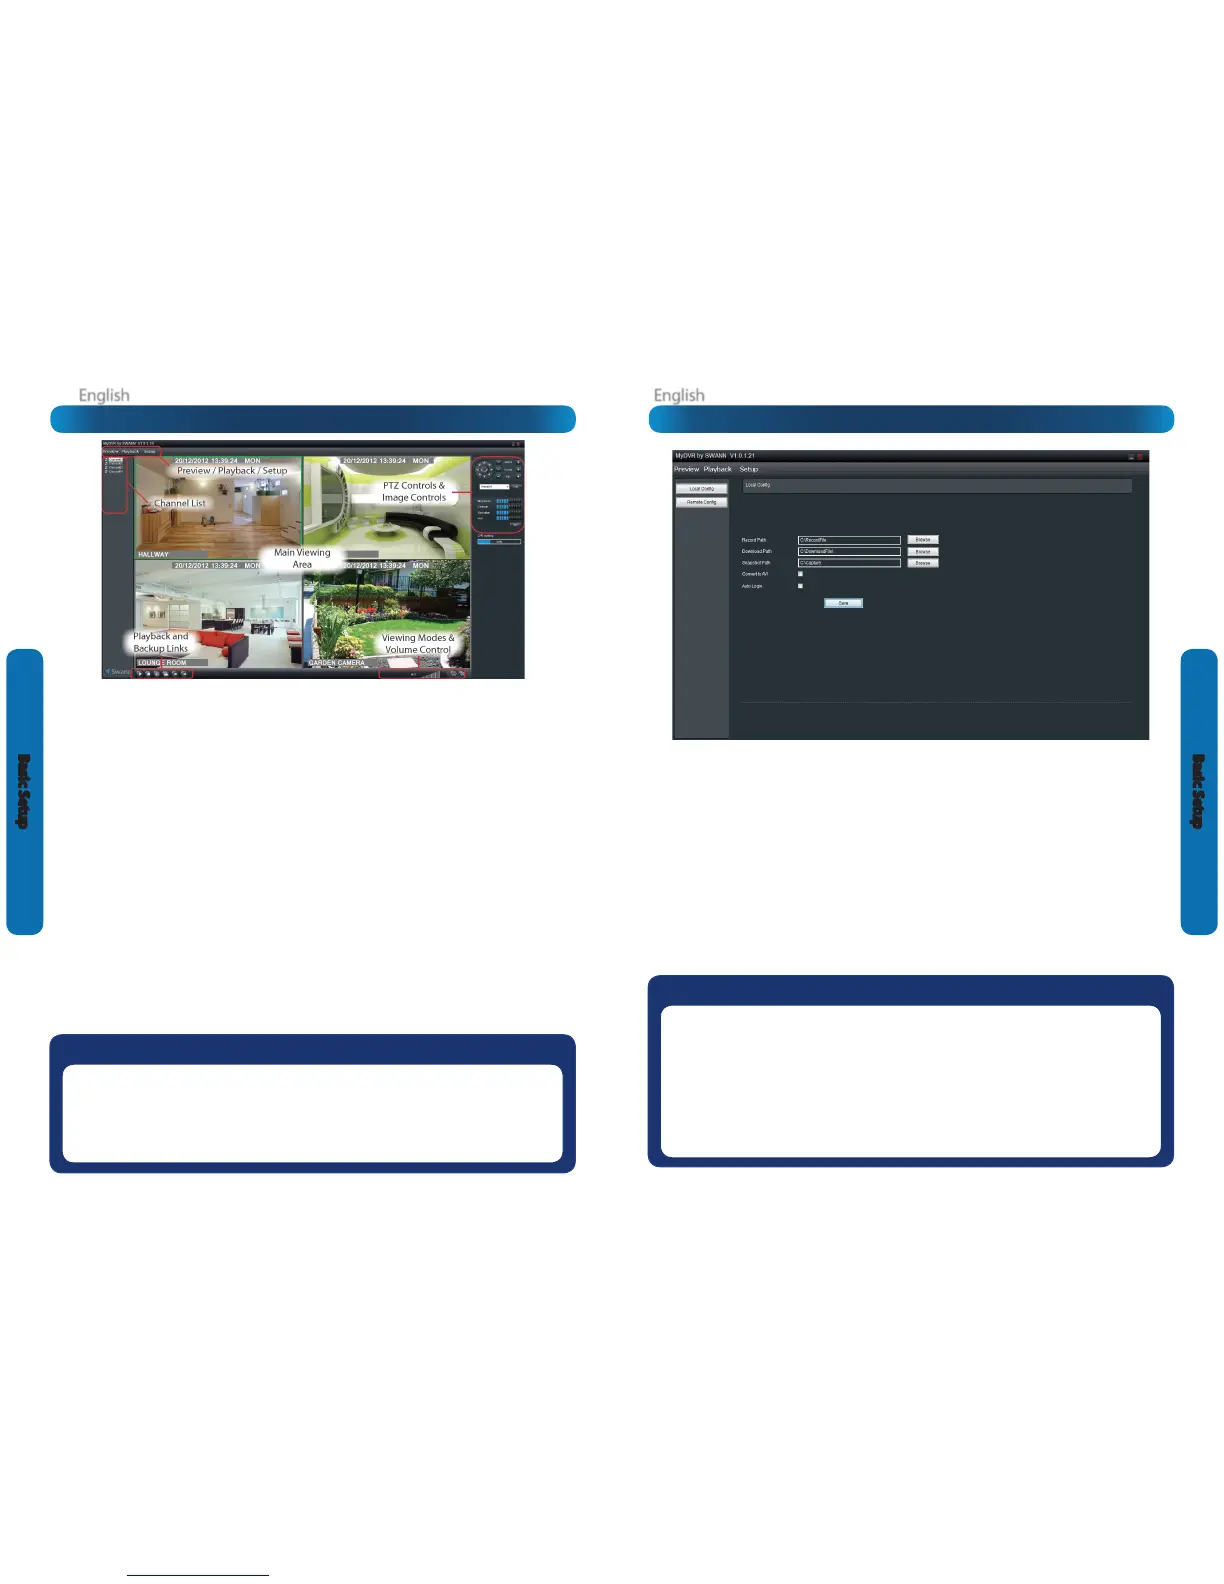
MyDVR: Local Conguration
The local conguration screen is where you can customise
how MyDVR will store and process footage on the local PC
when you download it from the DVR.
Record Path: Where MyDVR will save recordings if you select
Record from the Preview screen.
Download Path: Where MyDVR will save footage that you’ve
downloaded from the DVR.
Snapshot Path: Where MyDVR will save still images captured
using the snapshot function.
Convert to AVI: When selected, MyDVR will use your PC to
transcode footage from the DVR’s native format (H.264) into a
format that your computer (indeed, almost any computer) will
be able to playback without special software.
About transcoding to AVI:
Don’t be put o by the complex word - transcoding is just a
shortening of “translating code”.
Transcoding, while a straight-forward process, is very
processor intensive. You may notice signicant slow-down
on your computer while the transcoding takes place. For
best results, try not to over-burden your computer - just let it
transcode the footage in peace.
Auto-Login: When selected, MyDVR will automatically
login and open the Preview screen for the DVR it is currently
connected to. Simply un-check Auto-Login if you don’t want
MyDVR to do this anymore or you want to change the default
device (you’ll just need to go through the manual login
procedure once for the device you want).
Playback Problems?
Some media players have trouble playing back the transcoded AVI les from the MyDVR software.
We recommend using VLC media player, which has no problems with the DVR’s AVI les.
You can get it for free from www.videolan.org/vlc.
Note: Very few (if any) media players will be able to play the un-modied H.264 video streams that are the DVR’s
native format. The H.264 streams are raw video data with no “container” (AVI is a “container”). It’s a little like trying
to read a book with no punctuation or capital letters or spaces - the “transcoding” process puts in the spaces and
the full stops and makes it possible to be “read” by someone other than the author.
MyDVR: Interface
Preview: The default splash live-view screen of MyDVR.
The screen layout emulates the multi-channel live view
screen of the DVR, showing you images coming directly from
your cameras in near real-time (some delay is caused by the
network/Internet connection you’re using to access the DVR).
You can select a single camera or multi-channel viewing
by using the Viewing Mode buttons in the lower right corner.
Playback: Opens the Playback interface, which operates in
much the same way as the playback interface on the DVR itself.
Setup (Conguration): Allows access to both the Local
Cong screen and Remote Conguration menus.
Local Cong: Denes how MyDVR will manage and save
footage and still images to your local PC.
Remote Cong: Allows access to the DVR’s settings. The
congurable options are very similar to those you’ll nd in the
DVR menus.
Main Viewing Area: Where images from your camera will
be shown. Select Preview to return to this view from the
Playback interface or the Cong menus.
Playback / Backup Links: Quick access to playback and
backup.
PTZ Controls: For controlling PTZ devices. They operate in the
same way as those you’ll nd on the DVR itself.
Image Controls: You can alter the brightness, contrast,
saturation and hue of your images here. They operate in the
same way as those in the DVR’s menu (see “Display: Camera”
on page 28 for more information).
Viewing Modes: Choose between single and various split
screen modes.
Volume Control: Alters how loud the audio output from the
DVR will be. Remember that the nal output volume will also
be aected by the master volume control of your operating
system, as well as the levels set on speakers or ampliers
connected to your system.
CPU Loading: How hard your computer is working to decode
and display images as they arrive from the DVR. If this is
consistently high, you can try:
• disabling multiple monitor setups. The MyDVR application
doesn’t support hardware acceleration across multiple
monitors. Disabling all but your primary monitor will
greatly increase performance
• reducing the quality of the video. Select WAN from the
login screen instead of LAN
• reduce the number of video feeds being displayed. Select
a channel and click Stop to disable the monitoring
• switch to single channel view
Need more details?
The overview of the DVR settings presented over the next few pages is just that - an overview.
The full explanation of the DVR’s menu system and conguration options are listed in detail from
page 25 onwards. The DVR’s menu system is functionally very similar to the MyDVR software
interface, and you’ll nd more detailed information about all menu options and settings there.
The relevant page for additional information is listed next to each menu screen.