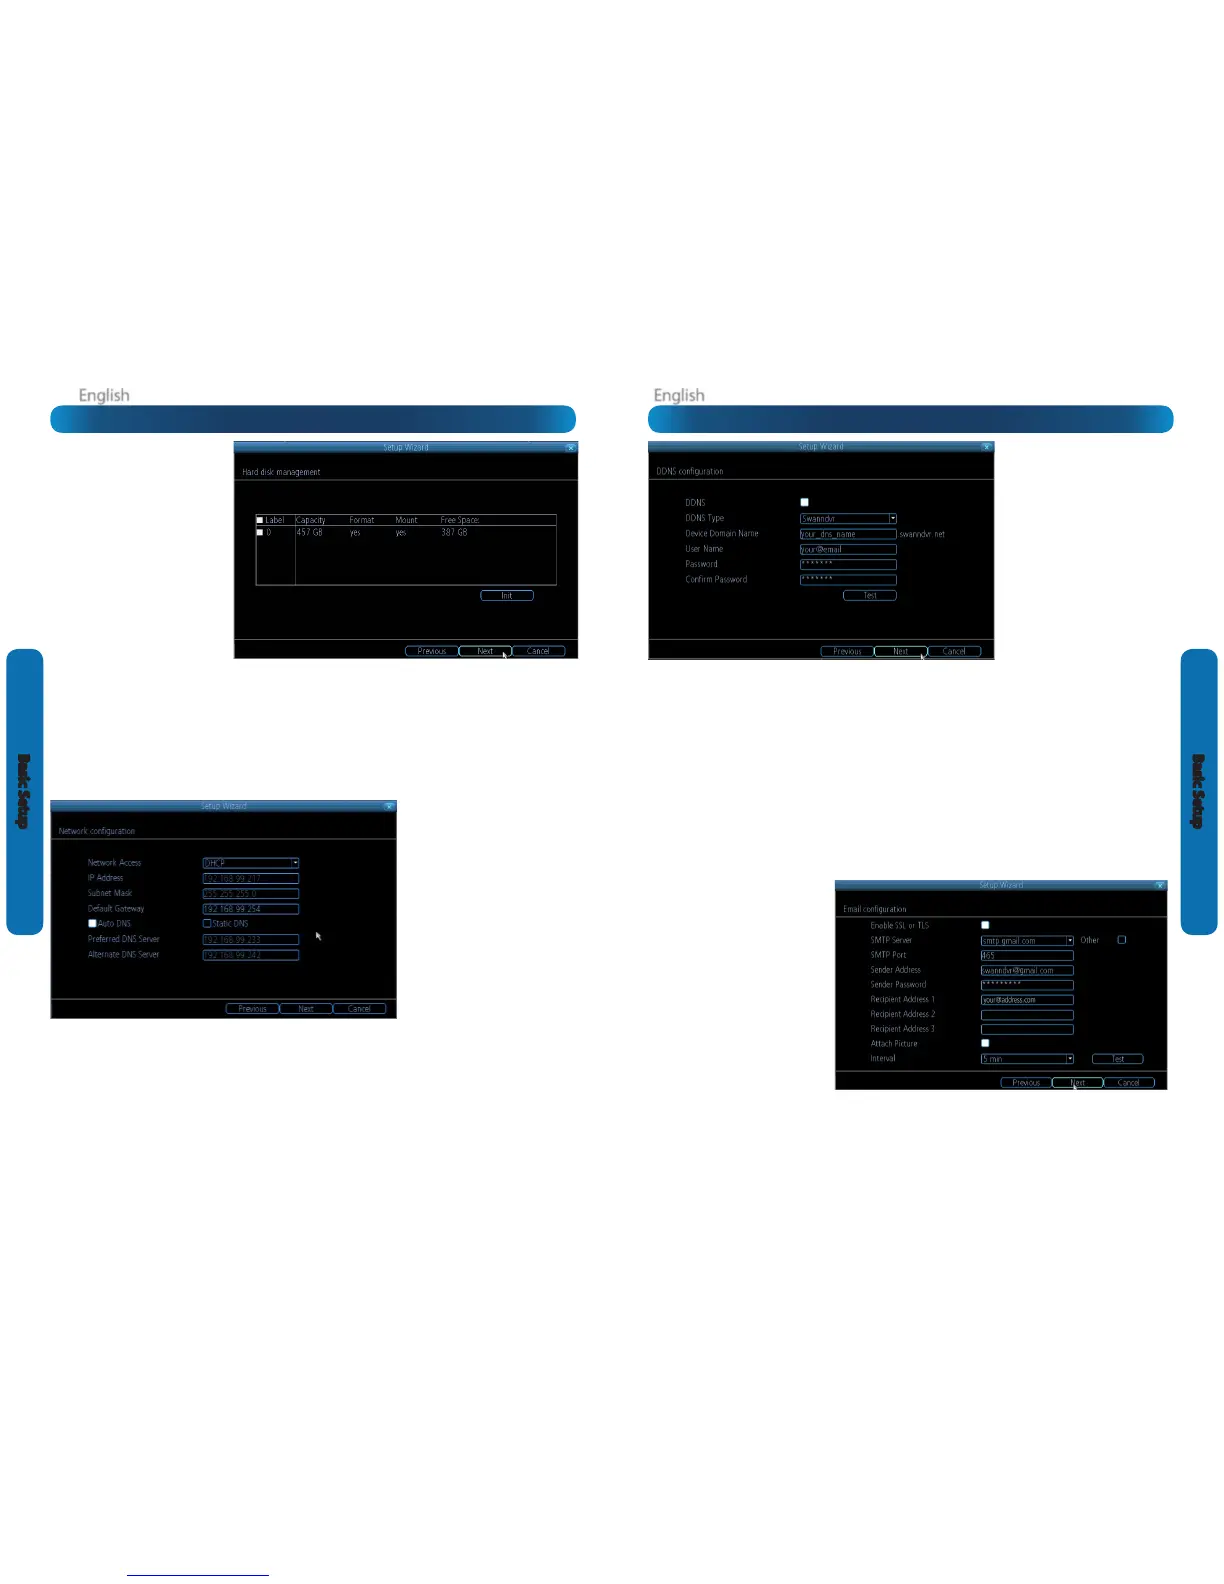
DDNS
A Dynamic DNS is a service which will let
you assign an address to your DVR so you
can access it via the Internet.
There’s more information about DDNS,
how to congure it and what it means
for you when remotely accessing the
DVR later in this manual. Have a look at
“Network: Advanced: DDNS” on page 39
for more.
DDNS Type: The DDNS server you’re
using. We recommend SwannDVR - you
can sign up for your free account at www.
swanndvr.com.
Device Domain Name: The domain name
you chose when signing up for your DDNS
account.
User Name: The username you selected when you signed up for your DDNS account. If you’re using SwannDVR and followed
the suggested username guidelines, this will be your email address.
Password: Enter the password you used when you signed up for your DDNS account.
Conrm Password: Re-enter the password to conrm.
Test: To check if the DDNS is working, click the Test button. After a short delay, a message will be displayed on-screen, informing
you whether the update was successful or not.
If the test is unsuccessful, a message will appear onscreen informing you that the “Update was Unsuccessful”. This could mean
there’s a problem with your network setup, or there’s a problem with the DDNS Account Name and Password you’re using.
Before DDNS will work, you’ll need to register an account with the DDNS provider of your choice. We recommend SwannDVR, as this
is a free service which we support directly. Boot up your computer and sign up at www.swanndvr.com.
Email
If you want the DVR to send email alerts as alarm events are detected, then you’ll need to congure an outgoing email server for
the DVR to use, and choose an email address for it to send to.
We recommend creating an account with Gmail (www.gmail.com) specically for the DVR. These instructions assume you’re
using a Gmail account. If you’re using a dierent email, see “Network: Advanced: Email Settings” on page 41 for details.
Enable SSL or TLS: Enable.
SMTP Server: Choose smtp.gmail.com.
SMTP Port: 465 (this value will self-
populate).
Sender Address: your_email@gmail.com.
Sender Password: The password you
chose for the Gmail account.
Recipient Address 1, 2, 3: Choose up
to three email addresses for the DVR to
send mail to.
Attach Picture: When selected, the DVR
will attach a still image to better illustrate
what has caused the alarm/alert state.
Interval: The minimum amount of time
that must elapse after the DVR sends
an email alert before it can be triggered
again.
Test: The DVR will send an email immediately using the setting you’ve entered. The DVR will tell you whether the outgoing
mail server responded to the request to send the email or not. If the DVR indicated the sending failed, this indicates there’s
something wrong with the SMTP server details you’ve entered. If the DVR reports success but you don’t receive the email, then
it’s likely there’s something amiss with the recipient email - in particular, check the Spam folder/settings.
Other: Allows for custom denition of an outgoing email server. See “Network: Advanced: Email Settings” on page 41 if you want
to use an email server other than Gmail. For advanced users ONLY.
HDD
Init.: Initializes the hard drive. You’ll
only need to do this for drives once,
assuming that it’s not already initialized.
If the Mount column reads “No” then
choose Init. to initialize the drive.
Label: A quick way of dierentiating
between hard drives. For the rst setup,
there will usually only be one hard drive
displayed. This displays internal HDDs
and those connected to the eSATA port.
Capacity: The total amount of space
on the hard drive. This will typically be
slightly less than the rated capacity of
the hard drive as a fraction of the space
is required by the le allocation table
(FAT).
Format: Whether the hard drive has been formatted to operate with the DVR. When the hard drive is formatted appropriately,
this will simply read “yes”. If it says anything else, such as an ominous “no”, then select the disk and choose Format.
Mount: Whether the drive has been initialized and is detected by the DVR. If the drive isn’t mounted then it needs to be
initialized (see above).
Free Space: The amount of available space on the hard drive.
Network Access
We’re not going to pretend this isn’t the
most complex aspect of conguring the
DVR, but if your router supports DHCP
and UPnP, then there’s nothing to do
here.
Recommended:
Don’t change anything.
Ensure that the Network Access
is set to
DHCP and that UPnP is enabled on your
router - it should just work.
If your router doesn’t support DHCP:
Then you’ll need to manually assign the
address of the DVR. If you’ve already
setup your network, we assume you
know what you’re doing. See “Addendum:
Third Party Hardware” on page 55 for
more information.
If your router supports DHCP but not UPnP: For local access (i.e. a PC connected to the same network) just set the Network
Access to DHCP. For remote access (i.e. a device connected via the Internet), you’ll need to manually forward ports on your router.
See “Addendum: Third Party Hardware” on page 55 for more information.
If you don’t know how to manually address devices and don’t have access to someone who does, you may want to consider
upgrading your router - we think that DHCP and UPnP are neat features that are well worth having.
There’s heaps more information on IP Addresses, DHCP, UPnP and all manner of remote access information later in this booklet.
In addition to “Addendum: Third Party Hardware” on page 55, have a look at “Network: General” on page 37 and have a word
with whoever set up your network - they might be able to help you.
Basic Setup: DDNS & EmailBasic Setup: HDD & Networking