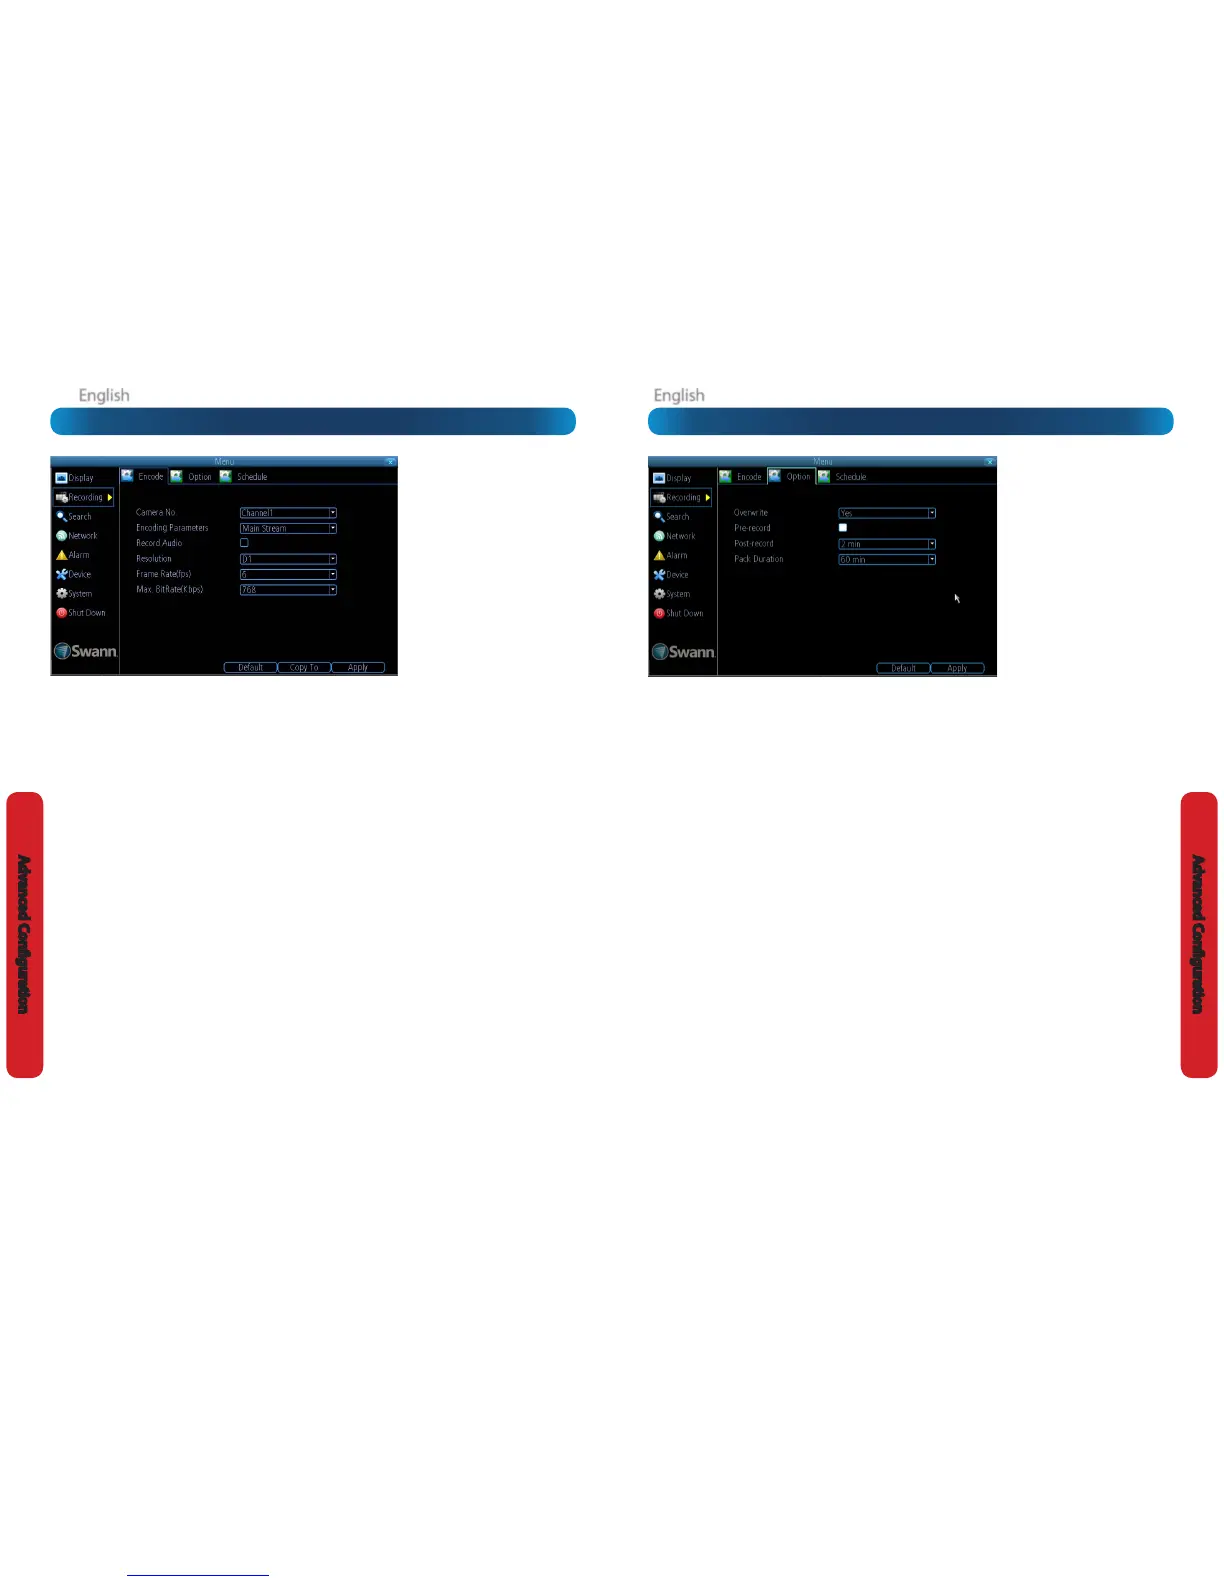
Overwrite: When enabled, the DVR will record over the les
already stored on the hard drive. The DVR will always record
over the oldest les on your hard drive rst.
Using the overwrite option is advisable, as the DVR will always
be able to record events as they happen. However, it does
mean that you’ll need to get important events o the HDD
before they’re overwritten.
Pre-Record: While Pre-Record is enabled, the DVR will record
a few seconds before an event occurs. It’s a little like making
the DVR psychic (but not really - it’s actually just caching a few
seconds of video which it adds to event recordings as they
occur).
If you’re using Motion Detection (recommended) and/or
Alarm based recording as your primary recording method(s),
then it’s a really good idea to use Pre-Record - sometimes, if
an event is fast enough, it might have left view before the DVR
can trigger a recording. With Pre-Record, there’s almost no
chance you’ll miss it.
Post-Record: How long after an event occurs that the DVR
will continue to record. It can be very useful - for example, if
an intruder or potential target triggers the motion detection
but pauses in view; having post-record enabled will get a
much better look at them. 30 seconds is the recommended
length for the post-record setting, but it can be set higher (the
options are 1, 2, 5 or 10 minutes) depending on your unique
circumstances.
Pack Duration: Pack Duration is a measurement of how long
the DVR will record for before splitting the output le into
discrete units. “Packs” are something like the chapter numbers
on a DVD - though the video is broken up into separate units,
it will still play through as one continuous movie (unless
interrupted by the schedule or motion detection turning the
recording on or o). If you don’t want to worry about setting
Pack Durations, you can leave it on the default value; it will
make little dierence to the day-to-day running of the DVR.
Recording: Option
The Recording: Option menu lets you
change some aspects of how the DVR
will record footage, such as:
• whether the DVR will record a short
video before events take place,
• how long after events take place the
DVR will continue to record for,
• how the DVR will store and divide
long recordings into “packs” and
• whether the DVR will record over
old footage to make room for new
events.
Camera No.: The camera feed you want to alter the settings
for. These will be numbered sequentially, and correspond to
the BNC video inputs labelled on the rear of the DVR. Note
that the channel name here is independent of the Camera Name
selected on the Display: Camera menu screen.
Encoding Parameters (advanced user option): Whether
you’re editing the parameters for the mainstream or the
substream.
Main Stream: The main stream is the video feed that the DVR
will record and display. This is the higher-quality stream.
Sub stream: The sub stream is the video stream that the DVR
will send to remote devices via a network or the Internet. It is
the lower-quality stream as a reduction in video size makes it
easier to send over a network.
Record Audio: Choose whether the channel you’ve selected
will record audio or not. If you don’t have any audio devices
connected, it’s a good idea to disable audio, as it will save
some space on your HDD.
Resolution: How many “little dots” are going to make up your
image. There are three options available:
D1: About the same resolution as a DVD (704 x 480 for NTSC,
or 704 x 576 for PAL). This is the default resolution for all
channels, and we suggest leaving this setting well alone.
HD1: Literally, half of D1 (704 x 240 NTSC / 704 x 288 PAL) and
about the quality of a typical YouTube video. This won’t save
HDD space - the bitrate is the important setting for determining
how much space your recordings require on the HDD.
CIF: 1/4 of D1 (352 x 240 NTSC / 352 x 288 PAL), and about
the same resolution as a low quality webcam. We can’t think
of a good reason to use CIF as your resolution setting, unless
you’ve some really cunning plan we didn’t think of. It won’t
save any HDD space - for that, you’ll need to change the bitrate.
Frame Rate: The number of frames per second (fps) that the
DVR will record. The default (and maximum) is referred to as
“real-time” and is 30fps (NTSC) or 25fps (PAL).
Reducing the number of frames per second will not save hard
drive space but potentially will improve the data-rate per
frame (depending how you set the bitrate - see the next point).
Remember that your FPS count is the same as saying “take
X photographs per second” (where X is your FPS setting).
5fps doesn’t sound like much, but it’s still ve individual
photographs per second. If maintaining image clarity while
reducing HDD consumption is your priority, it makes sense to
lower the frame rate.
Max. BitRate(Kbps): The actual amount of data that the DVR
will use to record video.
The main stream uses a variable bitrate to record video - the
more movement occurs in the video, the higher the bitrate
will have to be. When there’s little movement in view, the DVR
will automatically reduce the bitrate to conserve HDD space.
If the amount of movement in a recording would require a
higher bitrate to accurately record than what you’ve selected
as the maximum, the DVR will attempt to preserve as much of
the quality as possible by applying compression to the image.
This compression will take the form of irregular, fuzzy blocks
over segments or the entire image. If you encounter this, it
indicates that you might need to increase the overall bitrate.
If you’ve set a high bitrate but a low frame rate, the DVR will
still use all the data it can, resulting in potentially higher
quality per frame than at higher frame rates.
The sub stream uses a constant bitrate. This makes the video
easier to stream over a network or the Internet.
Note: Both the main stream and the sub stream are always
operating - in fact, the sub stream forms part of the main
stream. The options will aect the output quality of each
stream, but won’t change which one is being used in dierent
circumstances.
Recording: Encode
The Recording: Encode menu allows
you to alter and customize how the DVR
records footage and “encodes” the les.
“Encoding” is a term which refers to
the compression algorithm (a fancy
computer term for “make the le smaller
while retaining visual quality”) used by
the DVR.
You can choose and alter:
• the frame rate (how many images
per second the DVR records)
• the data-rate of each video stream.
The higher the data rate, the “better”
your images will look, but the more
space they’ll require on your HDD