Network Access: Here you can choose between the three
dierent types of networks that the DVR can be connected to.
The three types of networks are:
DHCP: DHCP (Dynamic Host Conguration Protocol) is a
system where one device on your network (usually a router)
will automatically assign IP addresses to devices connected to
the network.
STATIC: Static networks require all devices to have their IP
addresses manually dened, as there is no device dedicated
to automatically assigning addresses.
PPPoE: An advanced protocol that allows the DVR to be more
directly connected via a DSL modem. This is an option for
advanced users only.
IP Address: Just as houses and businesses need to have an
address which identies their location on the road network,
so too do computers and other devices need addresses (called
IP ADDRESSES) to identify their position on the electronic
network. The DVR uses IPv4 addressing, which consists of four
groups of numbers between 0 and 255, separated by periods.
For example, a typical IP address might be “192.168.1.24” or
something similar. The most important thing when setting the
IP address is that nothing else on your network shares that IP
address.
Subnet Mask: If the IP address is like a street address, then a
subnetwork is like your neighborhood. This will be formatted
in a similar way to the IP address (i.e. four numbers up to 255
separated by periods) but contain very dierent numbers. In
the above example, the Subnet Mask might be something like:
“255.255.255.0”.
Default Gateway: This is the address of the “way to the
Internet” - to continue the road analogy, this is like your local
access point to the highway. This is an IP address in the same
format as the others, and is typically very similar to the IP
address of the DVR. To continue the above examples, it might
be something such as: “192.168.1.254”.
Auto DNS / Static DNS: Choose how you’d like to dene your
DNS servers. We recommend leaving it on Auto unless you’ve
got a specic reason not to.
Auto DNS: The DVR will automatically choose a DNS server.
This is the recommended setting.
Static DNS: If you need to manually dene a DNS server, then
choose Static DNS. This is recommended for advanced users
only.
Preferred DNS Server: “Domain Name System”. Everything
on the Internet is located via an IP address - however,
for ease of use, we associate domain names (such as
“www.exampledomainname.com”) with those IP addresses.
This index is accessible in many locations online, and we call
those locations “DNS servers”.
DNS for STATIC conguration: Under most circumstances,
you can set the DNS Server address to be the same address as
your router (this is usually the same address as Gateway).
DNS for DHCP conguration: Typically, the DNS Server
address will automatically be detected by the DVR. In some
cases, you’ll need to enter a value - the address of your router
(the same as the Gateway) should work.
Alternate DNS Server: A backup DNS server. This is here as a
redundancy - your DVR will probably work without one.
MAC Address: The Media Access Control address. This is a
unique code which nothing else should share. You can’t
change this one - it’s pre-set when the DVR ships out.
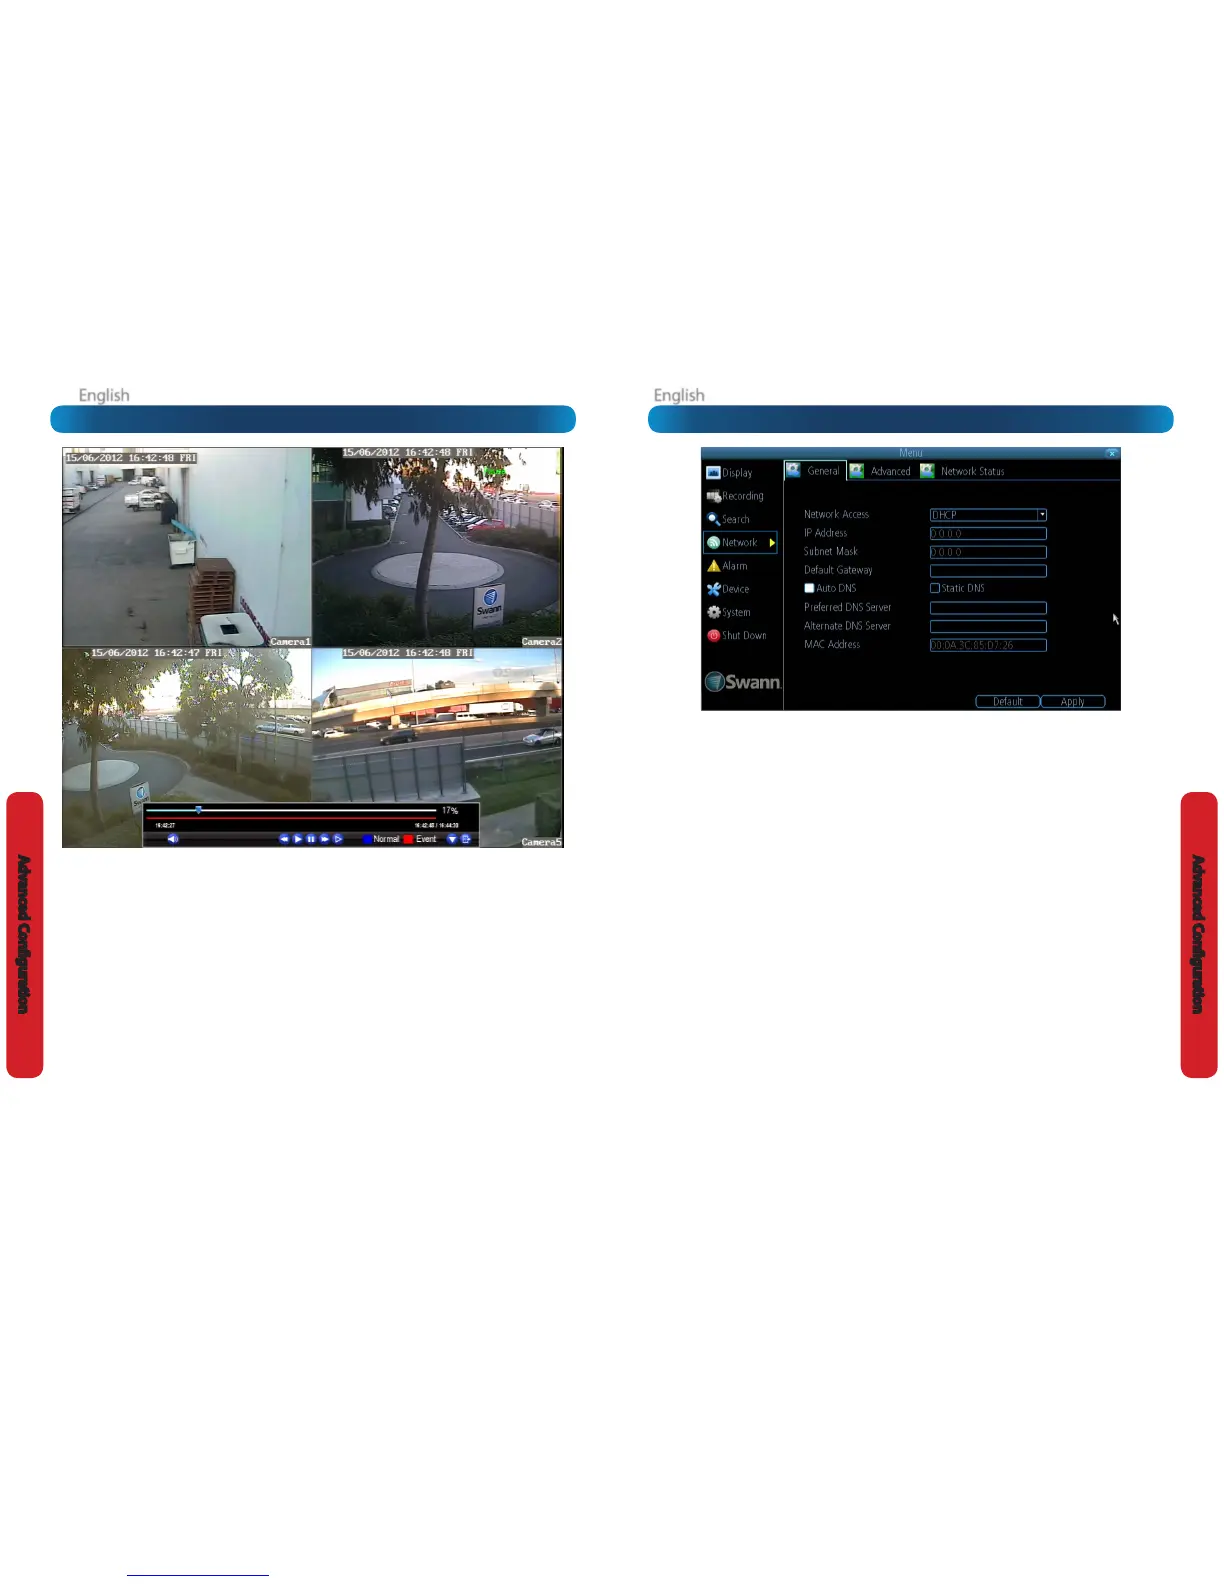
Network: GeneralThe Playback Interface
The Playback interface is quite similar to a computer’s media
player, or to the on-screen display of a DVD/Blu-ray player.
Most of the controls are quite straight forward, and operate in
the same way as a standard media player.
Current Position: A basic progress meter. You can click to
move the current position icon to quickly scan through video
events.
Volume Control: Alters the output volume of playback.
Rewind: Reverses the footage.
Play: Plays footage at normal speed.
Pause / Step: Pauses playback but retains still images on-
screen. Subsequent presses will move a single frame forward
in the video. This will usually be 1/30th (NTSC) or 1/25th (PAL)
of a second.
Fast-Forward: Speeds up playback.
Slow: Plays back footage at reduced speed. Press multiple
times to further reduce the speed: 1/2 speed, 1/4 speed, 1/8th
speed, 1/16th speed and so on.
Recording Type: Whether the video being played back was
recorded under normal recording (blue) or based on motion
or an alarm event (red).
Hide Console: Maximizes the area on-screen for playing back
your footage by hiding the on-screen controls.
Exit Playback: Leaves the playback interface and returns to
the live viewing mode.
Remember: Playback Limitations
While you’re playing back footage, the DVR continues to
monitor and record normally.
Simultaneously recording and playing back footage from many
channels at once is extremely resource intensive. If the DVR is
simultaneously recording/monitoring multiple channels and
playing back multiple channels at once, there may be a slight
reduction in performance from real-time to near-real-time.