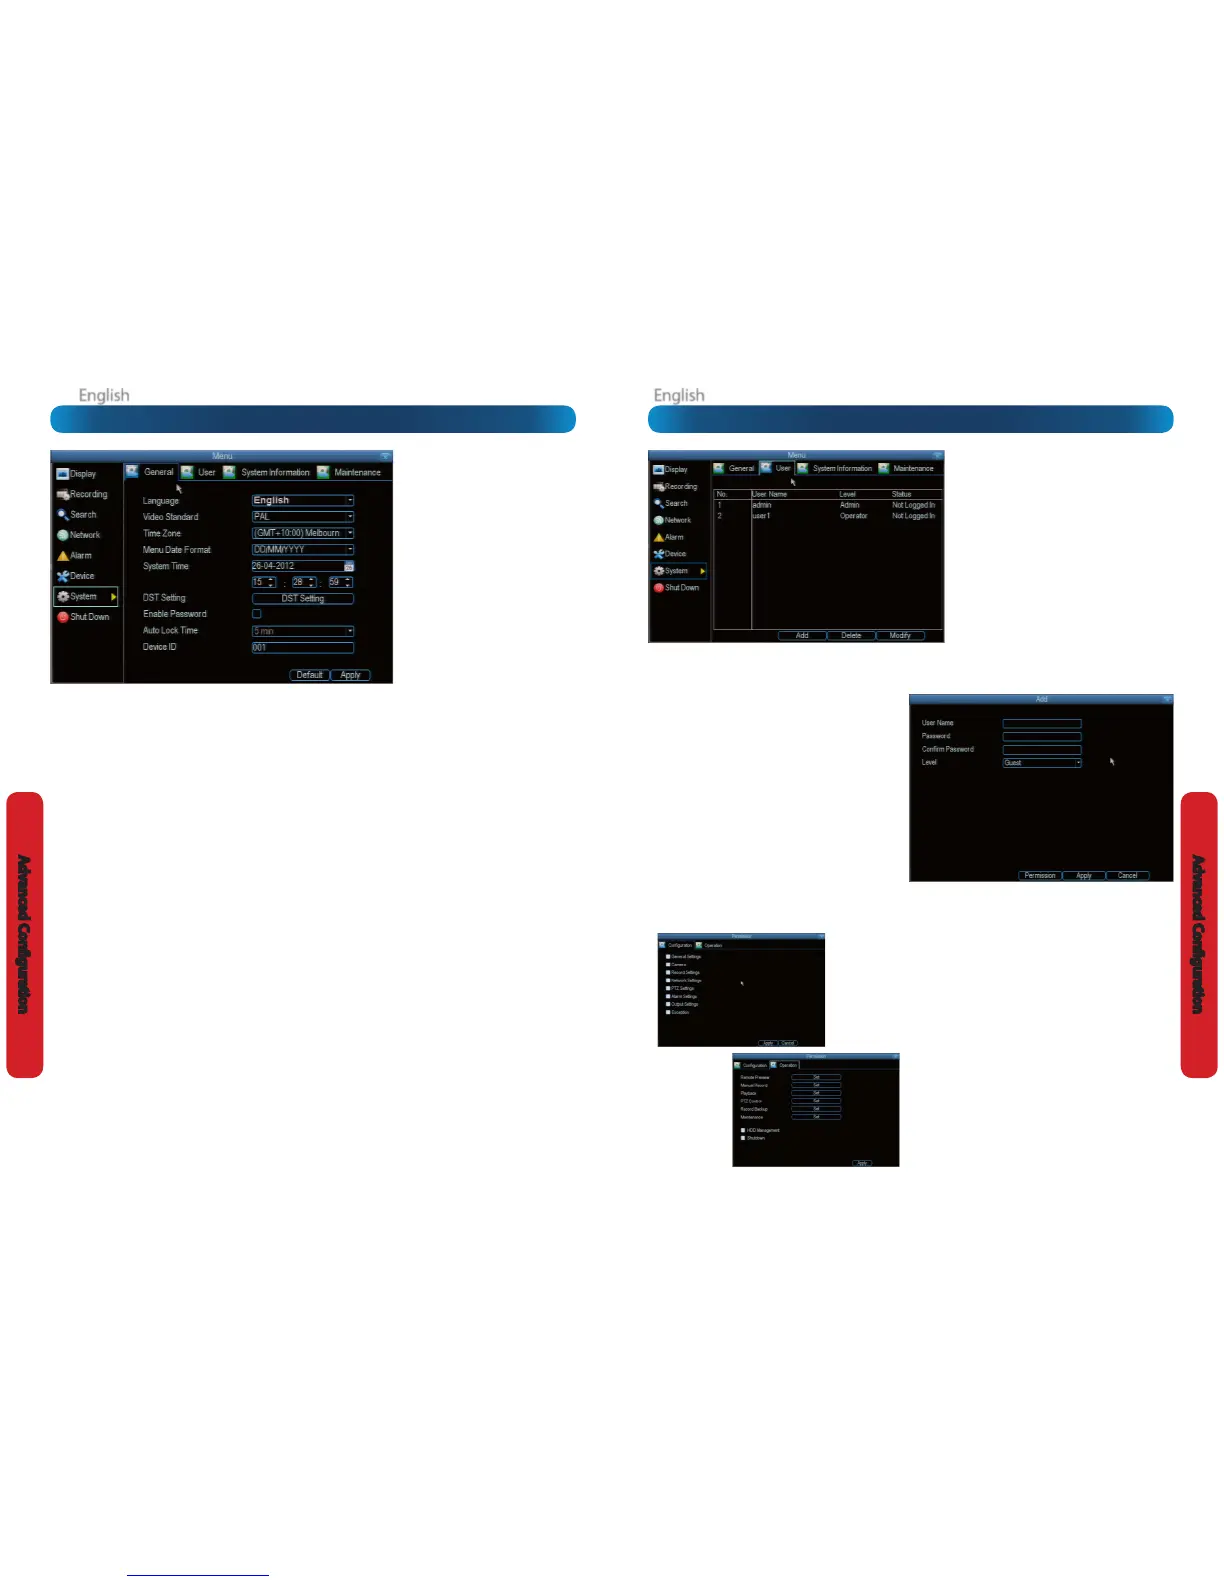
The System: User menu is where you can dene
and congure the dierent levels of access various
users have to the DVR.
We suggest that at minimum the admin account
be password protected, as it has access to all
aspects of the DVR’s operation.
To add additional users, choose Add.
To remove a user, choose Delete.
To customize a user’s level of access, choose
Modify.
You cannot modify the access level of the
default admin account - they can do everything.
This is to prevent an unfortunate incident where,
for example, no user has the permissions required
to change another user’s permissions - which
could lead to the DVR being, in at least some
senses, inoperable.
User Name: Select a name for the user you want to
dene. The best usernames are short, to the point, are
relevant to the specic user they’re intended for, are
easily memorable and hard to guess.
Password: A password can be any combination of
numbers (0 though 9) between one and eight characters
long.
Conrm Password: Must exactly match the password
for the denition of a new user to be successful.
Level: There are two default levels of access to the DVR -
Guests and Operators.
Guest: By default, a Guest user has access to the live
images on the DVR and can search through recorded
events. They cannot change any settings or congure
the DVR in any way.
Operator: The default permissions of an Operator allow
them to access and congure all aspects of the DVR.
You can easily customize the level of access each individual
user has. Simply choose the Permission button on either the
Add User or Modify to set the specic access for the user you
want. The Permission menu has two tabs - Conguration and
Operation.
Conguration: The conguration page species which menu(s)
the user can access. There is no hierarchy and any combination
of menus can be selected (although some combinations would
make little sense in practice).
Operation: You can select which channels the user has access
to, and what they can do with them. For example, you could set
a user to have permission to view all channels in live viewing
mode, but only playback channels 2 and 4.
Press the Set button next to each type of access to select specic
channels that the user can access.
Also, this page contains permissions for HDD Management
and Shutdown. These are surprisingly powerful levels of access:
between them, a user can remove all footage from a DVR’s
hard drive and turn the DVR o. Be careful assigning these
permissions!
System: User
Language: The language that the DVR’s menus, alerts and
other communications will use. This usually defaults to English.
Be careful not to change this setting unintentionally - it might
be tricky to nd the setting to change it back when the DVR is
speaking another language!
Video Standard: Here you can choose between PAL and NTSC.
PAL is used in Western Europe and Australia, NTSC is used in
the US, Canada and Japan. If the DVR’s picture is black and
white, ickering or similar, then this is probably caused by the
video system being set incorrectly. Don’t change this setting
unless advised to do so by Swann Technical Support. You
may not be able to see the DVR’s output on your screen
anymore!
Time Zone: Particularly important if you’ve enabled NTP - set
this to the time zone where you happen to be. For example,
people in eastern Australia (Canberra, Sydney and Melbourne)
choose GMT+10:00, whilst the Eastern Time zone in the USA
and Canada is GMT-05:00. (GMT stands for Greenwich Mean
Time - it’s the baseline that keeps all the dierent time zones
in sync.)
Menu Date Format: The format of the date (e.g. DD/MM/
YYYY or MM/DD/YYYY and so on).
System Time: This can be edited manually, or set to update
automatically by using NTP (see “Network: Advanced: NTP” on
page 39).
DST Setting: As the standards for daylight savings dier from
country to country, and often state to state, you might need
to manually tell the DVR exactly when it commences and
ends in your locality. First, turn DST on. We suggest setting the
Daylight Saving Time Mode to Date, and manually entering
the dates and times that daylight savings time applies to and
from, in your locality.
Note: Some NTP servers are NOT fully compatible with DST.
This may cause your system to double-count adding one
or removing one more hour than they should, or cancel
each other out. You may need to intentionally change your
time zone to compensate, or simply not use NTP and DST
simultaneously.
Enable Password: When enabled, the DVR will require a
password to access, even for local users. It’s advisable to
enable password protection
Auto Lock Time: When the password protection is enabled,
the DVR will automatically time-out, where after it will ask for
a password before returning to normal functioning. The Auto
Lock Time determines how long a period of inactivity will
cause the DVR to lock itself again.
Device ID: Dierentiates your DVR from other devices. If you
don’t have any other DVR’s or similar devices, then you can
leave this as-is. If you’ve got multiple DVRs running on the
same network, then it’s a great idea to give each a unique ID.
System: General
The System: General menu contains
many of the settings you’ll need to
congure to get the most out of your
DVR system. Most importantly:
• The time and date can be set here.
• You can select the language you
want for the menus/GUI.
• The conguration for automatic
adjustment to daylight savings time
is here.
• You can easily enable or disable
password protection - but will have
to create a valid username/password