DHR/AR Series SALS Accessory Getting Started Guide Page 16
Chapter 2:
Installing the SALS Accessory
Installing the SALS Accessory
The steps needed to attach the SALS Accessory to the rheometer involve the following:
1 Mounting the upper and lower fixtures
2 Attaching the upper geometry
3 Connecting camera and installing drivers
4 Aligning the system
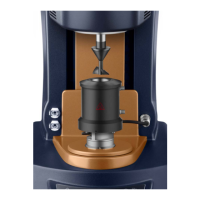
Mounting the Upper and Lower Fixtures
Follow these steps to mount the fixtures:
1 Ensure that the rheometer is turned on. Raise the head to the maximum travel.
2 Attach the upper fixture to the mounting ring on the underside of the instrument head using the three
captive screws provided.
NOTE: The camera should project to the right of the instrument when viewed from the front.
3 Mount the lower fixture on the rheometer using the Smart Swap connection.
4 Remove lens cover from upper assembly.
Attaching the Upper Geometry
The procedure for attaching a geometry to the instrument spindle is as follows:
1 Push the geometry up the spindle and hold it while locating the draw rod in the screw thread of the
geometry.
2 Screw the draw rod down, turning it clockwise. It should be screwed finger tight but not forced.
To remove the geometry, perform this operation in reverse.
 Loading...