June 2003 IPN: M5000-00-105 Tait Orca vehicle kit F - 11
Ensure the vehicle kit release button is down
and insert the radio into the radio cavity.
Push the radio firmly into place against the
locating pegs and radio interface. You should
hear the radio snap into place and the release
button will pop up.
Locking a radio in the vehicle kit
You can use the supplied key to lock the radio
into the vehicle kit when you leave the vehicle
unattended.
To lock the radio in the vehicle kit, insert the
supplied key in the lock and turn it clockwise.
To unlock the radio from the vehicle kit, turn
the key counterclockwise.
Removing the radio
To remove the radio from the vehicle kit, push
the release button down. The radio can now be
removed from the radio cavity.
Charging the battery
Once the radio is inserted into the radio cavity,
the charger status LED will glow amber for
three seconds, then red. When the LED glows
green, the battery is charged to a minimum of
70% capacity.
If the battery is too hot or too cold, the LED
will glow amber until the battery temperature
is within the safe range for recharging (0ºC to
50ºC). If the indicator remains amber, consid-
er turning on your air conditioning. Optimum
battery charging performance is obtained
between 15ºC and 25ºC.
Charge times when the radio is turned off are:
■ up to 1½ hours for the 1100 mAh NiCd
battery; and
■ up to 2 hours for the 1500 mAh NiCd.
battery.
You can still use the radio while the battery is
being charged, but the charge times will vary,
depending on how much the radio is being used.
The vehicle charger functional indicators are
summarised in Table F-4.
Table F-4: Charger status LED indicators
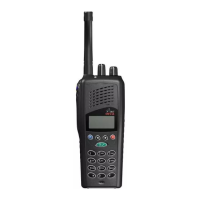
Figure F-6: Vehicle kit assembly
Using the radio while in the vehicle kit
While the radio is seated in the vehicle kit,
operation remains the same, except:
■ the radio’s microphone will be inoperative
and an external microphone such as a
Indicator Meaning
steady green battery charging
steady green battery charged to a minimum of 70%
capacity
steady amber charge suspended until battery tem-
perature is within correct range
flashing red battery not seated properly in the
charger, contacts dirty, battery faulty
or NiMH battery inserted
8
7
6
5
4
4
3
2
1
charger status LED
radio cavity
charger pins
locating pegs
locking
mechanism
radio interface
lock
release button
1
2
3
4
5
6
7
8
 Loading...