8 Ditto X4 Looper User Manual
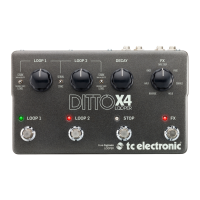
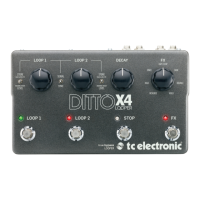
(10) OUTPUT jacks – Send audio via one or two ¼" TS cables.
(11) Power input – connect the 9V power supply. Note that this pedal cannot
operate on batteries.
(12) MODE switches – these allow ne details of the pedal’s operation
to be adjusted. See “Mode Switches” chapter for details.
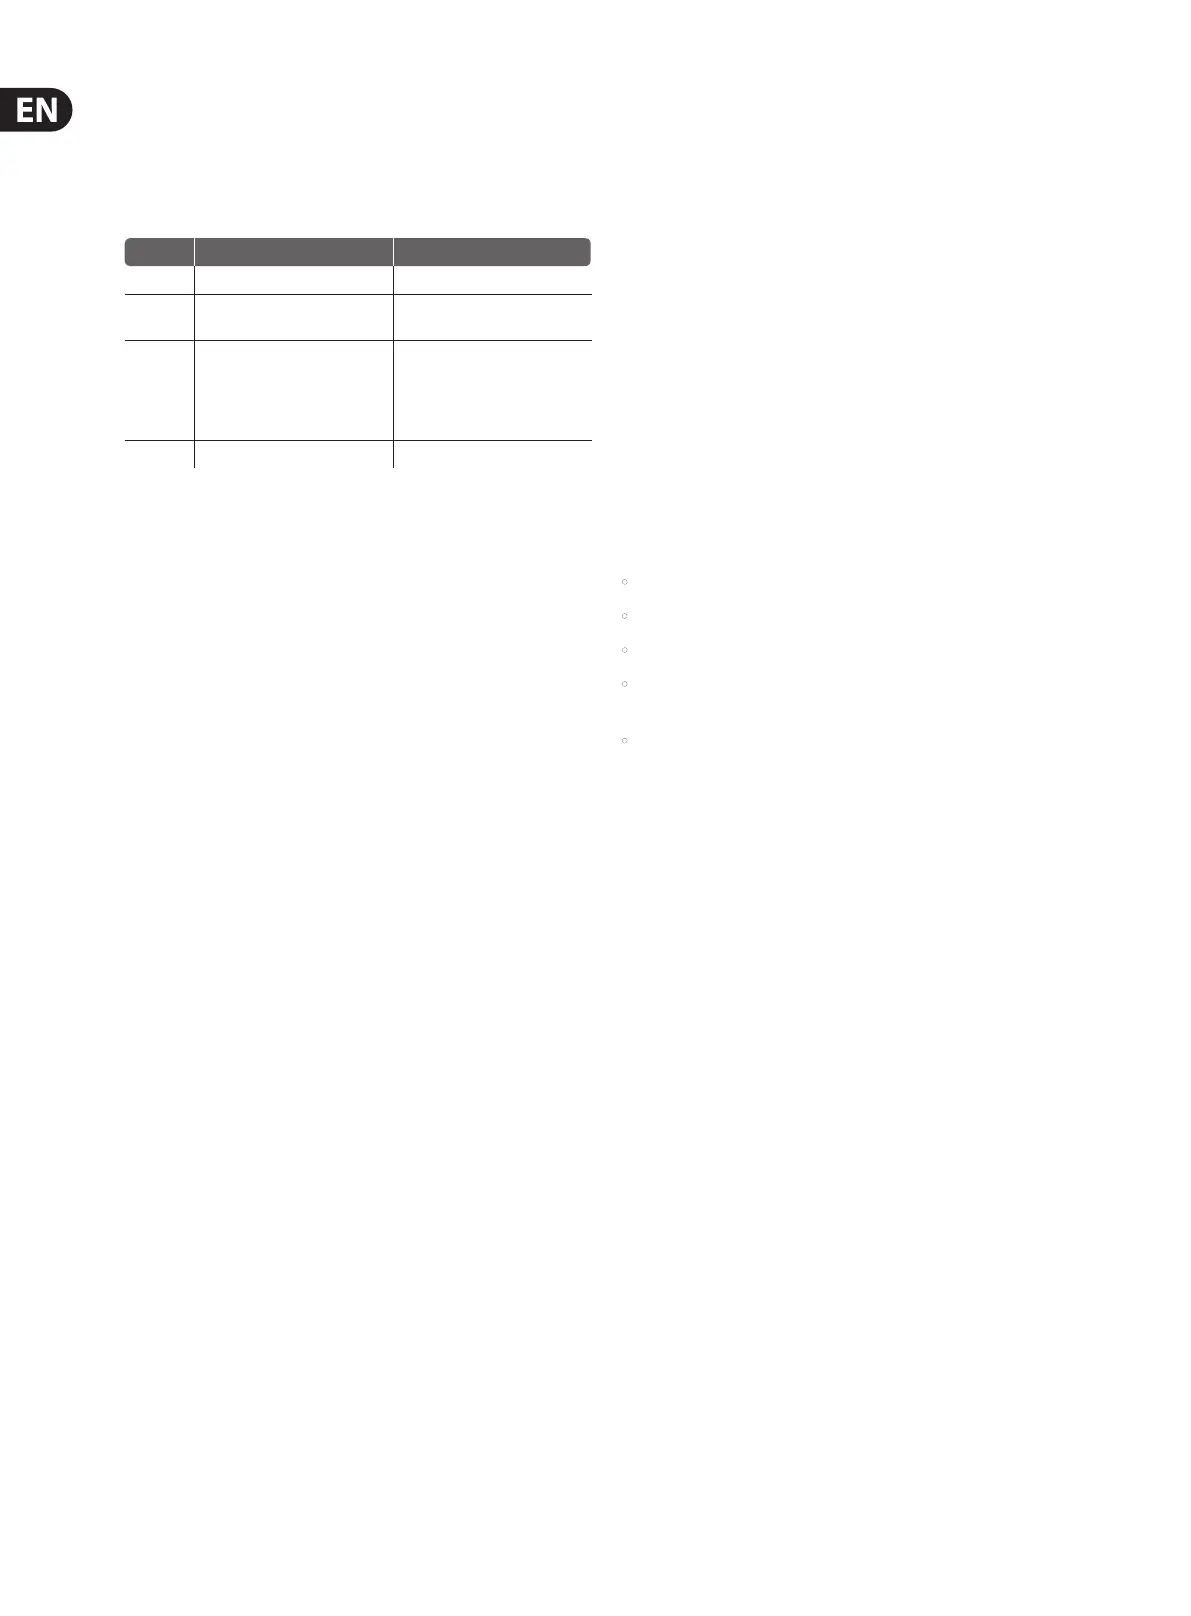
Switch Down Up
1
REC PLAY OVERDUB REC OVERDUB PLAY
2
Overdub starts immediately
(Sync mode only)
Overdub starts at the end of loop
3
Serial mode - record 2nd loop at end
of 1st loop’s cycle
Sync mode - loops are synced
Serial mode - begin recording
2nd loop immediately
Sync mode - loops are un-synced,
allowing simultaneous playback of
loops with dierent lengths
4 True Bypass Buered Bypass
(13) USB input – connect the Ditto X4 to a computer to transfer les back and
forth. This connection is also used for rmware updates.
(14) MIDI IN and THRU jacks – connect an external MIDI clock to keep your
loops perfectly in sync.
5. Creating Loops
Depending on the setting of the Serial/Sync switch, the Ditto X4 can function a
bit dierently. We’ll discuss how each loop operates by itself, then dive into the
possibilities with 2 loops. These instructions also assume that the pedal’s MODE
switches are set to their default “down” position (see callout #12).
Recording a single loop
To start recording, press one of the LOOP footswitches. The LED will light up red
to indicate that the loop is in record mode. At the end of your loop, press the
same footswitch again.
The LED will turn green and the loop will repeat continuously. The LED will
blink every time the loop starts over again. Each loop allows up to 5 minutes of
record time.
Adjust the corresponding LOOP 1 or LOOP 2 knob to set the playback volume for
the loop you have recorded. These knobs have no aect on the direct sound of
your guitar.
Overdubbing
To record another layer (overdub) on top of the rst loop, press the same LOOP
button (1 or 2) that you initially used. The footswitch LED will turn red to indicate
that you are recording.
When you’ve completed the second layer, press the footswitch again to quit
record mode. The Ditto X4 will begin looping both layers.
Note that the length of the loop will not increase when overdubbing. If you
continue playing while in record mode after the rst layer repeats, you will create
a 3rd layer of overdubbed audio. There is no limit to overdub layers.
Tip: Use the Decay knob to cause overdubs to gradually fade with each loop cycle.
Undo
It’s very possible that at some point during your looping experimentation,
you will not be satised with a loop layer you have just created. To clear the last
layer that you recorded, press and hold the loop footswitch for the loop you want
to delete for 1.5 seconds or longer during playback. The LED will blink twice in
rapid succession and the last take will be removed. Any previously-recorded takes
will remain.
Redo
If you delete the most recent loop layer by mistake, or simply change your mind,
it can easily be restored. Press and hold the loop footswitch for 1.5 seconds again
during playback. The LED will blink twice in rapid succession and the previously-
deleted layer will be restored.
Using undo/redo creatively
Undoing and redoing overdubs can be used for more than just correcting
mistakes. You can make your performance more interesting by removing and
bringing back sections. Here is a simple example:
• Record a bass line (loop cycle 1).
• Record a chord progression (loop cycle 2).
• Record a melody (loop cycle 3).
• Press and hold the loop footswitch to clear the melody, allowing you to play
dierent lines over the loop.
• Press and hold the loop footswitch to bring back melody from loop cycle 3.
Note – undoing or redoing by using the footswitch is only possible during
playback. If you hold down the footswitch after you have stopped loop playback
or recording, you will delete the full loop, including all overdubs!
Stopping loop playback/recording
To stop loop playback, press the relevant LOOP footswitch twice in short
succession. This is particularly useful when using both loops in Sync mode, since it
will allow you to stop one loop while the other continues.
Alternatively, you can press the dedicated STOP footswitch to stop one or
both loops.
To stop recording, press the LOOP footswitch for the loop you are recording to.
Playback will begin immediately.
Various onboard FX, such as TAPE STOP and FADE, will also stop the loop in an
interesting and less immediate way.
The associated LOOP LED will start ashing green to indicate that your loop is still
in memory and ready for playback.
Stopping loop playback/recording and
deleting the loop
To stop loop playback/recording and delete everything you have recorded, press
the LOOP footswitch twice in short succession and hold the switch down on the
second tap. After 1.5 seconds, the in-memory loop will be deleted.
Pressing and holding the STOP footswitch will delete BOTH loops, so only use this
method if you don't want to keep one of the loops intact.
The LED will turn o to indicate that the loop has been deleted. At this point, you
can start recording loops from scratch again.
 Loading...