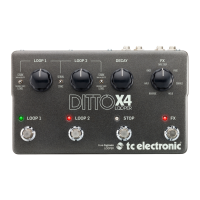
9 Ditto X4 Looper User Manual
Deleting the loop when you are not recording
or playing back
To delete everything you have recorded for one of the loops while you are not
recording or playing back audio, press and hold the LOOP footswitch. Doing this
will cause a brief moment of playback to occur before the pedal “realizes” that
you intend to delete the loop.
Holding the STOP footswitch for 1.5 seconds will delete both loops without any
audio being heard. If you do not intend to keep one of the recorded loops intact,
this is better method.
The LED will icker red and then turn o to indicate the loop is clear. Note that
while using the “undo” function that clears an overdub, deleting a whole loop
has no “redo” feature. Deleting loops as described in this section permanently
removes the loop.
A safe way to save a loop that you want to keep is to store the loop as a backing
track as described in chapter 6.
Using two loops in Serial mode
Set the SERIAL/SYNC switch up to the Serial position. In this mode, the 2 loops
are kept separate from one another, enabling dierent loop lengths and creative
switching back and forth.
You can start with either loop, but for this example, create a loop in loop 1. While
the loop is playing back, press the LOOP 2 footswitch. This will arm loop 2 and
the LED will rapidly ash red. Loop 1 will stop playback at the end of its cycle and
recording will automatically begin for loop 2.
After loop 2 has been created, it will continue to cycle automatically. You can
press the LOOP 2 footswitch again to record additional layers as described earlier
in this chapter. Pressing the LOOP 1 footswitch while loop 2 is playing will cause
both LEDs to rapidly ash green to indicate that the playback will switch.
Loop 2 will stop its playback after the cycle completes and loop 1 will
start automatically.
When 2 loops exist in Serial mode, the LED for the loop that is currently playing
will be solid green, and the paused loop will be ashing green.
To stop a loop’s playback, either press the current loop's footswitch twice in short
succession, or press the STOP footswitch. The LED will rapidly ash green and the
loop will stop at the end of its cycle.
Using two loops in Sync mode
Set the SERIAL/SYNC switch down to the Sync position. This mode allows loop 1
and 2 to be played independently or simultaneously. The rst recorded loop sets
the overall phrase length and the second loop can be multiples of that length.
For example, if the rst loop represents 4 measures of music, the second loop
could be 4 measures, 8 measures, 12, etc.
You can start with either loop, but for this example, create a loop in loop 1. Just
as loop 1 is completing its cycle and starting over, press the LOOP 2 footswitch.
The LED will turn red and recording will begin. Loop 1 will continue to play as you
record onto loop 2.
*note that flipping Mode switch 2 to the “up” position will allow the second loop to be armed during loop 1
playback, and recording will automatically begin at the start of the next cycle.
To stop loop 2 recording, either press the LOOP 2 footswitch at the end of
1 phrase to keep the 2 loops the same length, or simply let the recording
continue. The second loop’s length will always end in multiples of the rst loop,
so even if you stop the loop 2 recording a bit too early, the loops will still be in
sync when dual playback begins.
After material is recorded for both loops, you can stop and start either loop
at will. If only loop 1 is playing, loop 2’s LED will ash green. Press the LOOP 2
footswitch once to begin the second loop at any point during playback, not just at
the beginning of a cycle. Press a loop footswitch twice is short succession to stop
that loop.
Note that both loops can still contain multiple layers, so many creative options
exist for creating a stack of loops in loop 1, then creating another stack of layers
in loop 2 that can be started and stopped at will.
Keep in mind that a loop must be currently playing to record an additional
layer on top of it. If a loop is currently paused, you will need to press the loop
footswitch once to play the loop, then again to start recording.
6. Store, Import, Export
Current (in-memory) loop vs. stored loop
(backing track)
Ditto X4 Looper is very exible when it comes to recording, importing and
exporting audio loops. When you are recording something, this is the “current
loop”. It will be available even after powering down Ditto X4 Looper.
In addition to the memory that holds the current loops, there is an onboard
storage module (similar to a hard disk or a USB ash drive) for each of the 2 loops.
This storage module is used to transfer loops (or even complete backing tracks)
from and to your computer/DAW.
You can set playback volume for the in-memory loops and the stored loops
(backing tracks) independently. See “Balancing backing track and current loop
levels” at the end of this chapter.
Current loop stays in memory
When you power down Ditto X4 Looper and there are still loops in memory, the
loops will be available even after you power down the device.
When you power up Ditto X4 Looper again, the LOOP footswitch LED will ash
green, indicating your previously-recorded loop is available. Just hit the LOOP
footswitch and playback will start. If you want to start from scratch instead,
delete the loop (see “Stopping loop playback / recording and deleting the loop/
backing track” in chapter 5.
USB operation vs. looping
The following sections (“Exporting Ditto X4 Looper loops to a computer” and
“Importing loops into Ditto X4 Looper from a computer”) describe how you can
connect Ditto X4 Looper to a computer using the supplied USB cable to import or
export loops and backing tracks.
Please note that once you have attached it to a computer, your Ditto X4 Looper
eectively becomes a USB storage device, and audio is disabled. This means that
you can transfer audio les to and from Ditto X4 Looper – but you cannot play
back (or record) audio at the same time. Ditto X4 Looper does not act as a USB
audio interface. This means that to get back to looping, you will have to unplug/
eject Ditto X4 Looper.
On computers running Microsoft Windows or Apple OS X operating systems, no
software is required for accessing Ditto X4 Looper as described in this section –
it’s all plug & play.
 Loading...