EasyManuals Logo
Home>Tektronix>Test Equipment>2236

Tektronix 2236 User Manual

Tektronix 2236
60 pages
To Next Page IconTo Next Page
To Previous Page IconTo Previous Page
Page #39 background imageLoading...
Page #39 background image
Operators
Familiarization
--
2236
Operators
PROBE
COMPENSATION
O
Channel
1
and
Channel
2
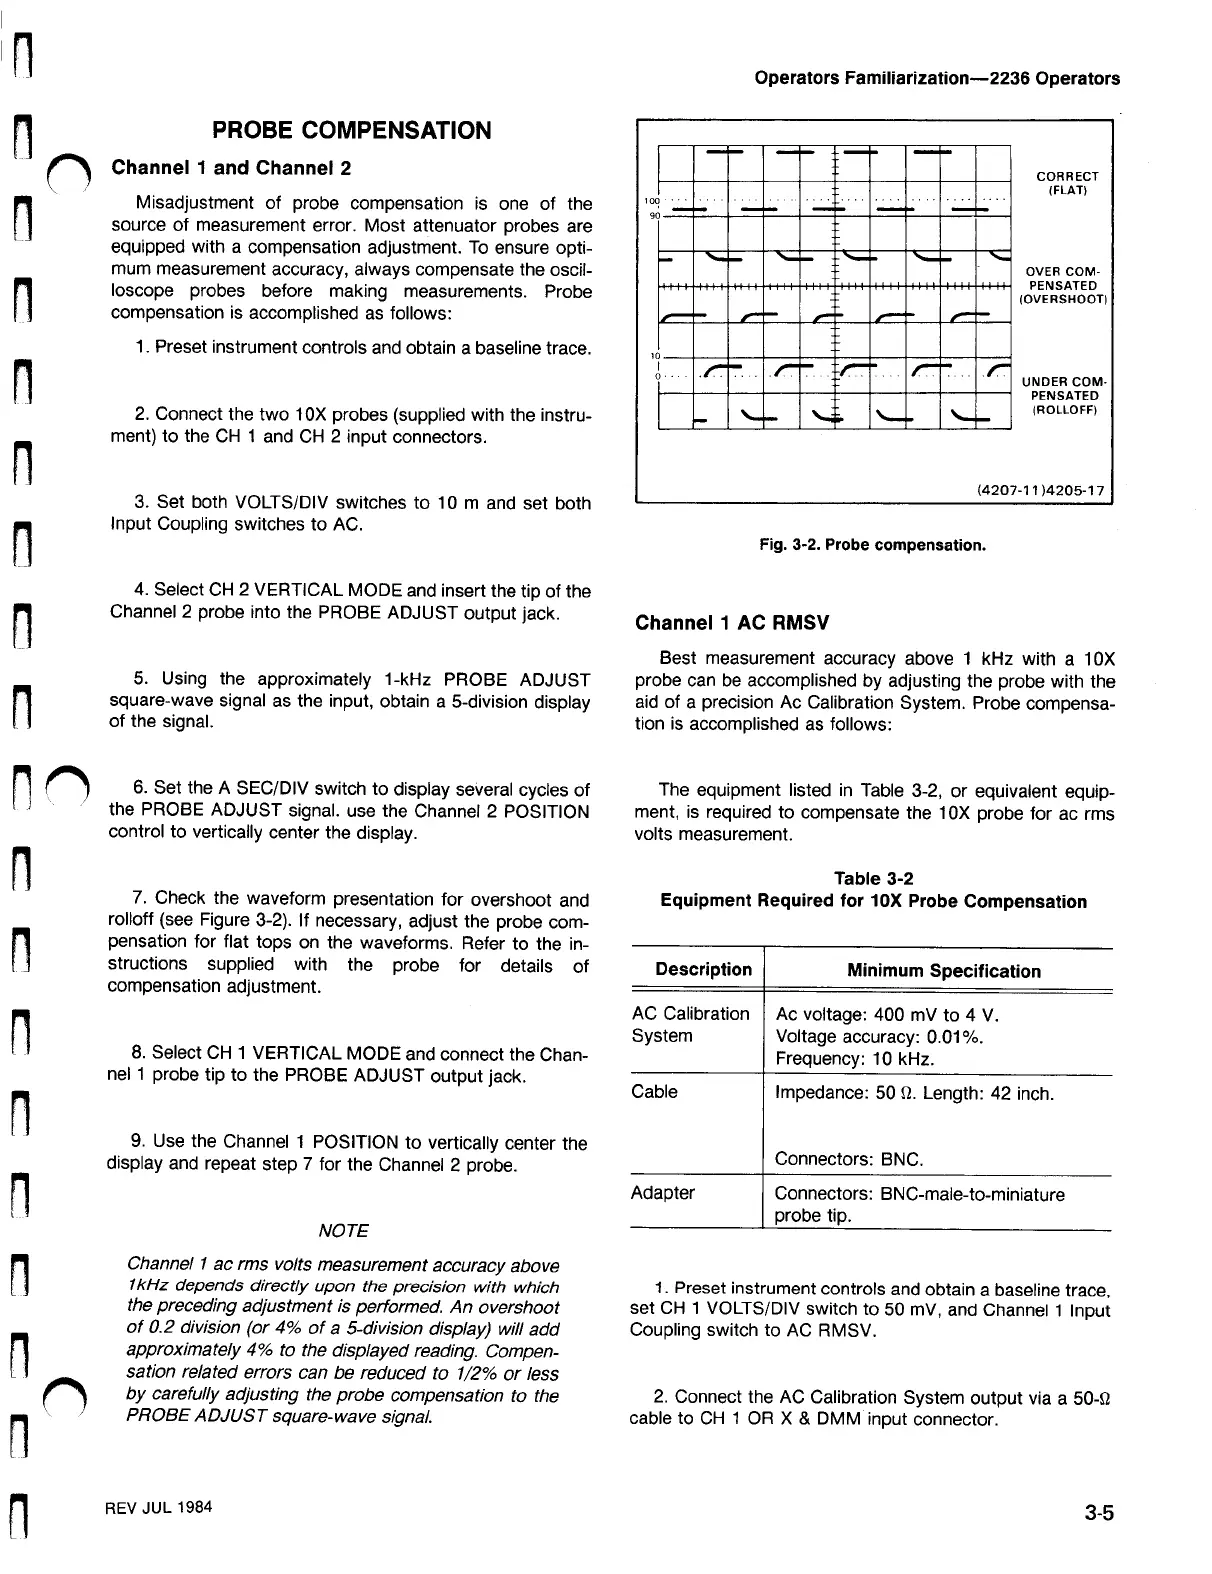
CORRECT
(
FLAT
)
100
90
Misadjustment
of
probe
compensation
is
one
of
the
source
of
measurement
error
.
Most
attenuator
probes
are
equipped
with
a
compensation
adjustment
.
To
ensure
opti
mum
measurement
accuracy
,
always
compensate
the
oscil
loscope
probes
before
making
measurements
.
Probe
compensation
is
accomplished
as
follows
:
OVER
COM
PENSATED
(
OVERSHOOT
)
1.
Preset
instrument
controls
and
obtain
a
baseline
trace
.
10
1
n
Hei
1
UNDER
COM
PENSATED
(
ROLLOFF
)
2.
Connect
the
two
10X
probes
(
supplied
with
the
instru
ment
)
to
the
CH
1
and
CH
2
input
connectors
.
-
ji
(
4207-11
)
4205-17
3.
Set
both
VOLTS
/
DIV
switches
to
10
m
and
set
both
Input
Coupling
switches
to
AC
.
Fig
.
3-2
.
Probe
compensation
.
4.
Select
CH
2
VERTICAL
MODE
and
insert
the
tip
of
the
Channel
2
probe
into
the
PROBE
ADJUST
output
jack
.
1
Channel
1
AC
RMSV
5.
Using
the
approximately
1
-
kHz
PROBE
ADJUST
square
-
wave
signal
as
the
input
,
obtain
a
5
-
division
display
of
the
signal
.
Best
measurement
accuracy
above
1
kHz
with
a
10X
probe
can
be
accomplished
by
adjusting
the
probe
with
the
aid
of
a
precision
Ac
Calibration
System
.
Probe
compensa
tion
is
accomplished
as
follows
:
6.
Set
the
A
SEC
/
DIV
switch
to
display
several
cycles
of
the
PROBE
ADJUST
signal
.
use
the
Channel
2
POSITION
control
to
vertically
center
the
display
.
The
equipment
listed
in
Table
3-2
,
or
equivalent
equip
ment
,
is
required
to
compensate
the
10X
probe
for
ac
rms
volts
measurement
.
Table
3-2
Equipment
Required
for
10X
Probe
Compensation
7.
Check
the
waveform
presentation
for
overshoot
and
rolloff
(
see
Figure
3-2
)
.
If
necessary
,
adjust
the
probe
com
pensation
for
flat
tops
on
the
waveforms
.
Refer
to
the
in
structions
supplied
with
the
probe
for
details
of
compensation
adjustment
.
Description
П
Minimum
Specification
AC
Calibration
System
8.
Select
CH
1
VERTICAL
MODE
and
connect
the
Chan
nel
1
probe
tip
to
the
PROBE
ADJUST
output
jack
.
Ac
voltage
:
400
mV
to
4
V.
Voltage
accuracy
:
0.01
%
.
Frequency
:
10
kHz
.
Impedance
:
50
2.
Length
:
42
inch
.
Cable
9.
Use
the
Channel
1
POSITION
to
vertically
center
the
display
and
repeat
step
7
for
the
Channel
2
probe
.
Connectors
:
BNC
.
Adapter
Connectors
:
BNC
-
male
-
to
-
miniature
probe
tip
.
NOTE
П
Channel
1
ac
rms
volts
measurement
accuracy
above
1kHz
depends
directly
upon
the
precision
with
which
the
preceding
adjustment
is
performed
.
An
overshoot
of
0.2
division
(
or
4
%
of
a
5
-
division
display
)
will
add
approximately
4
%
to
the
displayed
reading
.
Compen
sation
related
errors
can
be
reduced
to
1
/
2
%
or
less
by
carefully
adjusting
the
probe
compensation
to
the
PROBE
ADJUST
square
-
wave
signal
.
1.
Preset
instrument
controls
and
obtain
a
baseline
trace
,
set
CH
1
VOLTS
/
DIV
switch
to
50
mV
,
and
Channel
1
Input
Coupling
switch
to
AC
RMSV
.
C
2.
Connect
the
AC
Calibration
System
output
via
a
50-1
cable
to
CH
1
OR
X
&
DMM
input
connector
.
REV
JUL
1984
3-5

Table of Contents

Questions and Answers:

Question and Answer IconNeed help?

Do you have a question about the Tektronix 2236 and is the answer not in the manual?

Tektronix 2236 Specifications

General IconGeneral
BrandTektronix
Model2236
CategoryTest Equipment
LanguageEnglish

Related product manuals