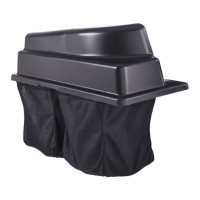
g354523
Figure 5
1. Locknut (3/8 inch), existing 5. Hole, existing in frame
2. Forward hole, left side
6. W asher
3. Front left caster (castor
fork and wheel not shown
for clarity)
7. Bolt (3/8 x 1-1/4 inches)
4. Locknut (3/8 inch), loose
parts
8. Left mounting bracket
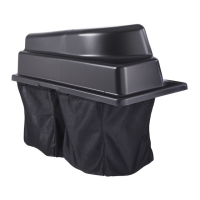
5. On the right side of the machine, install the right
weight-mounting bracket as follows:
• For machines without a foot assist lift pedal,
secure the bracket using 2 bolts (3/8 x 1-1/4
inches), 2 washers and 2 locknuts (3/8 inch)
( Figure 6 ).
Note: Use 1 locknut from the loose parts
and the other from 1 of the locknuts that you
previously removed.
g354522
Figure 6
1. Front right caster (castor
fork and wheel not shown
for clarity)
5. Bolt (3/8 x 1-1/4 inches)
2. Forward hole, right side 6. W asher
3. Locknut (3/8 inch), existing 7. Hole, existing in frame
4. Right mounting bracket
8. Locknut (3/8 inch), loose
parts
Note: For machines with a foot assist lift
pedal, the washers are not used.
• For machines with a foot assist lift pedal,
Remove the forward fasteners in the foot
assist lift pedal bracket and secure the
bracket using 2 bolts and 2 locknuts ( Figure
7 ).
Note: Use 1 locknut from the loose parts
and the other from 1 of the locknuts that you
previously removed.
8