Example
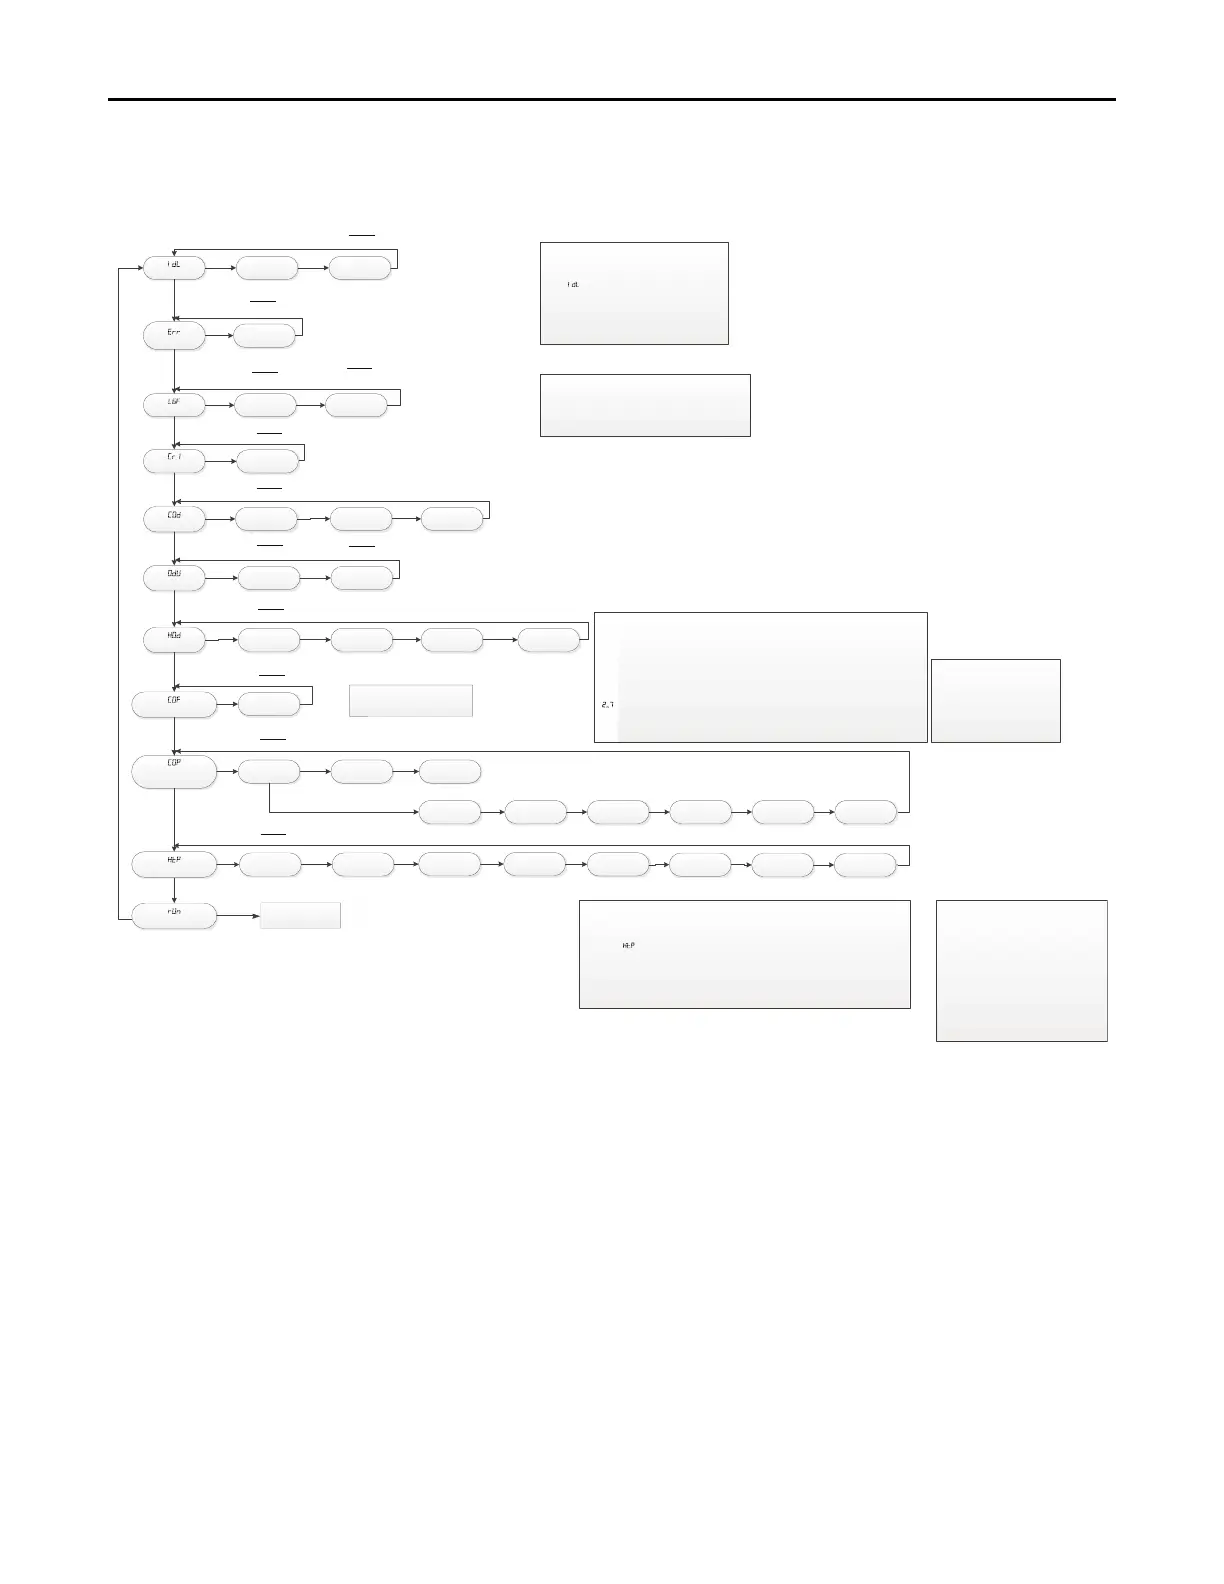
IdL
Status Menu
Err
Active Errors
Ht tp5
Example
Tap 5
E3.1
Example
Pressure Switch Error
L6F
Last 6 FAULTS
E3.1 E04
Example
Pressure Switch Error
Example
Open Limit Switch Error
CR1
Code Release #
Example
Software Version #
COd
Cooing Off Delay
000
090 180
Example
seconds
ODU
Outdoor Stages
1-1 2-1
HOD
Heat Off Delay
100 060
Example
seconds
COF
Continuous Fan Tap
CF.1
Example
Tap #
COP
Compressor Operation
Speed Tap
Example
Tap #
S9X1
Control System Menu Two Stage OD
140
CLEARING THE LAST6 FAULTS:
To clear the stored faults, scroll to the last 6 faults menu (L6F),
enter the menu by scrolling to the right and hold the
“Option” key for at least 5 seconds. Release and a set of 3
dashes will be seen 3 times. This confirms the faults have
been cleared.
SETTING UP YOUR SYSTEM:
To change any factory default value, first remove any
“call” from the furnace and allow all fan off delays to
finish ( IDL should be seen on the display).
Scroll to the selected Menu item by momentarily
depressing the “MENU” key and then depress the
“OPTION” key to the desired setting. Then momentarily
depress the “MENU” key again to save the change.
180
C1.3 C1.1 C1.2
C2.7 C2.4
HtP
Heating Speed Tap
H1.5 H1.1
001
H1.2 H1.3
Example
Single Stage
Example
2 stage 1 compressor
SELECTING GAS HEATING FAN SPEEDS:
Airflow can be adjusted while the unit is running.
Scroll to the HTP menu and momentarily push the OPTION key. Tap #5 is the default setting for all
models. When selection is made, momentarily push the MENU key to save.
If the temperature rise is too high, increase airflow. If the temperature rise too low, decrease
airflow.
NOTE: Tap 9 is not available for gas heating
run
Run Test Mode
H1.4
SELECTING COOLING / HP FAN SPEEDS for 2-1 ODU:
Airflow can be adjusted while the unit is running.
1
st
Stage Airflow: Scroll to the COP menu and momentarily push the OPTION key. Tap #3 is the
default 1
st
stage setting for all models. When selection is made, momentarily push the MENU key to
save.(change will not be applied until 2
nd
stage airflow tap is saved)
2
nd
Stage Airflow: After 1
st
stage airflow is selected, the default 2
nd
stage airflow tap will appear,
C
2
_7. If this tap is desired, momentarily push the MENU key to save.
Important: If a change is made to either 1
st
or 2
nd
stage airflow, both must be saved by pushing the
MENU key. Neither selection will be saved if this is not done
C2.5 C2.6 C2.8 C2.9
H1.6
H1.7 H1.8
Designated Gas Heating Airflow Taps
Upflow
S9X1B040U3PS (1-6)
S9X1B060U4PS (1-7)
S9X1B080U4PS (1-7)
S9X1C080U5PS (1-7)
S9X1C100U5PS (1-7)
S9X1D120U5PS (1-7)
Downflow
S9X1B040D3PS (1-6)
S9X1B060D3PS (1-7)
S9X1B080D4PS (1-6)
S9X1C100D5PS (1-7)
S9X1D120D5PS (1-7)
Default Airflow Taps
Gas Heat = Tap 5
ODU Menu 2-1
1
st
Stage Cooling / HP = Tap 3
2
nd
Stage Cooling / HP = Tap 7
Example
1
st
Stage Gas Heat
Note:
Do not adjust COF above TAP1.
See Run Test Menu
1
st
Stage Tap #