Immediately stop the machine travel and slightly back-up with the machine front slightly lifted ($BD B
B(FF). The working space will partially clean itself from excessive material. Then move again
against the growth.
?< +BF&D$$9BDB&:
Release both control levers on the handlebars and lift the front of the machine. Slide the machine slightly backward.
Clean the area under the top cover and spread the grass mass over the surface. Start the engine, turn on the working
tool drive, and start moving against the growth.
@< n…DFBD$$B%BF&D$;$((,DFDFB<:
Try to change the direction of your travel through the cut growth, or you may lift the front of the machine to liquidate
the growth top part. Then move again against the growth.
Try to install the optional accessory
p
– BDK:):AAAp. This will extend the length of the
working space, and the cut growth will then be better aligned before entering the working space.
2.4.4 REPLACEMENT OF ACCESSORIES - RECONFIGURATION
Replacement of the accessories with another adapter is only possible for brush cutters with the trade name
pt
whose
type designation starts with .
The brush cutters whose type designation also starts with are only single-purpose machines, and
B,D%,$$ .
The brush cutter’s default adapter mounted to the chassis is the / brush cutter. It must be removed
before any accessory change.
Prepare, if possible, ?$No. 10 and ?D$
No. 13, and a box for fastening material to be used
later.
lF,KBDF%BF& $,$(%$% D,F&B
,%B Br
7BD$&$D(:"B%B BFB9
(,% BB:
+B B ($BB*% (BBD
B B$9B B ~$,:
H $DB,(,F$:
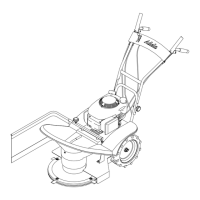
2.4.4.1 WORKING MECHANISM REMOVAL
8~FBBDBF&D$:+BF&DDD
…B$:E ,,%:
(B%FD$$B$}
D:>
:
1) m DB,$$(,%BF&D! Using spanner No. 10 unscrew per step }> both M6 nuts l and
remove the plastic cover
>
of belt drive >. Lift the front of the machine (by pushing down the handlebars) around the wheel axle
to its approximate position per }? and secure the machine against tipping over. Using spanner No. 13, loosen and unscrew per
step }@ three M8 bolts . Loosen and unscrew last fourth bolt M8 , while holding the body of blade ? by hand, to prevent
the fall and potential damage of the working tool or any important part of the blade body. Upon unscrewing the last M8 bolt 9
remove the body away from the chassis frame and put it aside. Visually check per }A whether splined coupling @ is fitted onto
blade body shaft ?. If the coupling stayed on the shaft in the frame, remove it and transfer
?
to the blade body shaft.
2) m %B%D$! Using two No. 13 spanners, loosen and unscrew M8 bolt per } (}@). Unhook guide
spur arm A by rotating it in the arrow direction per } from the chassis frame and put it aside.
3) m %BF&D$B ! Following step }o (}@), unscrew M6 bolt 7. Only loosen other M6
bolt 7>, so the sheet metal cover stays attached to the chassis frame. Now, using a No. 10 spanner, following }p9unscrew
both M6 bolts 8 and 8> (8> is on the opposite side and is not shown).
+&%,F%,:7DB~ (,$9B B ,(&(,FFDB:
%9&B$(*B B(,BDDB:
4) Unscrew last M6 bolt 7> per step }o (}@) and move multi-purpose chassis backwards.
5) D
@
! Attach plastic cover > per step } in the reverse way, than during its installation in step }>. Place a
part of cover > under the engine plate and fit the cover openings onto the chassis frame bolts. Screw in both M6 nuts l and
tighten them gently. The cover is plastic and could break. Now, the chassis of your brush cutter is prepared for attaching a
new adapter.
)BDFB$( $$B:
78
It must be purchased separately.
79
The sticker is affixed to the left side of the working space cover.
80
For quick installation, we recommend preparing, instead of 2 ring spanners, 1 ring spanner No. 13 and 1 ratchet (GOLA) with socket size 13.
81
Inside the cover, there you may keep the bolts from the next removal steps.
82
If possible, do not rotate it around its horizontal axis. Keep the original position in which it worked.
83
If you know that you will need to remove the cover again to install another adapter, do not replace it and do so later.
@
Revize 10/2019
 Loading...