EasyManua.ls Logo

VEVOR 3020 User Manual

VEVOR 3020
23 pages
To Next Page IconTo Next Page
Page #1 background imageLoading...
Page #1 background image
The user manual of the desktop-CNC
Notice:
1. This machine should be used with the PC parallel port and controlled by Mach 3 or other software.
The PC parallel port should work in condition of the EPP mode, the setup of the EPP mode should be
applied on the main board BIOS.
2. You’d better use the PC to control the machine, especially for this machine and do not install other
software if conditions permit. And please do not use the Laptop to control the machine, the battery of
some laptops will impact the pulse signal of the machine and the voltage of some parallel port is very low,
it will cause the lost of the signal.
Warn:
You should setup the software correctly, it will make the machine works well. If you do not do it well and
try to run the machine, it may damage the machine or cause the danger.
When you install or setup the machine, please do not turn on the control box, it may cause some
damages.
Please do not put the connectors on the control box, when it is power on. You should regulate the
spindle as the low speed when you want to restart it. The interval of the open/close button time should be
at least 30s, when you restart the spindle or turn on the control box again, otherwise it will cause the
damages of the control box.
Our machine is 220V, when it is power on, please do not open the control box, do not touch the
wiring connectors and not touch the running cutters, please wear the glasses or mask to protect yourself.
1.Software
1. Open the Mach 3 file, double click the “Mach3xxxxx.Exe”to start.
0
Question and Answer IconNeed help?

Do you have a question about the VEVOR 3020 and is the answer not in the manual?

VEVOR 3020 Specifications

General IconGeneral
BrandVEVOR
Model3020
CategoryPrinter
LanguageEnglish

Summary

Software Installation

Initial Software Launch

Start Mach 3 setup by executing the installation file.

Installation Wizard and Configuration

Navigate setup, accept license, choose directory, and complete installation.

Setup Completion and System Restart

Finalize installation, confirm actions, and restart the PC if prompted.

Mach 3 Configuration and Setup

Launching Mach 3 and Unit Settings

Restart PC, launch Mach 3, and set native units to MM.

Ports, Pins, and Motor Outputs

Configure hardware connections, ports, pins, and motor outputs.

Motor Tuning and E-Stop Configuration

Adjust motor tuning parameters and set up the E-stop input signal.

Machine Wiring and Operational Checks

General Precautions and Wiring

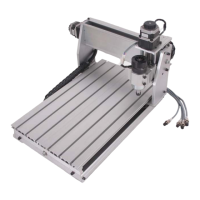
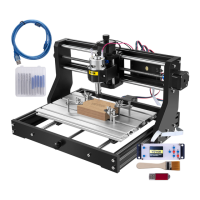
Handle machine with care, ensure ventilation, connect motors, and check wiring.

Axis Self-Locking Test

Verify that all axes are self-locked and controllable after powering up.

Spindle Operation and Direction Check

Confirm spindle rotation direction and safe operation of the speed regulator.

PC Connection and Axis Control Testing

PC Parallel Port Connection

Connect the PC to the control box using the parallel cable.

Mach 3 Interface and E-Stop Functionality

Launch Mach 3, check interface, and confirm E-stop button is functional.

Keyboard Axis Movement Test

Test X, Y, Z axis movement via keyboard and verify correct direction.

Engraving Process and Bit Usage

Material Preparation and Test Run

Fix material, perform unloaded cutter trace test, and import G-code.

Tool Setting and Zeroing

Import G-code, power on, move spindle to origin, and set tool height.

Engraving Execution and Safety Checks

Install cutters, perform engraving, monitor process, and ensure safety measures.

Engraving Bit Selection Guide

Recommendations for selecting appropriate engraving bits for various materials.

Related product manuals