19
Contents
Previous
Page
First
Page
Next
Page
Previous
View
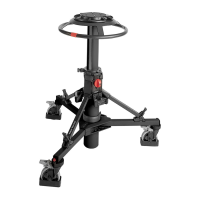
7.3 In adverse conditions secure the tripod using the tie-down hook (27), or suspend a weight from
the hook.
Pan and tilt head
8 The Pro-6
HDV
pan and tilt head (Fig 1.1) is supplied with a 75 mm ball mount. Adaptors are available
which enable the head to be installed on tripods or pedestals fitted with other mountings. These are listed
under ‘Optional Accessories’.
9 To install the head, remove the bowl clamp assembly (10) from the head, position the head on the tripod
and refit the bowl clamp assembly from below. Level the head with the aid of the level bubble (11) and tighten
the bowl clamp (10). The level bubble may be illuminated by pressing the switch (13). The light will extinguish
after approximately 15 seconds.
Mounting the camera
10 Remove the slide plate (17) from the head (Fig 1.1) by releasing the slide plate clamp (2), pressing the
slide lock release (1) and lifting the plate upward.
11 Install the required camera fixing screw (6) or (19) in the slide plate and retain with the rubber bung
(18). Stow the unused screw in the appropriate stowage (7) in the platform.
12 Attach the slide plate (17) to the camera or camera mounting plate under the approximate centre of the
camera's weight using the fixing screw (6) or (19) and locating pin (5) (if appropriate).
13 Set the platform level and apply both the pan (15) and tilt brakes (4).
14 Lower the camera onto the platform (Fig 2.1) ensuring that the edge of the slide plate opposite the slide
clamp engages first, and then push downward so the slide clamp ‘snaps’ into position.
15 Tighten the slide plate clamp (2).
WARNING!: Stability is reduced when the tripod is fully extended with the floor
spreader in the closed position. Use with care.
NOTE: After unpacking the product, to initially illuminate the level bubble, a paper transportation
tab must be removed from the battery. To access the battery, see ‘Battery replacement’ on
page 26.