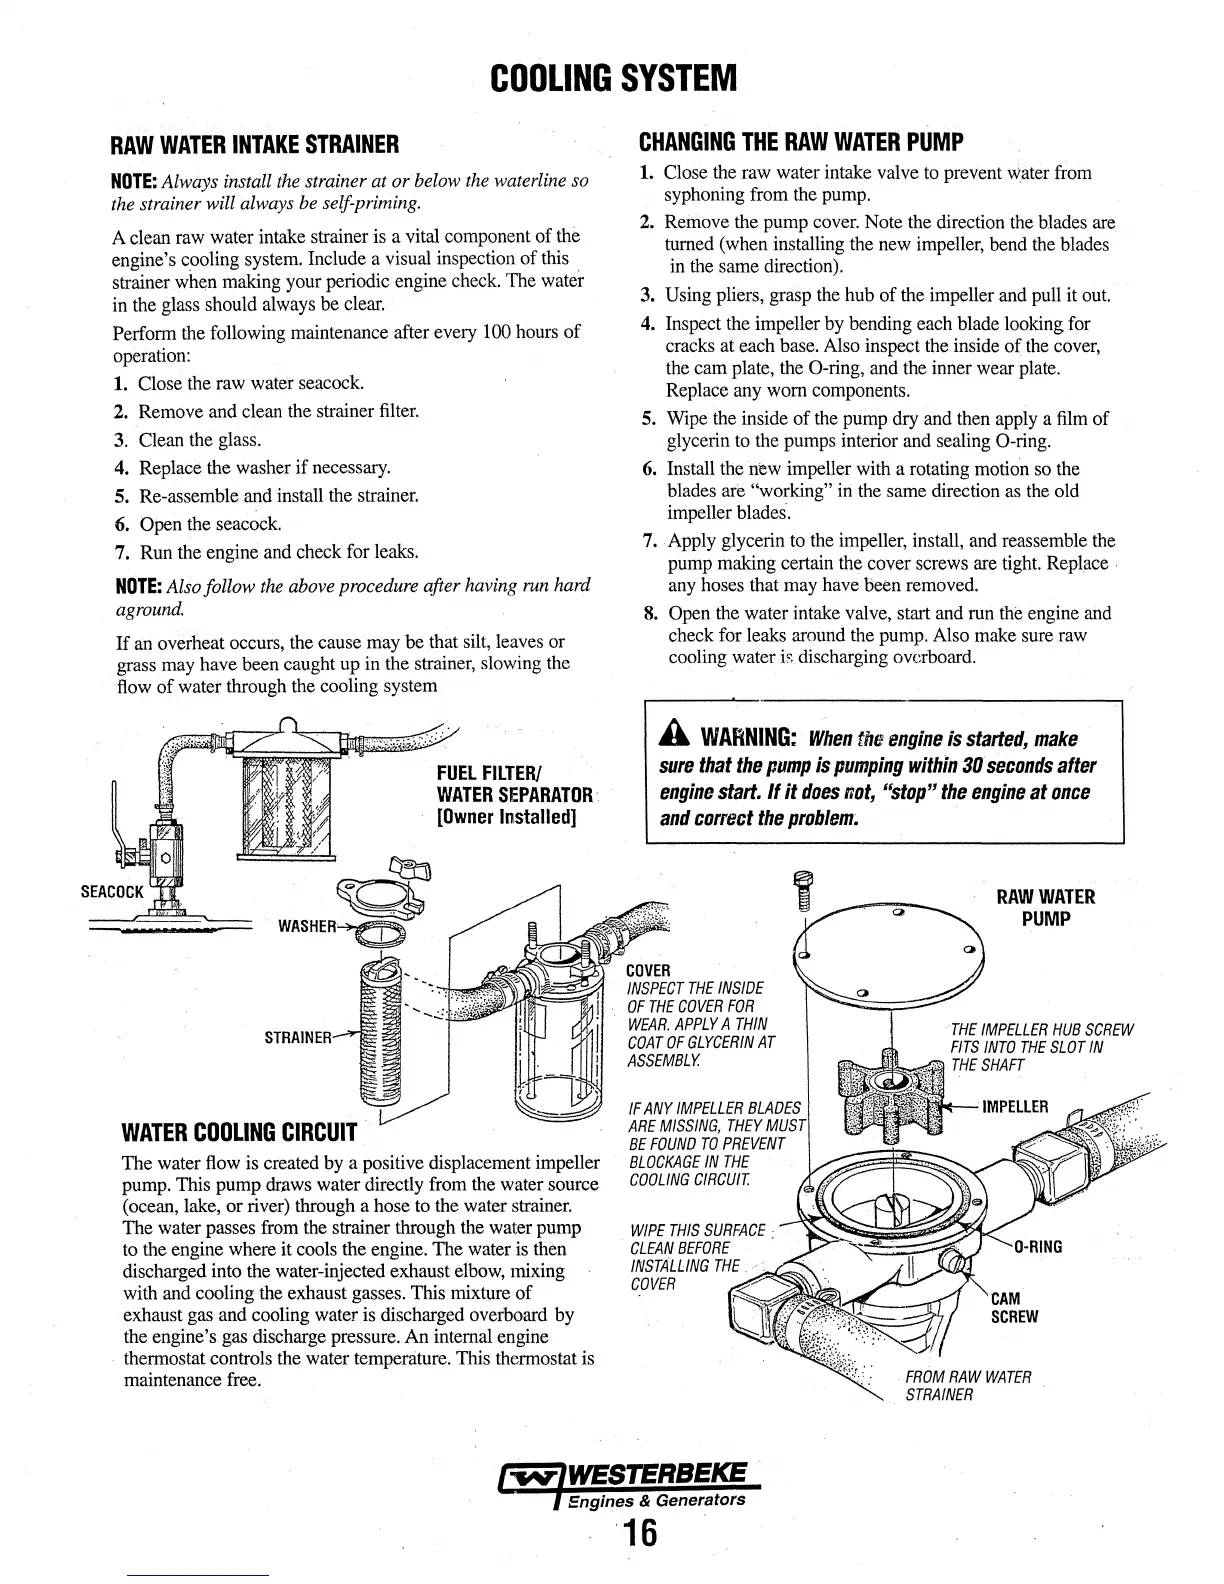
COOLING
SYSTEM
RAW
WATER
INTAKE
STRAINER
NOTE:
Always install
the
strainer at or below
the
waterline
so
the
strainer will always be self-priming.
A clean
raw
water intake strainer is a vital component of the
engine's
c.ooling
system. Include a visual inspection of
this
strainer when making your periodic engine
check.
The
water
in the glass should
always
be
clear.
Perform the following maintenance after every
100
hours
of
operation:
1. Close
the
raw
water seacock.
2. Remove and clean
the
strainer
filter.
3.
Clean the
glass.
4.
Replace the washer if
necessary.
5. Re-assemble
and
install
the
strainer.
6.
Open the seacock.
7.
Run
the engine
and
check
for
leaks.
NOTE:
Also follow
the
above
procedure after having
run
hard
aground.
If
an
overheat occurs, the cause
may
be that silt, leaves
or
grass
may
have been caught up in the strainer, slowing
the
flow
of water through the cooling system
~
Q
WASHER
>(j)
STRAINER
WATER
COOLING
CIRCUIT
.
FUEL
FILTER/
WATER
SEPARATOR·
[Owner
Installed]
The water
flow
is
created
by
a positive displacement impeller
pump.
This pump draws water directly from the water source
(ocean, lake, or river) through a hose
to
the
water
strainer.
The water passes
from
the
strainer through
the
water pump
to
the engine where it cools the engine. The water
is
then
discharged into the water-injected exhaust
elbow,
mixing
with
and
cooling
the
exhaust gasses. This mixture of
exhaust
gas
and cooling water
is
discharged overboard by
the
engine's
gas
discharge pressure. An internal engine
· thermostat controls
the
water temperature. This thermostat is
maintenance
free.
CHANGING
THE
RAW
WATER
PUMP
1.
Close the raw water intake valve to prevent
water
from
syphoning from
the
pump.
2.
Remove the pump
cover.
Note
the direction the blades
are
turned (when installing the
new
impeller,
bend
the
blades
in
the
same direction).
3.
Using
pliers, grasp
the
hub
of the impeller
and
pull
it
out.
4.
Inspect the impeller by bending each blade looking
for
cracks at each base. Also inspect the inside of
the
cover,
the cam plate, the 0-ring, and the inner wear plate.
Replace
any
worn
components.
5.
Wipe
the
inside of
the
pump dry and then apply a
film
of
glycerin
to
the pumps interior and sealing 0-ring.
6;
Install the
new
impeller with a rotating motion
so
the
blades are "working"
in
the
same direction
as
the
old
impeller
blades·.
7 •.
Apply
glycerin
to
the impeller, install, and reassemble
the
pump
making certain the cover screws
are
tight.
Replace .
any
hoses
that
may
have
Been
removed.
8.
Open
the water intake valve, start
and
run
the
engine
and
check for leaks
around
the
pump.
Also
make
sure
raw
cooling water is discharging overboard.
A
WARNING:
When
the
engine
is
started,
make
sure
that
the
pump
is
pumping
within
30
seconds
after
engine
start.
If
it
does
not,
"stop"
the
engine
at
once
and
co«ect
the
problem~
·
COVER
INSPECT
THE
INSIDE
OF
THE
COVER
FOR
WEAR.
APPLY
A
THIN
COAT
OF
GLYCERIN
AT
ASSEMBLY.
IF
ANY
IMPELLER
BLADES
ARE
MISSING,
THEY
MUST
BE
FOUND
TO
PREVENT
BLOCKAGE
IN
THE
COOLING
CIRCUIT.
WIPE
THIS
SURFACE
CLEAN
BEFORE
INSTALLING
THE
... :
COVER
.--..--.-~""
RAW
WATER
PUMP
CAM
SCREW
FROM
RAW
WATER
STRAINER
Engines & Generators
'16



 To Next Page