Installation
2–24 975-0012-01-02 Rev A
To connect the AC Input to the Inverter:
1. Disconnect the main breaker at the main electrical service panel (if used) or
disconnect the AC generator.
2. Install an appropriately sized circuit breaker in the electrical service panel.
This will serve as both an AC disconnect and over-current protection. If using
a generator only, use the circuit breaker in the generator.
3. Feed the HOT, NEUTRAL, and GROUND wires (using conduit) from the
inverter to the AC source. Leave several inches of extra wire at each end.
4. Make the connections to the inverter first. Wiring to the AC source is
performed after all connections have been made in the inverter.
a) Connect the GROUND (green) wire to the inverter’s AC GROUND
terminal.
b) Connect the NEUTRAL (white) wire from the AC source to the inverter’s
NEUTRAL INPUT terminal.
c) Connect the HOT (black) wire from the AC source to the inverter’s AC
HOT INPUT terminal.
5. Torque all connections to 16 in-lbs (1.8 nm).
Important:
The U.S. requires conduit be used in this type of installation. Refer to the
NEC and local codes. Conduit fittings can be replaced with strain reliefs where code
permits.
WARNING: Shock Hazard
Disconnect the battery cables from the inverter if they are already connected.
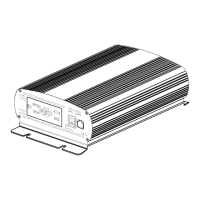
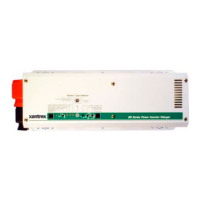
Figure 2-16
AC Terminals for AC Input to the Inverter
GROUND
HOT IN
NEUTRAL IN
Torque the
terminal
connections to
16 in-lbs (1.8 nm)
 Loading...