Do you have a question about the ABB PM5630 and is the answer not in the manual?
Defines the target audience for this manual, focusing on system integrators.
Outlines the manual's objective: to guide users through E-kit commissioning operations.
Highlights user responsibility for secure network connections and data protection from breaches.
Details security considerations for Modbus and HTTP protocols, emphasizing network security.
Provides instructions on how to reset forgotten E-kit user credentials via email.
Explains E-kit as an ABB Electrification solution for integrating devices via Modbus RTU/TCP protocols.
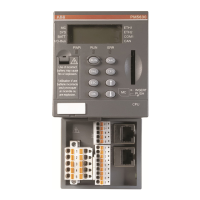
Describes the E-kit components: CPU, serial port, Ethernet ports, and SD card slot.
Details how to access the E-kit's integrated web server via a browser or specific software.
Lists functions enabled by the SD card: software updates, configuration backup, and catalog updates.
Lists available templates for integrating different ABB device families into E-kit.
Mentions the template list can be extended and directs users to find more information.
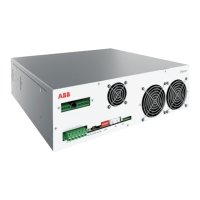
Specifies E-kit requires 24 V D.C. supply and can power external sensors.
Details critical warnings for safe operation: voltage, short-circuits, and current limits.
Explains the pin allocation and function of the 5-pin terminal box for power supply connections.
Details the 9-pin terminal box for Modbus RTU communication on the COM1 port.
Explains the pin signals and interfaces for RS-485 serial communication.
Emphasizes keeping the terminal box plugged in, even when unused, to prevent issues.
Illustrates correct and incorrect daisy-chain connection methods for RS-485 devices.
Specifies maximum cable length (700m) and number of devices (15) for RS-485 networks.
Recommends shielded twisted pair cables (e.g., Belden 3105A) for RS-485 communication.
Explains the need for 120 Ohm termination resistors at cable ends for signal integrity.
Describes the integrated 470 Ohm pull-up and pull-down resistors and how to activate them.
Introduces E-kit's two network interfaces functioning as switches (ETH1/ETH2).
Details the RJ45 connector pin allocation for Ethernet communication.
Specifies requirements for twisted pair cables (Cat3/Class C for 10Mbit/s, Cat5/Class D for 100Mbit/s).
States the maximum cable length is 80 m for Ethernet connections.
Guides users through configuring a static IP address for E-kit using the keypad.
Explains how to configure E-kit for dynamic IP assignment using DHCP via the keypad.
Provides steps for configuring a PC's IP address in Windows 10 for E-kit access.
Describes the automatic power-up sequence and the display of 'E-Kit'.
Outlines the process for firmware upgrades, including contacting the support center.
Explains the two user levels: Guest (view-only) and Admin (configuration).
Details that multiple E-kit sessions can be active simultaneously, but not with mixed user levels.
Instructs how to access the E-kit web server via browser using its IP address.
Describes the layout and components of the E-kit web interface homepage.
Guides on logging in as an Admin user using the default password 'Admin'.
Explains how to save configuration changes made via the web interface.
Details how to copy E-kit configuration to another unit using an SD card.
Introduces the process of configuring individual devices connected to E-kit.
Explains how to view device characteristics and access the configuration window.
Details the parameters for configuring devices, including name, type, template, and IP address.
Describes channel types (User, Modbus, Constant) and acquisition status indicators (green/grey).
Explains accessing the Model Database to edit or delete models.
Guides on creating a new device model starting from an existing template.
Describes the fields in the Edit Model window for configuring device models.
Details parameters for configuring channels within a device model, including target, access, and normalization.
Explains how Guest users can view devices and data without configuration rights.
Describes the information displayed and navigation within the web interface.
Introduces Ekip Connect 3 for communicating with E-kit and accessing its web interface.
Specifies the need to download Ekip Connect and consult its manual for integration.
Provides steps for connecting E-kit to Ekip Connect 3 via serial or Ethernet.
Provides the physical dimensions of the E-kit in millimeters and inches.
| CPU | 32-bit |
|---|---|
| Real-time Clock | Yes |
| SD Card Slot | Yes |
| Supply Voltage | 24 V DC |
| Programming Software | Automation Builder |
| Protection Class | IP20 |
| Ordering Number | 1SAP140100R0001 |
| Ethernet Ports | 2 |
| Operating Temperature | 0°C to +60°C |
| Number of Inputs | Configurable via I/O modules |
| Number of Outputs | Configurable via I/O modules |
| Communication Ports | Ethernet |
| Operating Temperature Range | 0 ... +60 °C (32 ... +140 °F) |
| Relative Humidity | 5% to 95% (non-condensing) |
| Communication Interface | Ethernet |
| Protocol | Modbus |
| Type | Programmable Logic Controller (PLC) |
| ABB Type Designation | PM5630 |
| Storage Temperature Range | -40 ... +70 °C (-40 ... +158 °F) |