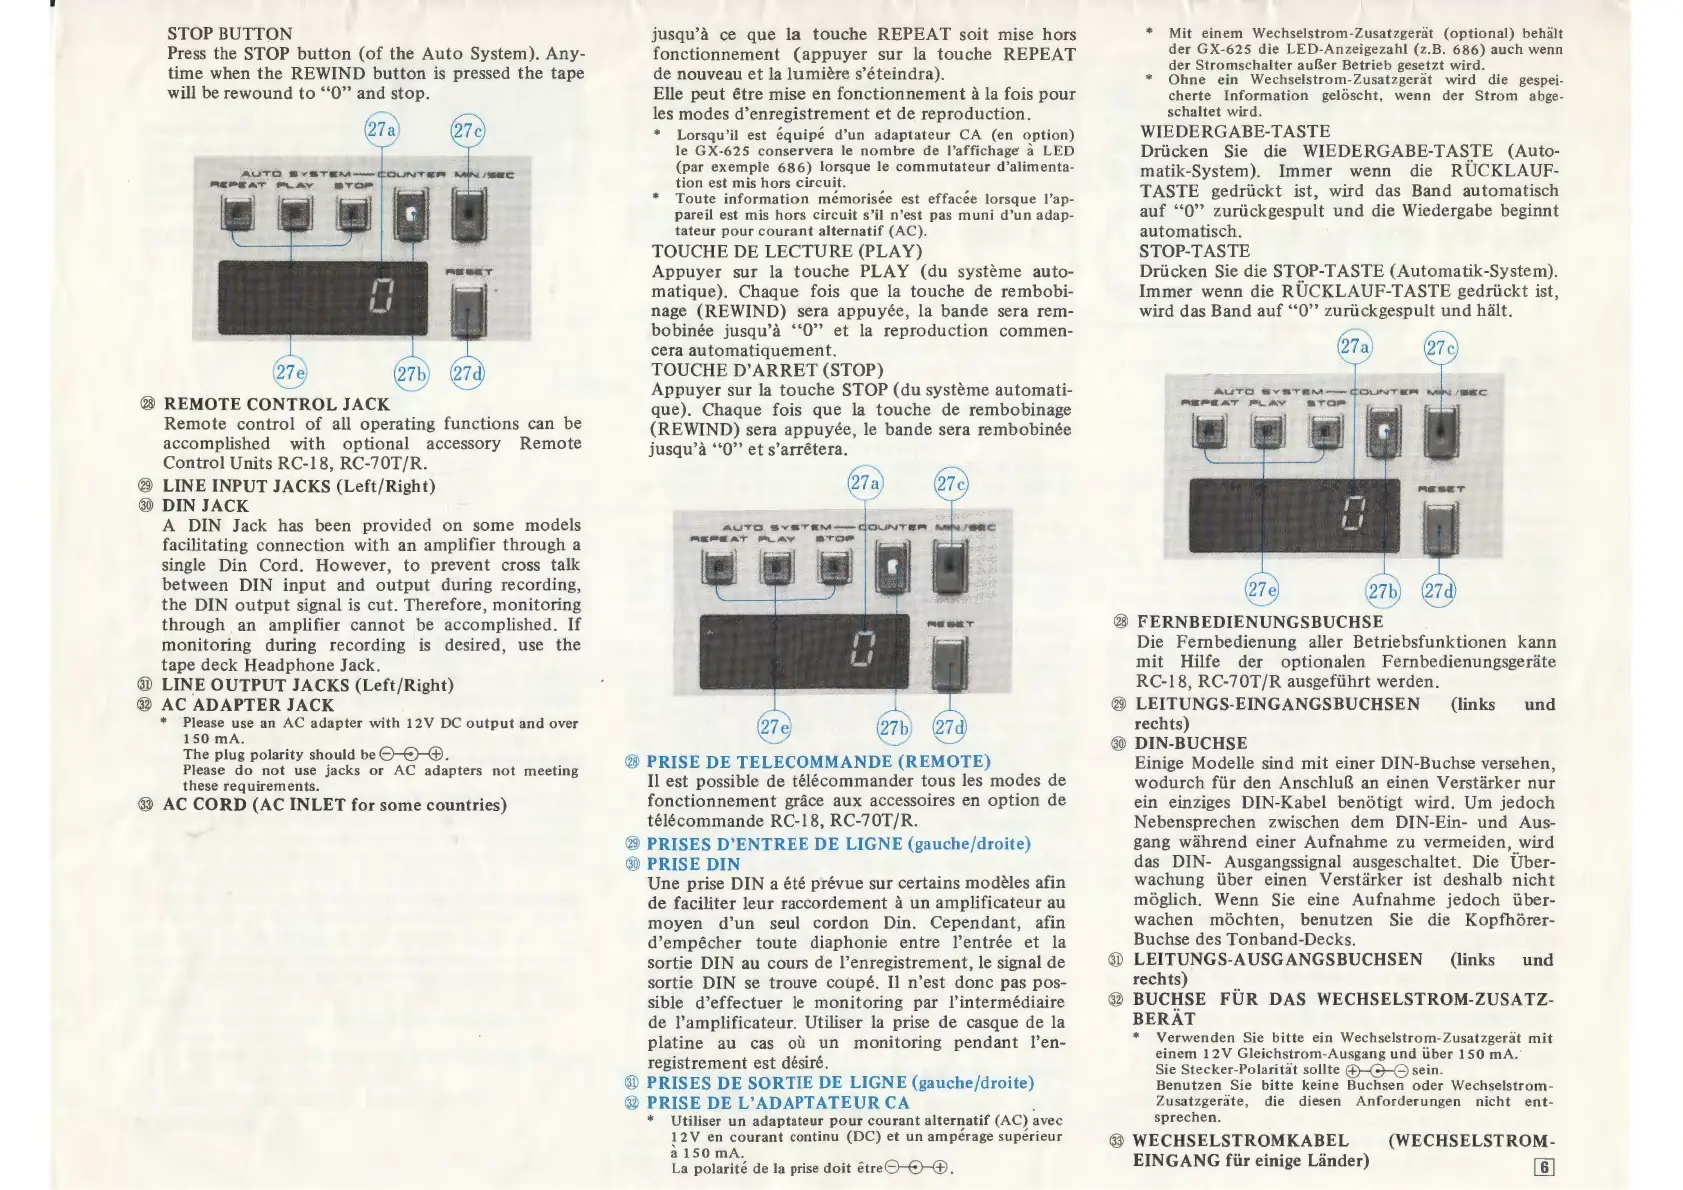
STOP BUTTON
Press the STOP
button
(of
the
Auto
System).
Any-
time
when
the
REWIND
button
is pressed
the
tape
will be
rewound
to
"0"
and
stop.
®REMOTECONTROLJACK
Remote
control
of
all
operating
functions
can be
accomplished
with
optional
accessory
Remote
Control
Units
RC-18,
RC-70T/R.
®
LINE
INPUT JACKS
(Left/Right)
®
DIN
JACK
A DIN
Jack
has be
en
providect
on
sorne
mo
dels
facilitating
connection
with
an
amplifier
through
a
single Din
Cord.
However,
to
prevent
cross talk
between
DIN
input
and
output
during recording,
the
DIN
output
signal is
eut.
Therefore,
monitoring
through
an amplifier
cannot
be
accomplished.
If
monitoring
during
recording
is
desired, use
the
tape
deck
Headphone
Jack.
® LIN.E
OUTPUT
JACKS
(Left/Right)
@ AC
ADAPTER
JACK
*
Please
use
an
AC
adapter
with
12V
DC
output
and
over
150
mA.
The
plug
polarity
should
be
8---E)---(B.
Please
do
not
use
jacks
or
AC
adapters
not
meeting
these
requirements.
@
AC
CORD
(AC
INLET
for
sorne
countries)
jusqu'à
ce
que
la
touche
REPEAT
soit
mise
hors
fonctionnement
(appuyer
sur
la
touche
REPEAT
de nouveau
et
la
lumière
s'éteindra).
Elle
peut
être
mise
en
fonctionnement
à la fois
pour
les
modes
d'enregistrement
et
de
reproduction.
*
Lorsqu'il
est
équipé
d'un
adaptateur
CA
(en
option)
le
GX-625
conservera
le
nombre
de
l'affichage
· à
LED
(par
exemple
686)
lorsque
le
commutateur
d'alimenta-
tion
est
mis
hors
circuit.
*
Toute
information
mémorisée
est
effacée
lorsque
l'ap-
pareil
est
mis
hors
circuit
s'il
n'est
pas
muni
d'un
adap-
tateur
pour
courant
alternatif
(AC).
TOUCHE
DE
LECTURE
(PLA
Y)
Appuyer
sur
la
touche
PLAY
(du
système
auto-
matique).
Chaque
fois
que
la
touche
de
rembobi-
nage (REWIND)
sera
appuyée,
la
bande
sera rem-
bobinée
jusqu'à
"0"
et
la
reproduction
commen-
cera
automatiquement.
TOUCHE
D'
ARRET
(STOP)
Appuyer
sur
la
touche
STOP
(du
système
automati-
que).
Chaque
fois
que
la
touche
de
rembobinage
(REWIND)
sera
appuyée,
le
bande
sera
rembobinée
jusqu'à
"0"
et
s'arrêtera.
®
PRISE
DE
TELECOMMANDE
(REMOTE)
Il
est
possible de
télécommander
tous
les
modes
de
fonctionnement
grâce
aux
accessoires
en
option
de
télécommande
RC-18,
RC-70T/R.
®
PRISES
D'ENTREE
DE
LIGNE
(gauche/droite)
®
PRISE
DIN
Une prise
DINa
été
prévue
sur
certains
modèles afin
de
faciliter
leur
raccordement
à
un
amplificateur
au
moyen
d'un
seul
cordon
Din.
Cependant,
afin
d'empêcher
toute
diaphonie
entre
l'entrée
et
la
sortie
DIN
au cours de
l'enregistrement,
le signal de
sortie
DIN
se trouve
coupé.
Il
n'est
donc
pas pos-
sible
d'effectuer
le
monitoring
par
l'intermédiaire
de
l'amplificateur.
Utiliser la prise de casque de
la
platine
au
cas
où
un
monitoring
pendant
l'en-
registrement
est
désiré.
®
PRISES
DE
SORTIE DE
LIGNE
(gauche/droite)
@
PRISE
DE
L'ADAPTATEUR
CA
*
Utiliser
un
adaptateur
pour
courant
alternatif
{AC)
avec
12V
en
courant
continu
(DC)
et
un
ampérage
supérieur
à
150
mA.
La
polarité
de
la
prise
doit
être
8---E)---(±l.
* Mit
einem
Wechselstrom-Zusatzgeriit
(optional)
behalt
der
GX-625
die
LED-Anzeigezahl
(z.B.
686)
auch
wenn
der
Stromschalter
au~er
Betrieb
gesetzt
wird.
*
Ohne
ein
Wechselstrom-Zusatzgeriit
wird
die gespei-
cherte
Information
geloscht,
wenn
der
Strom
abge-
schaltet
wird.
WIEDERGABE-TAS
TE
Drücken
Sie die WIEDERGABE-TASTE (Auto-
matik-System).
Immer
wenn
die RÜCKLAUF-
TASTE
gedrückt
ist, wird das Band
automatisch
auf
"0"
zurückgespult
und
die Wiedergabe beginnt
automatisch.
STOP-TASTE
Drücken
Sie die STOP-TASTE
(Automatik-System).
Immer
wenn
die
RÜCKLAUF-TASTE
gedrückt
ist,
wird das
Band
auf
"0"
zurückgespult
und
halt.
®
FERNBEDIENUNGSBUCHSE
Die
Fembedienung
aller
Betriebsfunktionen
kann
mit
Hilfe der
optionalen
Fernbedienungsgerate
RC-18,
RC-70T/R
ausgeführt
werden.
® LEITUNGS-EINGANGSBUCHSEN (links
und
rechts)
® DIN-BUCHSE
Einige Modelle sind
mit
einer
DIN-Buchse versehen,
wodurch
für
den
Anschlu~
an
einen
V
erstarker
nur
ein einziges DIN-Kabel
benotigt
wird.
Um
jedoch
Nebensprechen
zwischen
dem
DIN-Ein-
und
Aus-
gang
wahrend
einer
Aufnahme
zu
vermeiden,
wird
das DIN- Ausgangssignal ausgeschaltet. Die Über-
wachung
über
einen
Verstarker
ist deshalb
nich
t
moglich. Wenn Sie eine
Aufnahme
jedoch
über-
wachen
mochten,
benutzen
Sie die
Kopfuorer-
Buchse des
Tonband-Decks.
® LEITUNGS-AUSGANGSBUCHSEN (links
und
rechts)
@ BUCHSE
FÜR
DAS WECHSELSTROM-ZUSATZ-
BERAT
*
Verwenden
Sie
bitte
ein
Wechselstrom-Zusatzgeriit
mit
einem
12V
Gleichstrom-Ausgang
und
Über
150
mA.
·
Sie
Stecker-Polaritat
sollte
EB---G---8
sein.
Benutzen
Sie
bitte
keine
Buchsen
oder
Wechselstrom-
Zusatzgeriite,
die
diesen
Anforderungen
nicht
ent-
sprechen.
@ WECHSELSTROMKABEL
EINGANG
für
einige Lander)
(WECHSELSTROM-
[ID
 Loading...