TEMPUS. User Manual
5
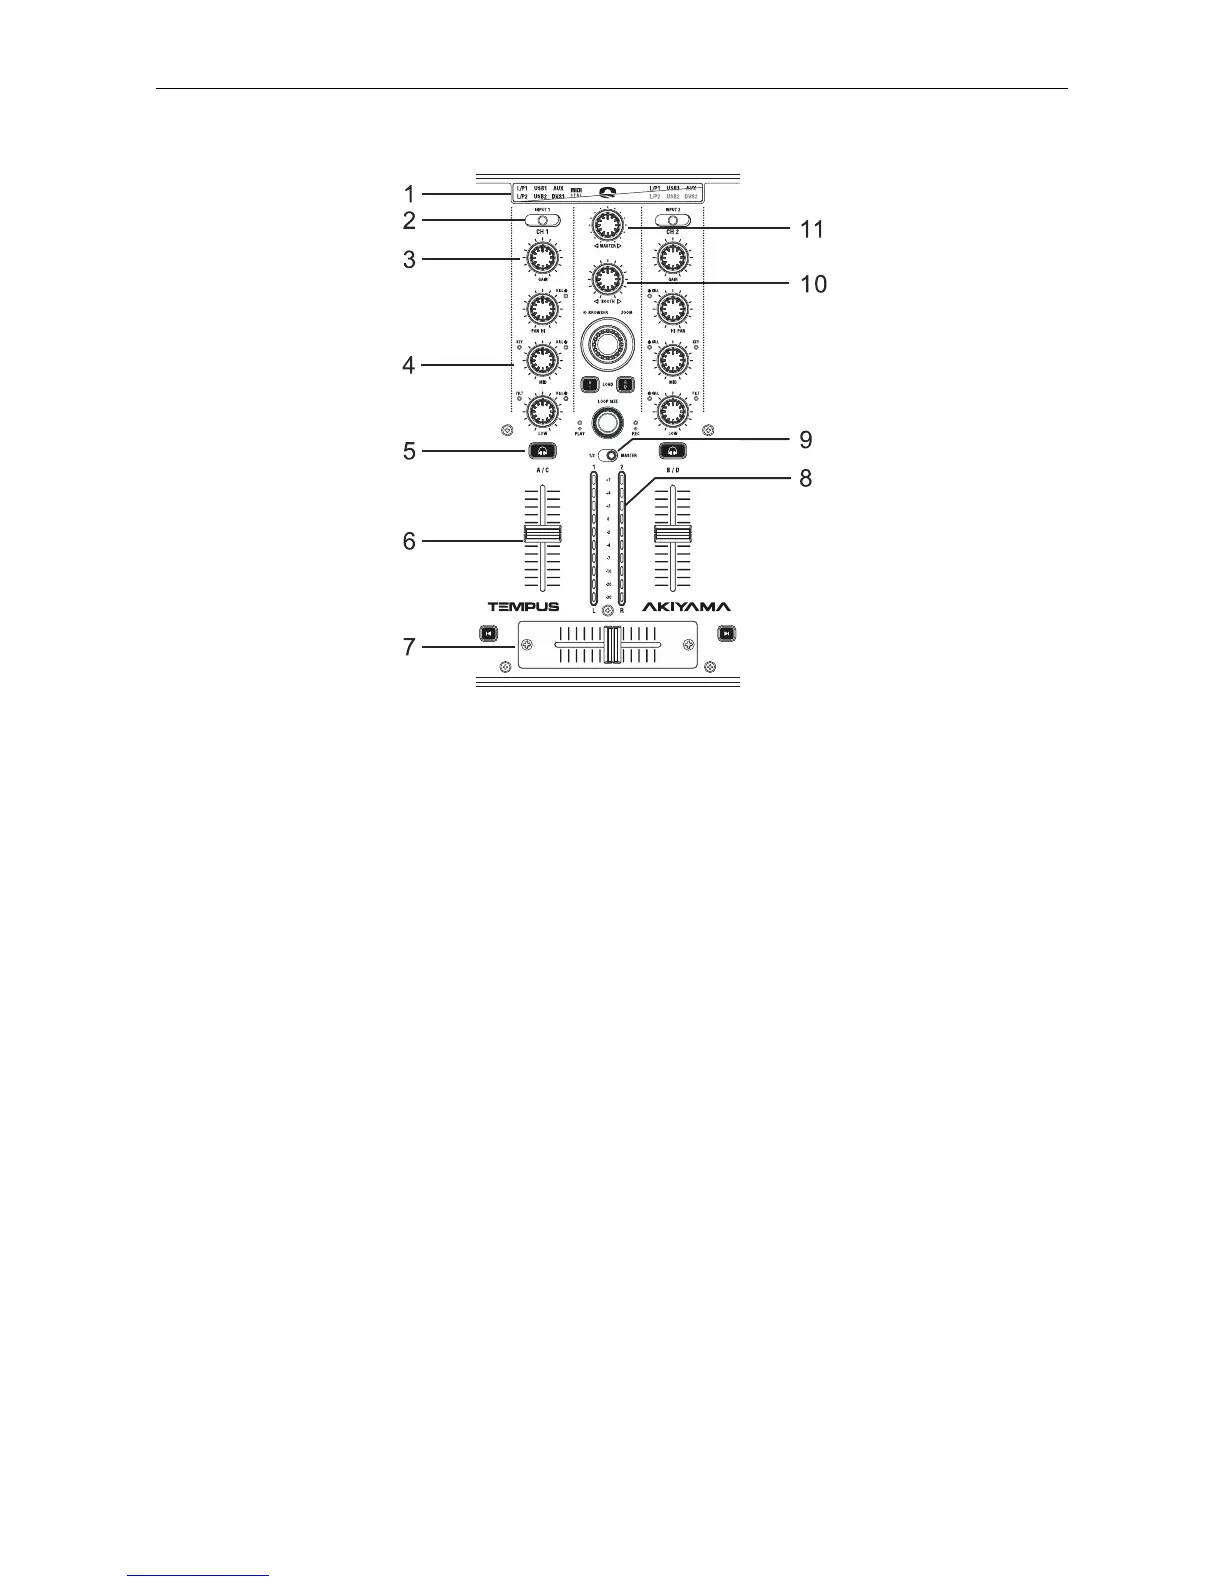
1.2. Mixer Panel
1. Input Select Display: Display the selected inputs included
L/P1 (Line/Phono 1), L/P2 (Line/Phono 2), USB1 (from PC),
USB2 (from PC), AUX and DVS (from PC). MIDI CTRL
indicates if the mixer section is in MIDI controller mode to
control the mixer section in the DJ software.
2. Channel Input Source Switch: In Mixer Mode selects the
input source for each channel. You can switch among
Line/Phono 1 (L/P1), Line/Phono 2 (L/P2), USB (from
computer), AUX, and DVS (from computer). In MIDI mode
selects which input will be sent across the USB.
NOTE: Hold the Left Deck “Deck Switch” and switch the input
select switch to keep your last selection in the device system
memory.
The difference between USB and DVS (Digital Vinyl System
Direct Mode) is the signals the device sends across the USB. If
USB is selected MASTER and Microphone are send to the
computer like for the rest of selections while if DVS is selected
L/P is send instead. When you use time code vinyl to control
DJ software you have to switch to the DVS mode. If you wish
to apply some effects of your software to any input before
mixing them you have to switch to the DVS mode as well.
Under MIDI Control Mode You can switch the input selections
among L/P1 (Line1/Phono1), L/P2 (Line2/Phono2) and AUX. If
AUX is selected on the right channel (CH 2), microphone
signal will be send to the sound card.
3. Channel Gain Control: This adjustment is used to adjust
an audio source signal input gain for a channel. Never use the
gain control to adjust output volume. Setting the gain level
properly will ensure a clean output signal.
NOTE: To properly set the gain level controls:
(1) Be sure the Master Volume Control is set to minimum.
(2) Set the Channel Fader to level 7.
4. Channel EQ:
HIGH: This knob is used to adjust the treble (high-range)
frequency sound for each channel. The adjustable range is
from -35dB to +10dB. Press this button to active kill function to
the lowest level “-35dB”.
MID: This knob is used to adjust the mid-range frequency
sound for each channel. The adjustable range is from -35dB to
+10dB. Press this button to active kill function to the lowest
level “-35dB”.
LOW: This knob is used to adjust the bass (low-range)
frequency sound for each channel. The adjustable range is
from -35dB to +10dB. Press this button to active kill function to
the lowest level “-35dB”.
NOTE: You can turn on or turn off the EQ kill function using
the setup program.
5. Channel CUE Button: Pressing in one or both CUE buttons
routes the respective source to the headphone and meter cue
sections. Pressing multiple buttons makes it possible to drive
mixed sound from the selected sources.
6. Channel Fader: These faders are used to control the
volume of the output signal of any source assigned to its
particular channel.
7. Crossfader: This fader is used to blend the output signals
of channels 1 and 2 together. When the fader is in the full left
position (channel 1), the output signal of channel 1 will be
controlled by the master volume level. The same fundamentals
will apply for channel 2. Sliding the fader from one position to
another will vary the output signals of channels 1 and 2
respectively. When the crossfader is set in the center position,
the output signals of both channels 1 and 2 will be even.
8. Level Meter: The dual LED’s indicators are used to detail
either the master output level, a combination of the master
output level or the PGM monaural level.
9. Level Meter Display Switch: This switch is used to choose
between master level indicators and channel level indicators.
10. Booth Control Knob: This rotary knob is used to control
the level of the booth output terminal on the rear panel. The
booth level is not affected by the master volume.
11. Master Volume Control: This rotary knob is used to
control the master output level (volume). To avoid distorted
output try to maintain an average output signal level of +4dB.
CAUTION: To avoid speaker damage that may be caused by
excessive volume, be sure this adjustment is always set to
zero before turning the unit on.