Getting Started P54x/EN GS/La4
MiCOM P543, P544, P545 & P546
(GS) 3-3
1. GETTING STARTED
1.1 User interfaces and menu structure
The settings and functions of the MiCOM protection and control relays are available from the
front panel keypad and LCD, and through the front and rear communication ports.
1.2 Introduction to the relay
1.2.1 Front panel
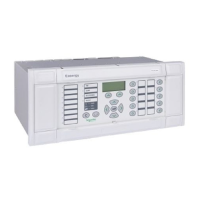
Figure 1 shows the front panel of the relay; the hinged covers at the top and bottom of the
front pan
el are shown open. An optional transparent front cover physically protects the front
panel. With the cover in place, access to the user interface is read-only. Removing the
cover allows access to the relay settings and does not compromise the protection of the
product from the environment.
When editing relay settings, full access to the relay keypad is needed. To remove the front
panel:
GS
1.
Open the top and bottom covers, then unclip and remove the transparent cover. If the
lower cover is secured with a wire seal, remove the seal.
2. Using the side flanges of the transparent cover, pull the bottom edge away from the relay
front panel until it is clear of the seal tab.
3. Move the cover vertically down to release the two fixing lugs from their recesses in the
front panel.
P0103ENe
Figure 1 Relay front view
The front panel of the relay includes the following, as indicated in Figure 1.
A 16-character by 3-line alphanumeric liquid crystal display (LCD)
A 19-key keypad comprising 4 arrow keys and ), an enter key
(), a clear key (), a read key (), 2 hot keys () and 10 () programmable
function keys
Function key functionality. The relay front panel features control pushbutton switches
with programmable LEDs that facilitate local control. Factory default settings associate
specific relay functions with these 10 direct-action pushbuttons and LEDs e.g.
Enable/Disable the auto-recloser function. Using programmable scheme logic, the user
can readily change the default direct-action pushbutton functions and LED indications to
fit specific control and operational needs.
 Loading...