2-1
2.0 Operation
2.1 General
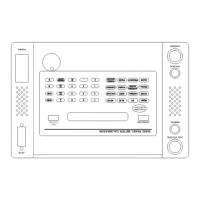
This section contains the operating procedures for the PMC. Operating Controls, Connectors and
Indicators are referred to by nomenclature that appears on the Front Panel. The Front Panel
Operating controls connectors and indicators for the PMC are shown in Figure 1.2.
2.2 Unpacking
Unpack the PMC and visually inspect for possible shipping damage. IF DAMAGE EXISTS,
NOTIFY ARBITER SYSTEMS AND THE CARRIER AND RETAIN THE SHIPPING
CARTON. DO NOT RETURN THE UNIT WITHOUT INSTRUCTIONS FROM ARBITER
SYSTEMS.
2.3 Setup
The PMC is housed in a rugged weatherproof transit case. The necessary equipment for panel
meter calibration should be stored inside the case. To set up the PMC for operation proceed as
follows:
1) Remove the cover by first depressing the pressure relief button and undoing the four latches.
Once the latches are completely free from the cover, the cover may be removed by lifting
straight up on the handle.
2) The power cord, voltage cable, current cable, and Hand Held Unit are stored in the cover.
Remove the power cord and any other accessories required for the calibration to be performed.
With the power switch in the OFF (0) position, connect the power cord between the line
module (See Fig. 1.2) and a power source having a nominal voltage of 115V rms.
3) Press the power switch to the ON (1) position. The display should read GPIB ADDRESS
XX, the RESET, NORMAL, and STBY (and STORE, if there are previously stored user
settings) LED indicators should be illuminated, and the fan should operate. The GPIB address
displayed, (XX) should be between 1 and 31. If not seeing these results after applying power,
difficulties may exist; the PMC should be turned off and the Self-Test Section (Sec. 2.8)
should be consulted. Observing these results after applying power means that the GPIB
address may now be modified (See Sec. 2.7).
4) After the GPIB address has been displayed for a few seconds, the PMC will begin a functional
self test (See Sec. 2.8.2). If the PMC fails one of the function tests a failure message will be
displayed alternately with PRESS (Down Arrow) FOR TESTS. Pressing the DOWN ARROW
key will initiate the diagnostic tests (See Sec. 2.8.3). Corrective action should be taken to cure
any function test failure prior to using the PMC. Once the function test has been successfully
completed, the PMC will momentarily display FUNCTION TEST PASSED, then enter Reset
mode and display DC, 60 Hz or 400 Hz. The function tests may be bypassed by pressing
RESET.