HIRO Installation Manual GDO-12V1
15
© Copyright 2019
6.6 Safety Testing & Auto-Close
6.6.3 Auto-Close
Auto-Close mode is a function that automatically closes the door after a pre-set
time. Safety beams must be installed in order to run the Auto-Close function. There
are two types of Auto-Close available:
(i) Standard auto-close - the door will Auto-Close after a programmed
time. In this mode the timer starts to countdown as soon as the door is
fully open. This function is useful in case the safety beam does not get
triggered.
(ii) Safety Beam triggered auto-close - the door will auto-close after a
programmed time. In this mode the timer starts counting down only when
the safety beam is triggered. ie car leaving the garage.
To enable the Auto-Close function:
a. Press and release the MODE button until the Spanner LED is highlighted.
b. One of the word LEDs (LAMP etc) will highlight. Press the BLUE CLOSE button
to move to the particular parameter:
(i) two (2) times to get to PE A/C or
(ii) three (3) times to get to standard A/C.
c. Press RED STOP / SET button to enter A/C parameter.
d. The OPEN, STOP and CLOSE LEDS will now flash.The default setting for Auto-
Close is OFF.
e. Press the OPEN button to move through options.
f. Press the RED STOP / SET button to save the parameter’s new value or press
MODE to leave the value unchanged - flashing will stop.
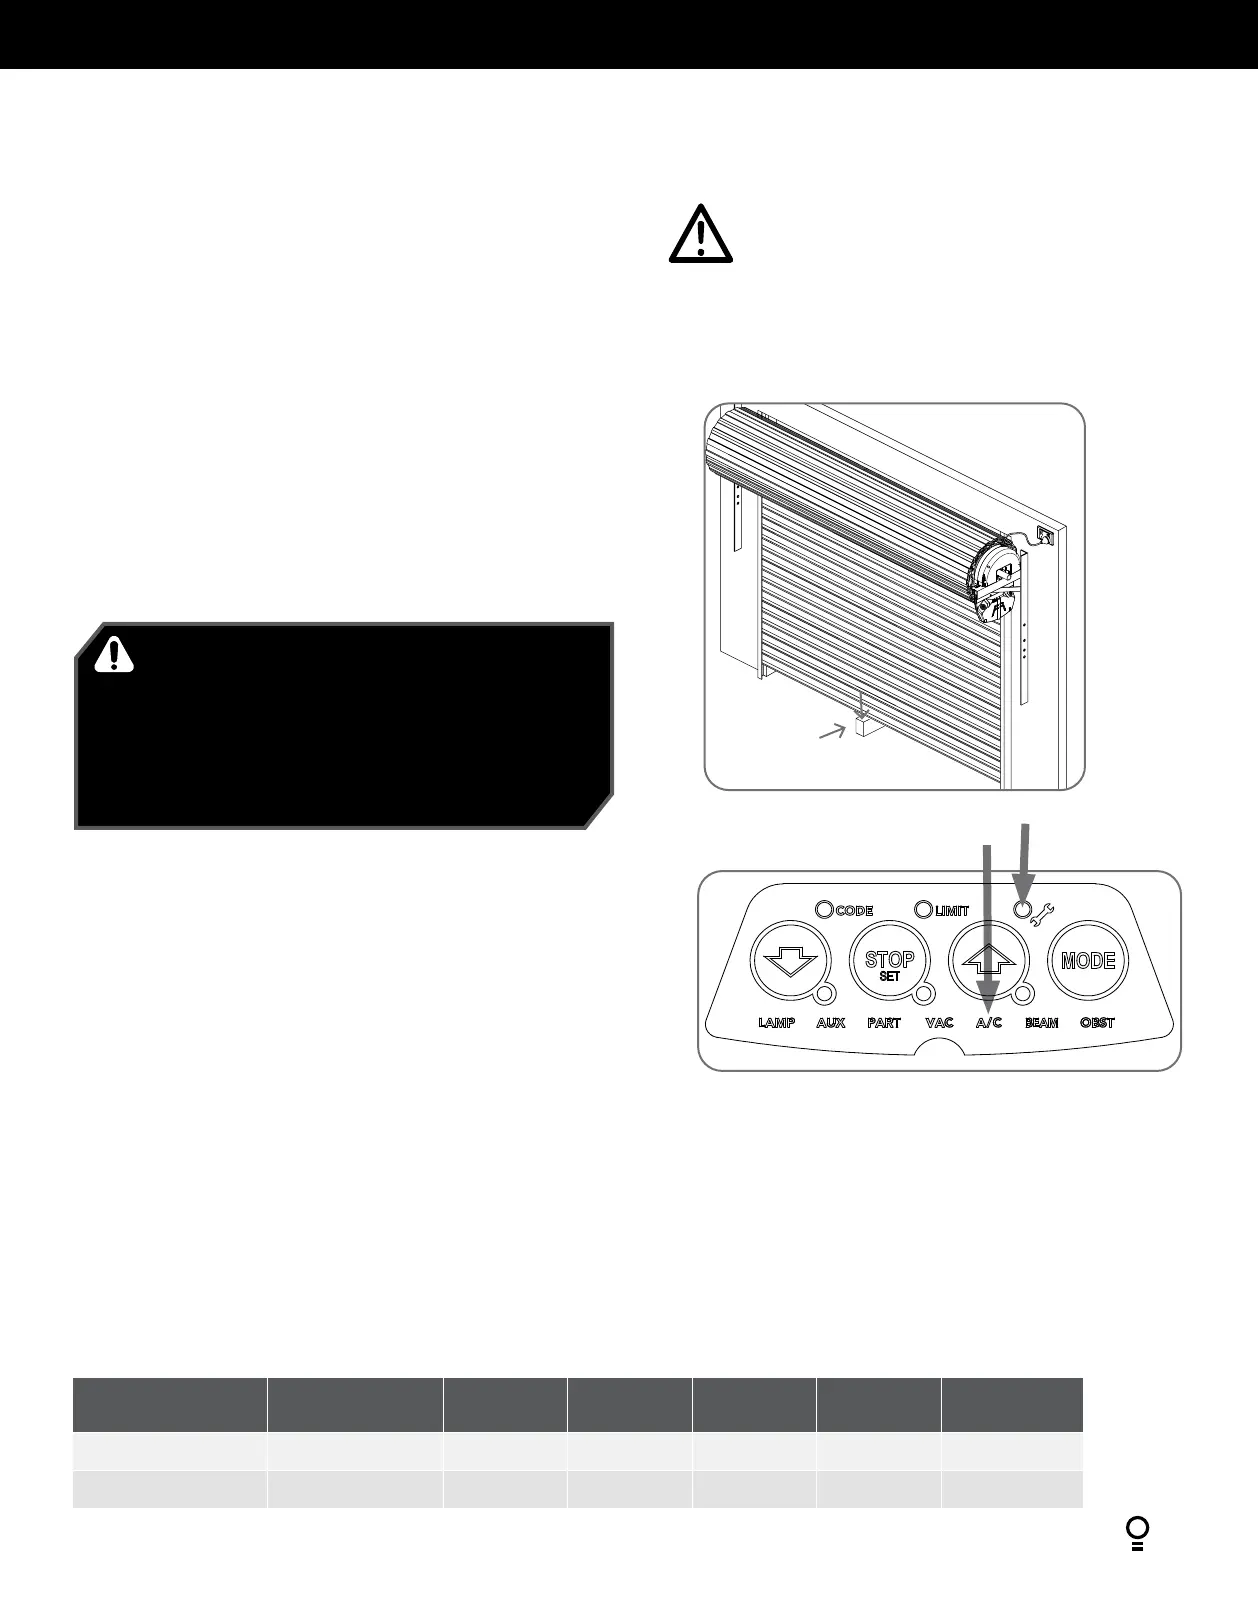
LED Indicators
Parameter OPEN OPEN &
STOP
STOP CLOSE &
STOP
CLOSE
A/C LED A/C Function
90s 60s 30s 15s OFF
A/C & BEAM LED’S
P.E A/C Function
60s
30s 15s 5s OFF
2” x 4” board
6.6.1 Testing Close Cycle
a. Press the OPEN button to open the door.
b. Place a piece of timber approximately 40mm high on the floor directly
under the door (Fig. 6.6.1).
c. Press the CLOSE button to close the door. The door should strike the
object and start to re-open.
If the door does not properly reverse.
• Check the “close” limit position. It should not have reached its “close”
limit before hitting board.
• If the door STOPS but does not reverse, decrease FORCE (refer to
Appendix A).
6.6.2 Testing Open Cycle
a. Press the CLOSE button to close the door.
b. Press the OPEN button to open the door. When the door reaches the
half open point, grab the bottom rail of the door firmly and the door
should stop.
c. If the door does not reverse readily when closing, or stop when opening,
the force may be excessive and need adjusting.
Fig 6.6.1
IMPORTANT WARNING! If the door is closing and is
unable to re-open when obstructed, discontinue use. Do
not use a door with faulty obstruction sensing. Repair
fault and re-test before using.
AVERTISSEMENT IMPORTANT! Si la porte est en train
de se refermer et ne peut pas être rouverte, arrêtez de
l’utiliser. N’utilisez pas une porte dont les détecteurs
d’obstacles sont défectueux. Réparez-les et refaites un
essai.
CAUTION: Take care when testing the safety
obstruction force. Excessive force may cause serious
personal injury and/or property damage can result
from failure to follow this warning.
ATTENTION: Testez la résistance aux obstacles avec
précaution. Une force excessive présente un risque
de blessure corporelle grave et/ou d’endommager le
matériel si vous ne respectez pas cet avertissement.