Automatic Technology America
3626 North Hall Street, Suite 610, Dallas, TX 75219, United States of America
P: +1 800 934 9892 W: www.ata-america.com
E.1 Remote Control Transmitter Button to the Courtesy
Light
The Remote Control Transmitter can be programmed to operate the
courtesy light on the opener independently of the door moving.
a. Press the MODE button to highlight the CODE LED if not already
highlighted.
b. Use the BLUE CLOSE or GREEN OPEN buttons to scroll through to
highlight the LIGHT LED.
c. Press and hold the RED STOP/SET button.
d. Press one of the four buttons on the Remote Control Transmitter for
two (2) seconds, pause for two (2) seconds, then press the same button
again for two (2) seconds.
e. Release the RED STOP/SET button.
f. Press the Remote Control Transmitter button to test.
E.2 Remote Control Transmitter Button to enable AUX
Output
The auxiliary output can be used to control alarm or another garage
door opener. This function requires a professional to wire the accessory
to the AUX Output before using the below step to code in the Remote
Control Transmitter.
a. Press the MODE button to highlight the CODE LED if not already
highlighted.
b. Use the BLUE CLOSE or GREEN OPEN buttons to scroll through to
highlight the AUX LED.
c. Press and hold the RED STOP/SET button.
d. Press one of the four buttons on the Remote Control Transmitter for
two (2) seconds, pause for two (2) seconds, then press the same button
again for two (2) seconds.
e. Release the RED STOP/SET button.
f. Press the Remote Control Transmitter button to test.
E.3 Remote Control Transmitter Button to Operate PART
(Partial) Mode
The PART mode position (see Appendix B Setting Partial Open Position)
must set prior to coding a Remote Control Transmitter.
a. Press the MODE button to highlight the CODE LED if not already
highlighted.
b. Use the BLUE CLOSE or GREEN OPEN buttons to scroll through to
highlight the PART LED.
c. Press and hold the RED STOP/SET button.
d. Press one of the four buttons on the Remote Control Transmitter for
two (2) seconds, pause for two (2) seconds, then press the same button
again for two (2) seconds.
e. Release the RED STOP/SET button.
f. Press the Remote Control Transmitter button to test.
E - Additional Transmitter Functions
Appendix
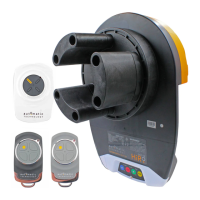
Fig E.1
Operate
Door
Vacation
Mode
Light
PART
Open
E.4 Remote Control Transmitter Button to activate
Vacation Mode
The opener can be programmed into a “Vacation Mode” where the
opener will not respond to any Remote Control Transmitter except
the button of the Remote Control Transmitter that was programmed
for vacation mode.
a. Press the MODE button to highlight the CODE LED if not already
highlighted.
b. Use the BLUE CLOSE or GREEN OPEN buttons to scroll through
to highlight the VAC LED.
c. Press and hold the RED STOP/SET button.
d. Press one of the four buttons on the Remote Control Transmitter
for two (2) seconds, pause for two (2) seconds, then press the
same button again for two (2) seconds.
e. Release the RED STOP/SET button.
f. Press the Remote Control Transmitter button to test.
E.5 Turn Off Vacation Mode
a. To turn off the Vacation Mode simply press the Vacation mode
button and release.
b. Test that Vacation Mode is off by using another Remote Control
Transmitter to operate the door.