HIRO Installation Manual GDO-12V1
3
© Copyright 2019
Contents
1. Safety Information 4
2. Sécurité 5
3. System Specifications 6
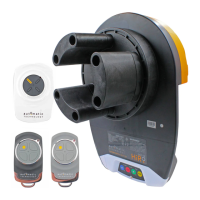
4. Kit Contents 7
5. Operator Safety & Security 8
5.1 Your Door CAN NOT be used by the opener when: 8
5.2 Your Door CAN be used when: 8
5.3 To Disengage the Opener: 8
5.4 To Re-Engage the Opener: 8
6. Installation Instructions 9
6.1 Pre-Installation Requirements 10
6.1.1 Door Operation 10
6.1.2 Unsuitable Door Types 10
6.1.3 Position 10
6.1.4 Power Supply 10
6.1.5 Sideroom 10
6.1.6 Forks 10
6.2 Door Preparation 11
6.2.1 Preparation 11
6.2.2 Pinning the Door to the drum: 11
6.2.3 Door prop preparation 11
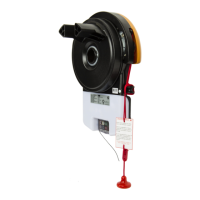
6.3 Fitting the Opener 12
6.4 Safety Beam Installation 13
6.4.1 Safety Infra-Red Beam Kit (P/N 62047) 13
6.4.2 Assembling the Mounting Bracket 13
6.4.3 Aligning the Transmitter and receiver 13
6.5 Setting Speed and Limits 14
6.5.1 Set the Limit Positions and adjust drive speed: 14
6.5.2 Clearing the Door Limit Positions 14
6.5.3 Re-profiling the Door 14
6.6 Safety Testing & Auto-Close 15
6.6.1 Testing Close Cycle 15
6.6.2 Testing Open Cycle 15
6.6.3 Auto-Close 15
6.7 Coding Transmitters 16
6.7.1 Transmitter Button to Operate Door 17
6.7.2 Installation of the Wall Mounted Transmitter 17
6.7.3 Erasing Programmed Codes 17
6.7.4 Selecting The Function To Be Coded 18
6.7.5 Activate Remote Code Set Mode 18
6.8 Attach Warning Labels 18
7. Operation Instructions 19
7.1 How to Use Your Operator 20
7.1.1 How To Operate the opener: 20
7.1.2 Replacing the Battery: 3V Lithium Battery CR2032. 20
7.2 User Operating Controls 21
7.3 Door Status Indicators 21
7.4 Disposal of Batteries 22
8. User Maintenance Instruction 23
8.1 Door Maintenance 23
8.2 If You Need a Service Call 23
9. Troubleshooting 24
10. Appendix 25
A - Adjustment Mode Parameters 25
B - Setting the PART (Partial) Mode position 25
C - LED Status 26
D - Setting Limits via Transmitter 27
E - Additional Transmitter Functions 28
GDO-12
HiR
High Roll Up Garage Door Opener