Centipede
—A WARNING:
A~
SHOCK HAZARD
Connect this game only
to
a grounded
3-wire
outlet.
If
you
have
only a 2-wire
outlet, we recommend
you
hire
a
licensed
electrician
to
install
a grounded outlet.
Players may receive an electric
shock if
this
game
is
not properly grounded!
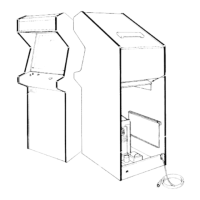
These new parts,
as
well
as all other major
parts
in the game, are illustrated in Figure 1.
Throughout
this manual, wherever
one of these new
parts is
mentioned,
you
will
see this symbol:
B. Game
Inspection
This new game is ready
to
play upon removal
from
the
shipping carton. However,
your careful inspec-
tion
is needed
to supply
the final
touch of quality
control. Please follow these steps
to help us insure
that your
new game was delivered
to you
in
good
condition.
NOTE
Do not plug the
game
in
yet!
1.
Examine the exterior of
the
game
cabinet
for
dents,
chips, or broken
parts.
2. Remove the screws that were
used
as
extra
se-
curity to seal the rear
access panel. Unlock and
open this panel, as
well
as the coin
door; inspect
the
interior
of
the game
as
follows:
•
Check that all plug-in
connectors
(on the
game
harness) are firmly
seated. Replug
any
connectors
found
unplugged. Don’t
force
connectors together. The connectors
are
keyed so they only
go
on in the proper
orien-
tation.
A
reversed edge connector will
dam-
age a
PCB and will void
your warranty.
•
Check
that
all
plug-in integrated circuits
on
the game PCB are firmly seated in their
soc-
kets.
•
Remove the tie-wrap
that
holds
the coiled
power cord on the inside cabinet wall. Check
the cord for any
cuts or
dents in
the insula-
tion. Place
the square
black
plastic strain-
relief plate in the wood
slot at the bottom of
the rear panel
opening.
—A
—
WARNING
A—
To avoid
possible
unpleasant
electrical
shock,
do
not
touch internal
parts of the
monitor with
your
hands or
metal
objects
held in your
hands!
•
Note the
location of
the
game’s serial
num-
ber—
it
is
printed
on the special
label
on the
outside of
the
game cabinet.
Verify
that
the
serial numbers
also
stamped
on the
Centi-
pede™ Game PCB,
Regulator/Audio
II PCB
and
monitor are
all identical.
A drawing
of
the
serial-numbered
components
is
on the
inside
front cover
of this
manual.
Please
mention
this number
whenever
you call
your
distributor for
service.
•
Check all
major
subassemblies
such
as the
power
supply,
control panel
and
monitor for
secure mounting.
C.
Game
Installation
Figure
2
Installation
Requirements
Power
Temperature
Humidity
Space Required
Game Height
130
watts
0
to
38°
C
(32
to
100°F)
Not over
95%
relative
64
x 82
cm
(25
Va
x 32V4
in.)
181
cm (71 V4
in.)