2.7 Filling the installation with gas
" This operation is reserved for installers familiar
with the legislation for handling refrigerants.
" Creating a vacuum with a vacuum pump is
essential.
" Never use equipment used beforehand with any
refrigerant other than a HFC.
2.7.1 Creating a vacuum and
lling the refrigeration connections with gas
• First seal test
- Remove the protective plugs (B) from the charging
hole (Schrader) in the gas valve (large diameter).
- Connect the hose to the manifold,
- Connect the bottle of nitrogen to the manifold.
- Pressurize the refrigerant circuit to 10 bar with nitrogen.
- Leave the circuit under pressure for half a day.
- Check that the pressure has not fallen.
- Look for and repair any leaks, and then recommence
the test.
- Once the pressure has remained steady for a few
hours, empty the nitrogen.
• Creating a vacuum and lling the refrigeration
connections with gas
- Connect the vacuum pump to the manifold.
- Create a vacuum until the residual pressure in the
circuit falls below 0,01 bar.
- Let the pump continue to operate for another 30
minutes after reaching the vacuum.
- Close the blue valve on the set of manometers and
then stop the vacuum pump without disconnecting
any of the hoses in place.
- Leave for at least half a day.
If after this time the pressure has risen, there
is a leak. Find and repair the leak and then
recommence vacuum testing.
When the pressure remains steady for a few
hours after stopping the vacuum pump, the circuit
can be considered airtight.
- Remove the access plugs (A) from the valve controls.
- First of all fully open the small valve and then the
large one using a hex key (counterclockwise direction)
without forcing excessively against the stop.
- Remove the blue hose rapidly.
- Ret the 2 plugs and tighten them to the recommended
tightening torque gure 18 page 17.
The outdoor unit does not contain any additional
refrigerant, enabling the installation to be purged.
Flushing is strictly forbidden.
2.7.2 Sealing test
Once the refrigeration circuit has been gassed as
described above, check that all the refrigeration
connectors are gas-tight:
6 connectors for models Evolution 5 and Evolution 6, 5
connectors for model Evolution 8 and 4 connectors for
models Evolution 10, Evolution 13 and Evolution 16.
The sealing test must be performed with an approved
gas detector. If the arings have been made correctly,
there should be no leaks.
" If there is a leak:
- Bring the gas into the outdoor unit (pump down),
- Make the connection again,
- Repeat the commissioning procedure.
Lo
Hi
Jeu de manomètres
(manifold)
Pompe à vide
Flexible de service
Basse
pression
Haute
pression
Vanne “gaz” (gros diamètre)
Vacuomètre
Liaison frigorifique
Bouchon (A)
Clé hexagonale de 4 mm
Vanne 3 voies
Orifice de charge
Bouchon (B)
Flexible de service (bleu)
muni d’un poussoir de valve
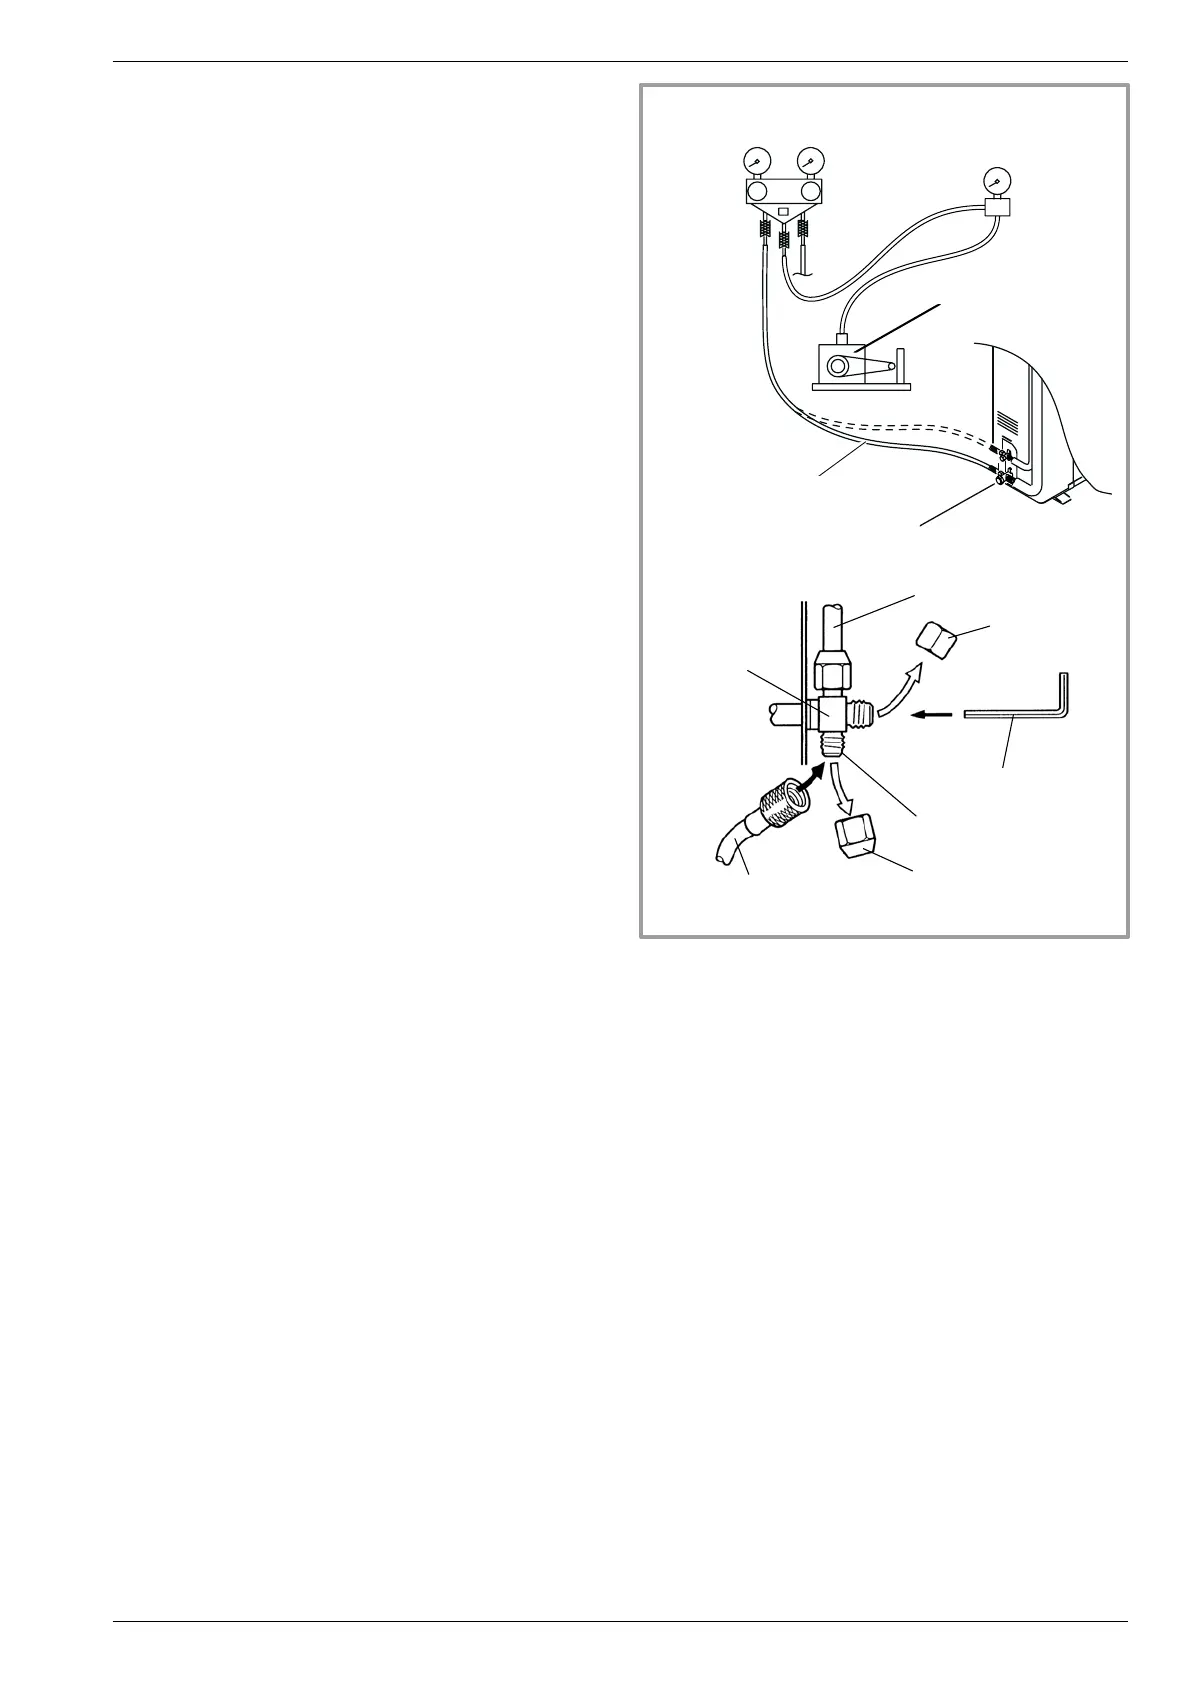
gure 20 - Extraction under vacuum and gassing
Clé hexagonale/Allen
de 4 mm
Manometer kit
(manifold)
Vacuum pump
Service hose
Service hose (blue) tted with
valve push-button
Plug (B)
Plug (A)
Hex / Allen key 4 mm
Load orice
Refrigeration
connection
3-way valve
Low
pressure
High
pressure
Gas valve (Large diameter)
Vacuum meter
Installation and operation manual "1397 - EN" - 19 -
Heat pump split single service alféa Evolution