EasyManua.ls Logo

ATOMSTACK A5 - User Manual

ATOMSTACK A5
27 pages
Print Icon
To Next Page IconTo Next Page
Loading...
Shenzhen AtomStack Technologies Co., Ltd. support@atomstack3d.com
1
ATOMSTACK A5
Laser engraving machine manual
English
Question and Answer IconNeed help?

Do you have a question about the ATOMSTACK A5 and is the answer not in the manual?

Summary

Security Statement

Laser Safety

Discusses the hazards of the Type 4 laser product and necessary safety precautions for users.

Fire Safety

Outlines fire risks associated with laser engraving and essential fire safety measures.

Material Safety

Advises on safe materials for engraving and lists materials to avoid.

Use Safety

Provides guidelines for safe operation, including positioning and avoiding hazards.

AtomStack A5 Engraver Introduction

Software Installation and Use

LaserGRBL Software Installation and Use

Step-by-step guide to downloading, installing, and configuring the LaserGRBL software.

LightBurn Installation Tutorial

Instructions for downloading and installing the alternative LightBurn software.

Laser Focus Adjustment

Fixed Focus Piece Operation

Details on using the fixed-focus piece for accurate laser focusing.

Positioning

Engraving Positioning Steps

Guides on using software tools for accurate placement of the engraving pattern.

Common Materials and Recommended Parameters

Engraving Parameter Recommendations

Table of recommended engraving quality, laser options, and speed for various materials.

Cutting Parameter Recommendations

Table of recommended cutting times, speed, and laser options for different materials.

Common Problems and Solutions

Connection Issues Troubleshooting

Addresses common problems and solutions for connecting the engraver to the software.

Engraving Line Straightness Issues

Troubleshoots causes and solutions for uneven or crooked engraving lines.

Overview

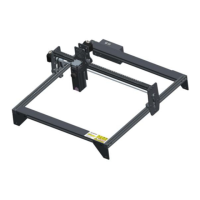
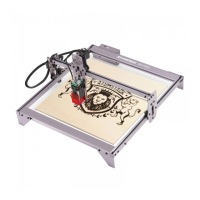
The ATOMSTACK A5 is a laser engraving machine designed for both engraving and cutting various materials. This manual provides comprehensive guidance on its operation, software installation, safety precautions, and maintenance, ensuring users can achieve optimal results while prioritizing safety.

Function Description

The ATOMSTACK A5 utilizes a fixed-focus laser, distinguishing it from traditional zoom lasers that require manual adjustment of the laser spot. This fixed-focus design simplifies the setup process, as users only need a dedicated fixed-focus sheet to achieve the optimal engraving focal length. The laser engraver is equipped with a 5W laser, capable of cutting certain boards and engraving on stainless steel. It supports Pulse Width Modulation (PWM) control, which allows for more detailed and intricate engraved patterns.

The primary function of the ATOMSTACK A5 is to engrave and cut a wide range of materials. For engraving, it can be used with various graphics formats such as NC, BMP, JPG, PNG, and DXF. The software allows for adjustments to image parameters like sharpness, brightness, contrast, and highlights, providing flexibility in achieving desired visual effects. Different engraving modes, such as "line to line tracking" and "1bit dithering," are available, with 1bit dithering being particularly suitable for grayscale graphics. For cutting operations, users can select vector graphics or centerline engraving modes.

The machine's operation is managed through software, with LaserGRBL being the recommended open-source option for Windows users (Win XP / Win 7 / Win 8 / Win 10). Mac users can opt for LightBurn, a paid software that also supports Windows. The engraver receives commands from the computer, necessitating a continuous connection to the computer and the engraving software during operation. The computer's configuration influences the speed and quality of the engraving process.

Usage Features

Safety First: Before operating the ATOMSTACK A5, users are strongly advised to read the safety guide carefully. The device uses a Type 4 laser, which is powerful enough to cause eye injuries and skin burns. While a laser cover is installed to filter diffuse light, wearing laser goggles is still recommended. Direct exposure of skin to the laser beam, especially at close range, should be avoided. Teens must be supervised by parents, and the laser engraving module should not be touched while switched on.

Fire Safety: The high-intensity laser beam generates significant heat, which can cause materials to catch fire during cutting. Users should never leave the machine unattended during engraving. It is crucial to clean the laser cutter of debris, scraps, and flammable materials after each use and to keep a fire extinguisher nearby.

Material Safety: The ATOMSTACK A5 is designed for engraving materials such as wood, bamboo, leather, plastic, fabric, paper, opaque acrylic, and glass. Materials not recommended include metal, precious stones, transparent materials, and reflective materials. Engraving materials with unknown properties should be avoided.

Operational Safety: The engraver should only be used in a horizontal position and securely fixed to prevent accidental shifting or dropping. The laser should never be pointed at people, animals, or any combustible object, regardless of whether it is in operation.

Software Installation and Setup:

  1. LaserGRBL Download: Users can download LaserGRBL from http://lasergrbl.com/download/.
  2. Installation: The software installation is straightforward, requiring users to click "Next" until completion.
  3. Custom Buttons: LaserGRBL supports custom buttons, which can be downloaded from http://lasergrbl.com/usage/custom-buttons/. These buttons can be imported into the software by right-clicking on a blank space next to the bottom button and selecting "Import custom button."
  4. Connecting the Machine:
    • Connect the engraver to a computer with LaserGRBL installed.
    • Plug in the power supply.
    • Open LaserGRBL.
    • Select the correct port number and a baud rate of 115200. If multiple serial devices are connected, users may need to identify the correct port in the Windows device manager or try port numbers one by one.
    • Install the CH340 Driver by clicking "Tools" > "install CH340 Driver" in LaserGRBL, then restart the computer.
    • Click the lightning connection logo in the software; a red X indicates a successful connection.

Setting Engraving Parameters:

  1. Select File: Open LaserGRBL, click "File" > "Open File," and choose the desired graphic (NC, BMP, JPG, PNG, DXF).
  2. Picture Parameters: Adjust sharpness, brightness, contrast, and highlights. The preview window will show the factual effect.
  3. Engraving Mode: Choose "line to line tracking" or "1bit dithering" for engraving. For cutting, select vector graphics or centerline engraving.
  4. Engraving Quality: This relates to the laser scan's line width. For the ATOMSTACK A5, with a rectangular spot of 0.3*0.5mm (core energy area 0.1*0.3mm), a quality range of 5-8 is recommended. The optimal value may vary depending on the material.
  5. Image Manipulation: Images can be rotated, mirrored, or cut within the preview window.
  6. Speed and Energy: After setting the above, proceed to configure carving speed, carving energy, and carving size.
    • Engraving Speed: A speed of 1000 is recommended for optimal results, though users can adjust it based on preference. Faster speeds save time but may reduce engraving quality, and vice versa.
    • Laser Mode: M4 command is recommended for 1bit dithering engraving, and M3 for other cases. Users should check GRBL configuration if their laser only supports M3.
    • Engraving Energy: This depends on the material. A table of recommended parameters for common materials is provided in the manual.
    • Size and Create: Set the desired engraving size and click "Create" to finalize parameters.

Laser Focus Adjustment:

The ATOMSTACK A5 uses a fixed-focus laser, simplifying focusing. The specific focus point is 2mm from the bottom of the acrylic cover. A fixed-focus piece is included to aid in adjustment.

  1. Move the laser head over the object.
  2. Place the fixed-focus piece on the object.
  3. Loosen the fixing screws on the sliding rails on both sides of the laser.
  4. Slide the laser freely until it contacts the fixed-focus plate.
  5. Slightly lift the laser to remove the fixed-focus film.
  6. Tighten the fixing screws.
  7. Remove the fixed-focus piece.

Positioning:

Positioning is crucial before starting an engraving job.

  1. Move to Center: Select the "Move to Center" button in the software. The laser will move to the center of the pattern. Place the object to be engraved below the laser at this point.
  2. Light Laser: Click the "light laser" button. The laser will emit a weak light, indicating the center of the engraving pattern. Adjust the object's position accordingly.
  3. Profile Scan: Click the "Profile Scan" button. The laser will scan the outer contour of the pattern. Users can reposition the object based on the scanned contour. The "wrap-around" button can be used multiple times to fine-tune the contour's position.

Starting and Terminating:

  1. Start: After all settings are complete, click the green button to start engraving. The number next to the button can be edited to specify multiple consecutive engraving or cutting passes, useful for cutting uniform shapes.
  2. Terminate: To stop a job midway, click the terminate button.

LightBurn Installation (Alternative Software):

  1. Download: Download the LightBurn installation package from https://lightburnsoftware.com/pages/trial-version-try-before-you-buy.
  2. Installation: Double-click the package and click "Next" to install. (Note: LightBurn is a paid software; a trial version is available).
  3. Find My Laser: After installation, click "Find My Laser."
  4. Add Device: Select "GRBL (410mm x 400mm)" and click "Add Device."
  5. Set Origin: Typically, the origin is set to "Front Left."
  6. Port Selection: If the software isn't connected, select the correct port for the laser engraver.

Techniques for Using the Machine:

  • Laser Height: To ensure structural stability, elevate the laser as far away from the table as possible during use.
  • Spot Orientation: The laser's core spot is a 0.1*0.3mm rectangle. For delicate models, using the vertical direction (0.3mm length) is recommended.
  • Precise Positioning:
    • Move the laser to the lower left of the frame.
    • Use a ruler and pencil to mark a center point on the object.
    • Ensure the laser shield is parallel to the object's edge.
    • Click the two designated buttons in sequence to move the laser point to the marked center.

Maintenance Features

The manual addresses common problems and their possible causes and solutions, which can be considered a form of user-level maintenance guidance.

Troubleshooting Connection Issues:

  • Driver Missing: If the engraving machine cannot connect to the software, it's likely due to a missing driver. The solution is to install the CH340 Driver via "Tools" > "install CH340 Driver" in LaserGRBL and then restart the computer.
  • Multiple Software Instances: If multiple LaserGRBL software instances are open, close the redundant ones.
  • Incorrect Port Number: Select the correct port number in the software.
  • Incorrect Baud Rate: Ensure the baud rate is set to 115200.
  • Unconnected Data Line: Check if the data line is correctly connected.
  • USB Port Problem: Try using a different USB port on the computer.

Troubleshooting Engraving Line Straightness:

  • Loose Belt: If the engraving line is not straight, the belt might be loose. Re-tension the belt.
  • Unsecured Belt Screws: Tighten the set screws at both ends of the belt.
  • Wobbling Rollers/Brackets: Adjust the eccentric nut under the bracket to lock it and prevent wobbling.
  • Laser Stand Shake: If the laser stand extends too much, causing the laser to shake, raise the laser to be as close to the top as possible to reduce wobble.

These troubleshooting steps empower users to perform basic maintenance and resolve common operational issues, contributing to the longevity and consistent performance of the ATOMSTACK A5.

ATOMSTACK A5 Specifications

General IconGeneral
Engraving Accuracy0.01mm
Data Transmission MethodUSB
Engraving Area400 x 400 mm
Laser Output Power5W
Laser Protective CoverYes
Operating SoftwareLaserGRBL
Supported File FormatsBMP, JPG, PNG, DXF
Supported MaterialsWood, Leather

Related product manuals