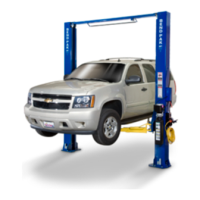
GrandPrix (GP-7 Series) Two-Post Lifts 49 P/N 5900209 — August 2018 — Rev. C2
7. Release the Up Pushbutton when the vehicle is off the ground by a few inches.
8. Check to make sure the pads have solid contact with the vehicle’s lifting points and that the vehicle
is balanced on the lift arms.
You can give the vehicle a slight push to make sure it is solid and balanced.
If the vehicle is either not solid or not well balanced, lower it back to the ground (see Lowering
the Lift for the lowering procedure) and make the necessary adjustments.
9. Push in and hold the Up Pushbutton.
10. When the vehicle reaches the desired height, go up a bit further, then release the Up Pushbutton.
11. Push and hold the Lowering Handle and the Safety Lock Release Handle to lower the lift down
onto the nearest Safety Lock.
12. Double check to make sure both Lift Heads are on a Safety Lock.
Do not leave the lift controls until the lift is on a Safety Lock or on the ground.
13. Begin work on the vehicle.
Lowering the Lift
To lower the lift, you first raise it a small amount to get it off the Safety Lock, then move it down.
To lower the lift:
1. Check under and around the vehicle to make sure the area is clear of all obstructions. If you find
any, move them out of the way.
2. Press and hold the Up Pushbutton to move the lift off the Safety Lock.
Raise the lift at least two inches to get clear of the Safety Lock.
3. Push in and hold the Safety Lock Release Handle (on the Powerside Post above the Power Unit).
4. Push down and hold the Lowering Handle (on the Power Unit).
Both the Safety Lock Release Handle and the Lowering Handle must be held down at the same
time to lower the lift.
Do not override the lift controls; they are designed specifically
to return to off when released.
Remain clear of the lift as it comes down; obey the pinch point warning decals.
5. When the lift is on the ground, release both handles, then move the all four arms to their full drive-
thru positions.
6. Drive the vehicle out.