EasyManua.ls Logo

BendPak HD-12SS-B User Manual

BendPak HD-12SS-B
44 pages
To Next Page IconTo Next Page
Page #1 background imageLoading...
Page #1 background image
INSTALLATION AND OPERATION MANUAL
SHIPPING DAMAGE CLAIMS
When this equipment is shipped, title passes to the
purchaser upon receipt from the carrier.
Consequently, claims for the material damaged in ship-
ment must be made by the purchaser against the trans-
portation company at the time shipment is received.
BE SAFE
Your new lift was designed and built with safety in mind.
However, your overall safety can be increased by proper
training and thoughtful operation on the part of the
operator. DO NOT operate or repair this equipment with-
out reading this manual and the important safety instruc-
tions shown inside.
Keep this operation manual near the
machine at all times. Make sure that
ALL
USERS read this manual.
12,000 POUND CAPACITY
COMMERCIAL GRADE
FOUR-POST LIFTS
Models:
HD-12SS-B
HD-12-B
HD-12X-B
PLEASE READ THE ENTIRE CONTENTS OF THIS MANUAL PRIOR TO
INSTALLATION AND OPERATION. BY PROCEEDING YOU AGREE THAT YOU
FULLY UNDERSTAND AND COMPREHEND THE FULL CONTENTS OF THIS
MANUAL. FORWARD THIS MANUAL TO ALL OPERATORS. FAILURE TO
OPERATE THIS EQUIPMENT AS DIRECTED MAY CAUSE INJURY OR DEATH.
REV F 12-15 -07
1645 Lemonwood Dr.
Santa Paula, CA. 93060, USA
Toll Free 1-800-933-9970
Tel: 1-805-933-9970
Fax: 1-805-933-9160
1800-253-2363
Question and Answer IconNeed help?

Do you have a question about the BendPak HD-12SS-B and is the answer not in the manual?

BendPak HD-12SS-B Specifications

General IconGeneral
BrandBendPak
ModelHD-12SS-B
CategoryLifting Systems
LanguageEnglish

Summary

Installation and Operation Manual

Read First Instructions

Crucial safety and operational guidance to review before proceeding with setup.

Shipping Damage Claims

Procedure for reporting and processing claims for transit damage.

Safety Overview

Emphasis on safety through training and proper operation.

Product Warranty Information

Warranty Coverage

Details the five-year structure and one-year component warranties.

Warranty Limitations

Exclusions for wear, misuse, improper installation, and cosmetic defects.

Important Notices and Responsibilities

Installer/Operator Notice

Critical warnings regarding installation and usage to prevent injury.

Hazard Level Definitions

Explanation of DANGER, WARNING, and CAUTION signal words.

Owner's Responsibilities

Owner's duties for safe operation, maintenance, and training.

Installer and Operator Safety

Site and Concrete Verification

Requirement to inspect site and concrete for defects before installation.

Protective Equipment Recommendations

Guidance on personal protective gear for safe installation and operation.

Introduction and Safety Guidelines

Introduction to the Manual

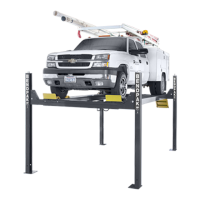
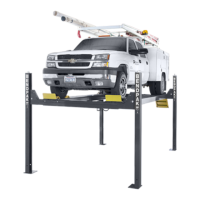
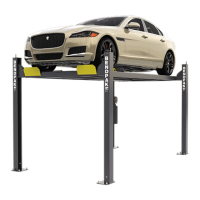
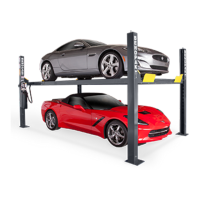
Overview of the lift's advanced design and the manual's purpose.

Essential Safety Instructions

Key safety rules to follow before operating the lift.

Installation Preparation

Tools Required for Installation

List of necessary tools for the lift installation process.

Step 1: Site Selection

Criteria for choosing an appropriate installation location.

Step 2: Floor Requirements

Specifications for concrete floor quality and slope.

Assembly Overview Diagram

Lift Component Identification

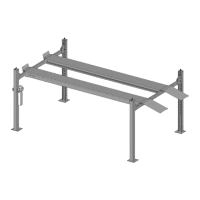
Visual guide to the major parts of the lift assembly.

Floorplan and Model Specifications

Lift Floorplan Layout

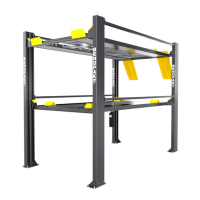
Diagram showing dimensions and layout for different lift models.

Model Specifications Table

Detailed technical specifications for each lift model.

Power Unit Location Guidance

Power Unit Placement Strategy

Instructions on correctly positioning the power unit relative to the lift.

Step 3: Column and Cross Tube Installation

Column Placement and Shimming

Positioning columns and calculating shim requirements.

Cross Tube Installation Procedure

Steps for seating cross tubes onto the installed columns.

Step 4: Raising Cross Tubes and Safety Locks

Engaging Safety Locks

Ensuring primary safety locks are correctly engaged on the ladder.

Final Column and Crossbar Setup

Securing columns and crossbars in their final positions.

Step 5 & 6: Runway Installation

Powerside Runway Mounting

Installing the powerside runway, including cylinder and sheave.

Offside Runway Mounting

Positioning and securing the offside runway onto the cross tubes.

Step 7: Cable Installation and Routing

Cable Preparation and Removal

Removing and noting the order of cable components for re-installation.

Cable Routing Diagram

Illustration detailing the correct path for all lifting cables.

Step 7/8: Cable and Sheave Installation

Cable and Sheave Assembly

Extending the cylinder and installing cables and sheaves in the correct order.

Securing Lifting Cables

Routing threaded cable ends and securing them with nuts.

Step 9/10: Power Unit and Hydraulic Hoses

Power Unit Mounting and Fluid Fill

Mounting the power unit and filling its reservoir with hydraulic fluid.

Hydraulic Hose Connections

Installing fittings and connecting hydraulic hoses to the power unit.

Step 10 Continued: Hose Routing and Clearance

Cylinder Hose Fittings

Connecting 90-degree fittings to cylinder ports using appropriate sealant.

Hose Routing for Clearance

Ensuring hoses are clear of cables and retaining rings during connection.

Step 11: Air Line Routing

Air Line Installation and Valve Placement

Routing air lines and positioning the push button air valve correctly.

Safety Label Placement

Label Application Guidelines

Instructions for proper placement of safety warning labels.

Power Unit Installation and Wiring

Power Unit Installation Notes

Key considerations for installing and operating the power unit safely.

Electrical Wiring Diagrams

Schematics for single and three-phase power connections.

Step 12-14: Power Unit, Safety Springs, and Start-Up

Power Unit Electrical Hook-Up

Connecting the power supply to the motor and verifying voltage.

Slack Safety Spring Inspection

Checking slack safety springs for secure attachment before lift operation.

Initial Lift Operation Test

Testing the power unit, checking for leaks, and verifying cable positioning.

Step 14 Continued: Lift Operation Checks

Safety Lock Functionality Check

Verifying all safety locks are cleared, free, and functioning correctly.

Cable Adjustment for Leveling

Adjusting cables to set safety locks at the correct height.

Step 15 & 16: Anchoring and Attachments

Column Anchoring Procedure

Drilling and securing column base plates to the concrete.

Approach Ramps and Tire Stops

Installing approach ramps and front tire stops on the lift.

Step 17 & 18: Leveling and Bleeding

Runway Leveling and Synchronization

Using a level to synchronize and level all four runways.

Hydraulic System Bleeding

Procedure for removing air from the hydraulic system.

Optional Equipment: Rolling Jacks

Integrated Air Line Kit Installation

Instructions for installing the air line kit for rolling jacks.

Optional Equipment: Utility Workstation

Utility Station Mounting and Wiring

Guidelines for installing and connecting the utility air-electric workstation.

Step 19: Operation Procedures

Vehicle Lifting Procedure

Steps for safely positioning and raising a vehicle on the lift.

Vehicle Lowering Procedure

Steps for safely lowering a vehicle and the lift.

Scheduled Maintenance

Routine weekly and monthly maintenance tasks for the lift.

Wire Rope Inspection and Maintenance

Lifting Cable Inspection

Visual inspection guidelines for lifting cables and sheave rollers.

Lifting Cable Replacement Criteria

Conditions requiring immediate replacement of lifting cables.

Wire Rope Care and Lift Capacity

Lifting Cable Lubrication

Recommendations for lubricating and maintaining wire rope.

Maximum Load Capacity

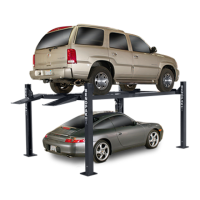
Lift's weight limits and proper vehicle loading for safety.

Safety Decal Information

Pictographic Safety Warnings

Understanding the meaning of safety pictographs on the lift.

Safe Lift Operation Practices

Operator Training Requirements

Essential training topics for safe and effective lift operation.

Vehicle Loading Safety

Key safety procedures for positioning and lifting vehicles.

Critical Lift Operation Prohibitions

Lift Operation Restrictions

Actions to avoid during lift operation to prevent accidents.

Troubleshooting: Lift Not Raising

Common Causes for No Lift

Identifying potential issues when the lift fails to raise.

Troubleshooting Remedies

Solutions for addressing lift raising problems.

Troubleshooting: Motor and Lowering Issues

Motor Failure Diagnosis

Causes and solutions for a non-operational motor.

Slow or Failed Lowering

Troubleshooting issues related to the lift lowering slowly.

Troubleshooting: Loaded Lift Issues

Causes for Loaded Lift Failure

Identifying why a loaded lift may not operate correctly.

Remedies for Loaded Lift Issues

Steps to resolve problems with a loaded lift.

Troubleshooting: Lift Stability

Causes for Lift Instability

Reasons why the lift may not stay in position.

Solutions for Lift Instability

Fixes for a lift that fails to maintain its height.

Main Parts List and Identification

Key Component Breakdown

List of primary lift parts with part numbers.

Runway Component List

Runway Parts Identification

Detailed parts list for the lift runways.

Crosstube Component List

Crosstube Parts Identification

List of parts specific to the crosstube assembly.

Air Valve Component List

Air Valve Parts Identification

List of components for the air valve system.

Installation Documentation

Pre-Installation Agreement Form

Agreement to be completed before lift installation commences.

Post-Installation Checklist

Verification checklist for completed installation tasks.

Optional Equipment: Rolling Jacks

Rolling Jack Specifications

Details on lifting capacity and dimensions for rolling bridge jacks.

Related product manuals