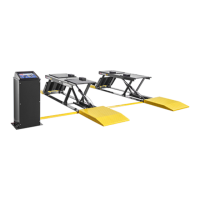
P-9000LT/F Low-Rise Pit Lift 23 P/N 5900022 — Rev. B — Nov. 2019
To assemble the Console and attach the Power Unit:
1. Select a site for the Console that permits Operators to have a full, unobstructed view of the Lift.
If you are going to use the included Hydraulic Hoses, the Console can go on either side of the Lift
(on the end of the Lift with the Hydraulic Cylinders), up to 30 inches away from the closest side.
2. Arrange all of the Console components near where you are going to put it together.
3. Put the Grommets into place in the Grommet Holes on the bottom of the Left and Right Sides.
4. Put the Left Side on the left and the Right Side on the right, then attach both of them to the Back;
make sure to orient the Back so that the
Power Unit Plate is on the inside
.
The Back attaches on the outside of the two sides.
Do not attach the Nuts at the top of the sides or the Back at this point; these will be attached later
when you are ready to attach the cover of the Console.
5. Remove the Power Unit from its packing material.
6. Using the supplied Nuts and Bolts, attach the Power Unit to the Power Unit Plate on the inside
Back of the Console.
Important: Do
not
make any of the
connections
to the Power Unit at this point.
7. Attach the Front of the Console, then the Cover.
Important: All of the components of the Console are now in place, but they are not all
connected. To make connections to the Power Unit, remove both the Console
Cover and the Front. Making these connections is described later.
8. If you are ready to anchor the Console, find the holes in the bottoms of the two sides (
on the
inside
) . The Anchor Bolts go into these holes.
9. Using the holes as a guide, drill two holes 3/8" wide by 2.5" deep into the Concrete.
Go in straight; do not let the drill wobble. Use a carbide bit (conforming to ANSI B212.15).
10. Remove all dust from the holes.
Use a wire brush, vacuum, hand pump, or compressed air. Do
not
ream the hole. Do
not
make
the hole any wider than the drill bit made it.
11. Insert an Anchor Bolt with Washer into each hole, then tap it down into the hole.
12. Turn the Anchor Bolt
clockwise
to the recommended installation torque, 50 – 65 pound feet,
using a Torque Wrench.