MASTERING YOUR BERNINA
®
1/04/02 700D/800DL/15
BERNINA
®
700D/800DL
MASTERING
YOUR
BERNINA
®
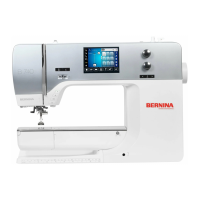
SECURING SERGED SEAMS
Fabric: Medium weight cotton, 4” x 6”
Needle: 80/12 Universal
Thread: 4 cones of serger thread
Presser Foot: Standard
• Owner’s manual pg.___
• Thread the serger for a 4-thread overlock stitch.
• Fine tune the tensions for a balanced overlock stitch (3-5).
Note: If you are using a Wavy Rotary Cutter or Pinking Shears to trim the samples, do all trimming
before beginning to sew this sample.
• Fold the fabric in half to 2” x “6” and place the fabric under the presser foot.
• Take 2-3 stitches on the fabric. Lower the needles into the fabric.
• Raise the presser foot and with your left hand gently pull the thread chain around the needles to
the knife.
• Lower the presser foot and continue serging (cutting off the excess thread chain) until you are one (1)
stitch off the end of the fabric.
• Locate the rolled hem lever on the right side of the cloth plate; pull it towards you, releasing the thread
chain from the stitch finger.
• Raise the presser foot and carefully flip the fabric over so that the lower looper side of the previously
serged seam will be overstitched.
• Place the fabric under the presser foot so that the first stitch will enter the fabric when you begin stitching.
• Slide the rolled hem lever towards the body of the serger.
• Serge for about 1”, overstitching the previous stitching. Guide the fabric so as not to cut the previous
stitching. Option: Rotate the upper knife up.
• Raise the toe of the presser foot and rotate the fabric 90° clockwise.
• Serge off the edge of the fabric.
• If the upper knife is up, rotate it down into the cutting position.
• Trim and mount the sample