Rev 9 2022
27
Maintenance & Repair Thermostat Replacement
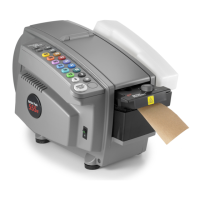
12. Remove the knob (5/16” nut driver)
13. Remove the brass washer
a. Do not lose it will be used again
later
14. Flip the heater over
15. Remove the 3 Philips screws holding the heater
together
16. Remove the plasc washers
a. Do not lose they will be used again
17. Remove the slip on electrical connectors from
the thermostat
18. Remove the nut holding the thermostat on
19. Discard the old thermostat
20. Place new thermostat
21. Replace the nut
22. Replace the electrical connectors
23. Reinstall the black cover with the 3 plasc
washers and screws
24. Flip the heater over
25. Replace the brass washer
26. Replace the heater knob (5/16” driver)
27. Replace the heater knob cover
28. Place the lower heater plate in place on the new
heater assembly
29. Reinsert the heater retainer sha making sure it
passes through both heater and lower heater plate
30. Oponal recommendaon replace the blade
oiler (page XX)
31. Replace the retainer bracket
32. Tighten the bracket locking the sha in place
33. Plug the new heater into the corresponding spot
on the controller board
34. Use wire es to keep heater wires in place
35. Replace the right cover (5 Philips screws)
36. On le cover plug keypad ribbons back into
controller board
37. Be sure not to miss any pins as this will eect the
length selected
38. Reinstall le cover be sure not to pinch or drive a
screw through the keypad ribbons.
39. Replace water tank, brushes, and water bole
Connued