English–91 609 929 J73 • (06.03) PS
Mounting the Table Extension
(see Figure
)
For the mounting, use the "table extension" attach$
ment set 40 (2 guide rods, 2 bolts for securing, 2 clips).
Slide the threaded drilling ends of the two guide rods
to the stop into the drillings provided on the table ex$
tension 2.
Screw the rubber bumper 39 onto the table extension.
Then slide the two guide rods of the table extension
into the holders provided under the saw table.
Insert the clips for fastening into the drillings of the
guide rods.
Screw the screws for securing against pulling out into
the threads provided.
Mounting the Parallel Fence
(see Figure )
The parallel fence 7 can be positioned on the left or
right of the saw blade.
Loosen the clamping handle 41 of the parallel fence 7.
This releases the locking mechanism.
Slide the parallel fence as straight as possible from the
side into the guide 21 and the guide groove 15 of the
saw table.
The parallel fence can then be slid to any position. To
lock the parallel fence, retighten the clamping handle
41.
Mounting the Table Insert
(see Figure )
Hook the insert plate 3 into the intended cut$out 42.
Then press the insert plate downward until the spring
43 engages.
The front end of the table insert must be flush or just
below the table surface, the rear end flush or slightly
above the table surface.
To set to the correct level, use the four adjustment
screws 44.
Mounting the Angle Guide
Insert the rail 45 of the angle guide 16 into one of the
guide groove 20 provided on the saw table.
(see Figure )
The position of the angle guide in the left guide groove
can be locked by turning the locking knob 46.
In the right guide groove, the angle guide cannot be
locked.
For better placement of the work piece, the angle
guide must be widened with the auxiliary parallel fence
48.
Mount the auxiliary parallel fence of aluminium with the
attachment set 49 provided onto the angle guide (see
Figure ). As required, the auxiliary parallel fence of
black plastic that is included can also be used.
Take care that the auxiliary parallel fence rests com$
pletely on the saw table.
The distance between the saw blade and the auxiliary
parallel fence can be a maximum of 15 mm.
Mounting the Auxiliary Parallel Fence
(see Figure )
When sawing small work pieces and vertical mi>
tre angles:
Slide the profile rail 50 into the groove on the short side
of the auxiliary parallel fence 48.
Position the profile rail in front of the parallel fence 7 so
that the drilling on both parts match.
Slide the attachment screws 51 through the drillings
on the side of the parallel fence and tighten.
When sawing high work pieces:
Attach the auxiliary parallel fence 48 with the aid of the
enclosed attachment set 49 vertically on the parallel
fence 7.
Stationary Mounting
To ensure safe handling, the power tool
must be mounted on a flat and stabile
working surface (e.g., workbench).
Mounting without the Table Stand
(
see Figure
)
Attach the power tool with suitable screw fasteners to
the working surface. The holes 19 serve for this pur$
pose.
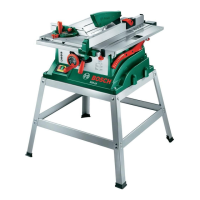
Mounting with the Table Stand
(
see Figure
)
Use the "Table Stand" attachment set 52 for mounting
(24 screws with nuts for assembly, 4 screws with nuts
for attachment to the power tool, 4 washers).
Screw together the table stand 53. Tighten the screws
firmly.
Attach the power tool to the support surface of the ta$
ble stand. The drillings 19 on the power tool as well as
the elongated holes in the table stand serve for this
purpose.
e
f
g
h
i
j
k
l
PTS10_WEU.book Seite 9 Donnerstag, 23. März 2006 11:47 11
 Loading...