3-63
Confidential
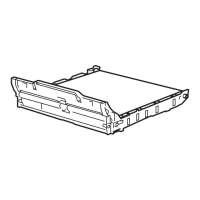
9.18 Main PCB ASSY
(1) Disconnect the twenty two Connectors (CN2, CN3, CN4, CN7, CN8, CN9, CN10, CN11,
CN12, CN13, CN14, CN21, CN28, CN30, CN31, CN32, CN33, CN36, CN37, CN38,
CN39 and CN41) and three Flat cables (CN1, CN17 and CN27) from the Main PCB
ASSY.
Fig. 3-72
Note: Backup of machine information
Before starting disassembly work, back up the machine information and user setting
information. (Refer to “1.3.11 Backup of machine information (Function code 41)” in
Chapter 5.) After replacing the PCB, restore the backup data to a new PCB.
Note:
- After disconnecting flat cables, check that each cable is not damaged at its end or
short-circuited.
- When connecting flat cables, do not insert them at an angle. After insertion, check
that the cables are not at an angle.
CN2
CN3
CN4
CN7
CN8
CN9
CN10
CN11
CN12
CN13
CN14
CN41
CN18
CN21
CN23CN28
CN30
CN31
CN32
CN33
CN36
CN37
CN38
CN39
CN40
CN1
CN17
CN27
CN5
CN6
Main PCB ASSY

 Loading...