10
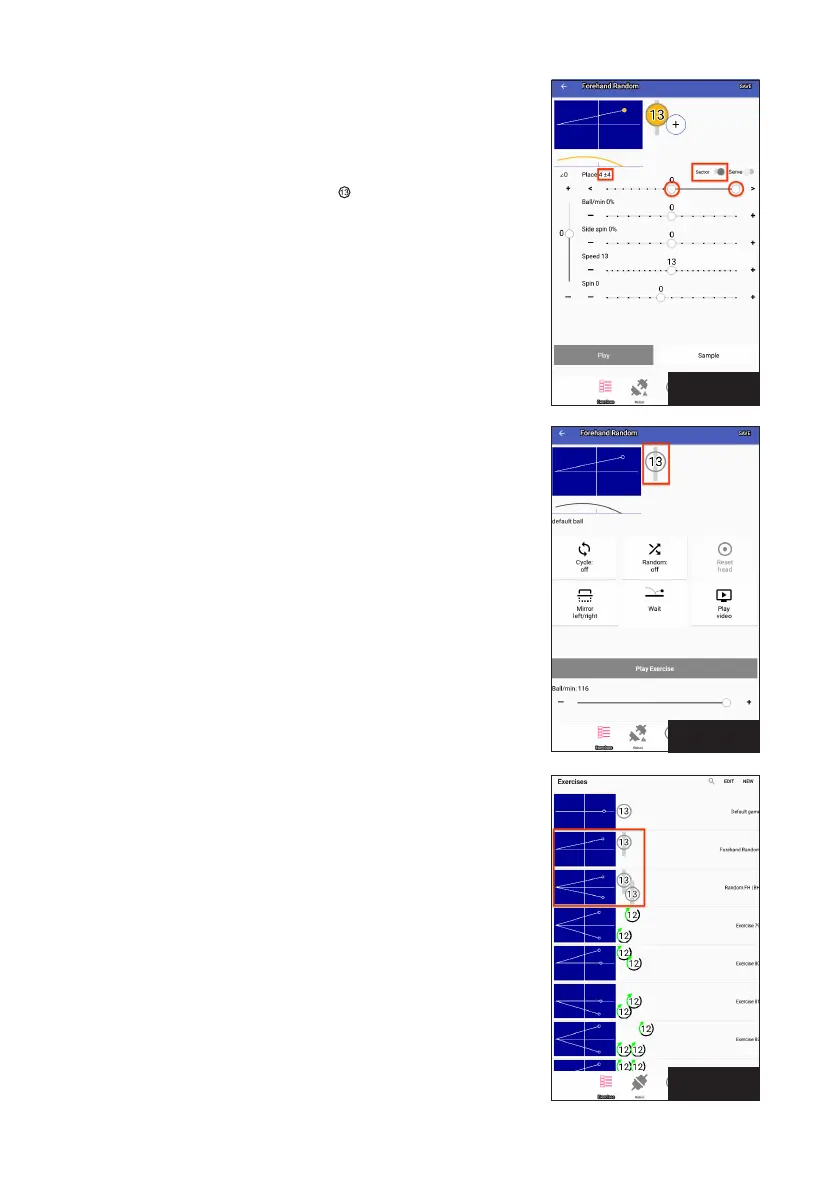
In Photo 11, the range has been set to 4 ±4, which results in that
ball being thrown randomly anywhere between Placements 0 and 8.
As the buttons are moved back and forth, the Place setting (given
directly underneath the side view diagram) changes accordingly.
When Sector is turned on, the ball icon
has a gray line running
through it (Photo 12). Its length provides an approximate width of
the range. You also see the gray line in the Exercise List (Photo 13):
IMPORTANT: Sector overrides Random Scatter and Random Place
functions (explained in Exercise Screens, page 11). If any ball in
an exercise uses Sector, the Random Scatter and Random Place
functions won’t work until Sector is turned off.
The Sector range must be set in increments of 2 units because it is
given as equal plus and minus values from a midpoint. For example,
you cannot select a range from 0-7. You would need to select 0-8
(4 ±4), 0-6 (3 ±3), or 1-7 (4 ±3).
The Serve switch can be used on the first 3 balls of an exercise.
When switched on, it introduces a 1.5 second delay before that ball.
This simulates the normal pause that occurs before the serve in an
actual game. If more than one Ball is designated as a Serve, then
the robot automatically picks one of those Balls and starts the Ex-
ercise with that Ball. Balls designated as Serves are coloured pink.
For example, let’s say Ball 1 is thrown to the backhand, Ball 2 is
thrown to the center, and Ball 3 is thrown to the forehand. All
3 balls are designated as Serves. For the 1
st
repetition of that
exercise, there is a 1.5 second delay, Ball 1 is served to start the
exercise, and then that Serve is followed by all other programmed
balls not designated as Serves. The 2
nd
repetition will also have a
1.5 second delay, then start with Ball 2, and followed by all other
balls not designated as Serves. The 3
rd
repetition will follow a
similar pattern except its serve will be Ball 3. The 4
th
repetition uses
Ball 1 as the serve. However, if Type RND is turned on, the serve is
selected at random to start each repetition of the exercise instead
of following the exact order as just described.
Underneath all the sliders are 2 buttons, Play and Sample. To test
your settings for a ball, tap Sample. It changes to Stop Sample
and samples of the Current Ball are repeatedly thrown at the rate
determined by the Ball/min setting. When you finish sampling the
Current Ball, touch Stop Sample. Repeat until the Current Ball is to
your liking. Use Sample to throw only the Current Ball.
When you touch Play, you are switched to the Stop Exercise
screen. Balls are thrown out in order from Ball 1 to however many
Balls are in that exercise (unless Place Random is selected.) Use
Play to throw all balls in an exercise.
Photo 12
Photo 13
Photo 11