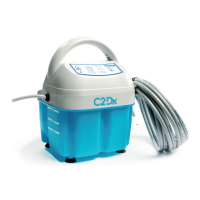
Reservoir
Tools required:
• #2 Phillips screwdriver
Procedure:
1. Unplug the product.
2. Drain the water out of the reservoir.
3. Using a #2 Phillips screwdriver, remove and save the 9 screws that secure the tray to the reservoir. P/N 90018082 (x4)
P/N 90018075 (x5). Save the screws and the tray assembly.
Keep the upper housing with the tray. The upper housing has wires that connect the two parts.
4. Reverse steps to reinstall.
5. Verify proper operation before returning the product to service.
Upper front and rear housing
Tools required:
• #2 Phillips screwdriver
Procedure:
1. Unplug the product.
2. Drain the water out of the reservoir.
3. Using a #2 Phillips screwdriver, remove and save the 9 screws that secure the tray to the reservoir. P/N 90018082 (x4)
P/N 90018075 (x5). Save the screws and the tray assembly.
4. Using a #2 Phillips screwdriver, remove the four screws from the back of the upper housing handle. Save the screws.
5. Remove and discard the upper or rear front housing assembly.
6. Reverse steps to reinstall.
7. Verify proper operation before returning the product to service.
PC Board
Tools required:
• #2 Phillips screwdriver
Procedure:
1. Using ESD Protection, Unplug the product.
2. Drain the water out of the reservoir.
3. Using a #2 Phillips screwdriver, remove and save the 9 screws that secure the tray to the reservoir. P/N 90018082 (x4)
P/N 90018075 (x5). Save the screws and the tray assembly.
4. Using a #2 Phillips screwdriver, remove the four screws from the back of the upper housing handle. Save the screws and
upper housing handle.
5. Lift the Upper Front Housing from the Tray assembly.
6. Remove the Keypad Ribbon cable (Figure 5 on page 25, item 10) from the PC Board (Figure 5 on page 25, item 1).
7. Remove the Temperature Sensor (Figure 5 on page 25, item 8) from the PC Board.
8. Remove the six wires from the PC Board.
9. Remove the three screws from the PC Board.
10. Remove and discard the PC Board.
101176 Rev 1
Service
26 c2dx.com