25
A total of 50 Security+ 2.0
®
remote controls or KPW250 keypads and 2
keyless entries (1 PIN for each keyless entry) can be programmed to the
operator. When programming a third keyless entry to the operator, the
first keyless entry will be erased to allow the third keyless entry to be
programmed. When the operator’s memory is full it will exit the
programming mode and the remote control will not be programmed. The
memory will need to be erased before programming any additional
remote controls. NOTE: If installing an 86LM to extend the range of the
remote controls DO NOT straighten the antenna.
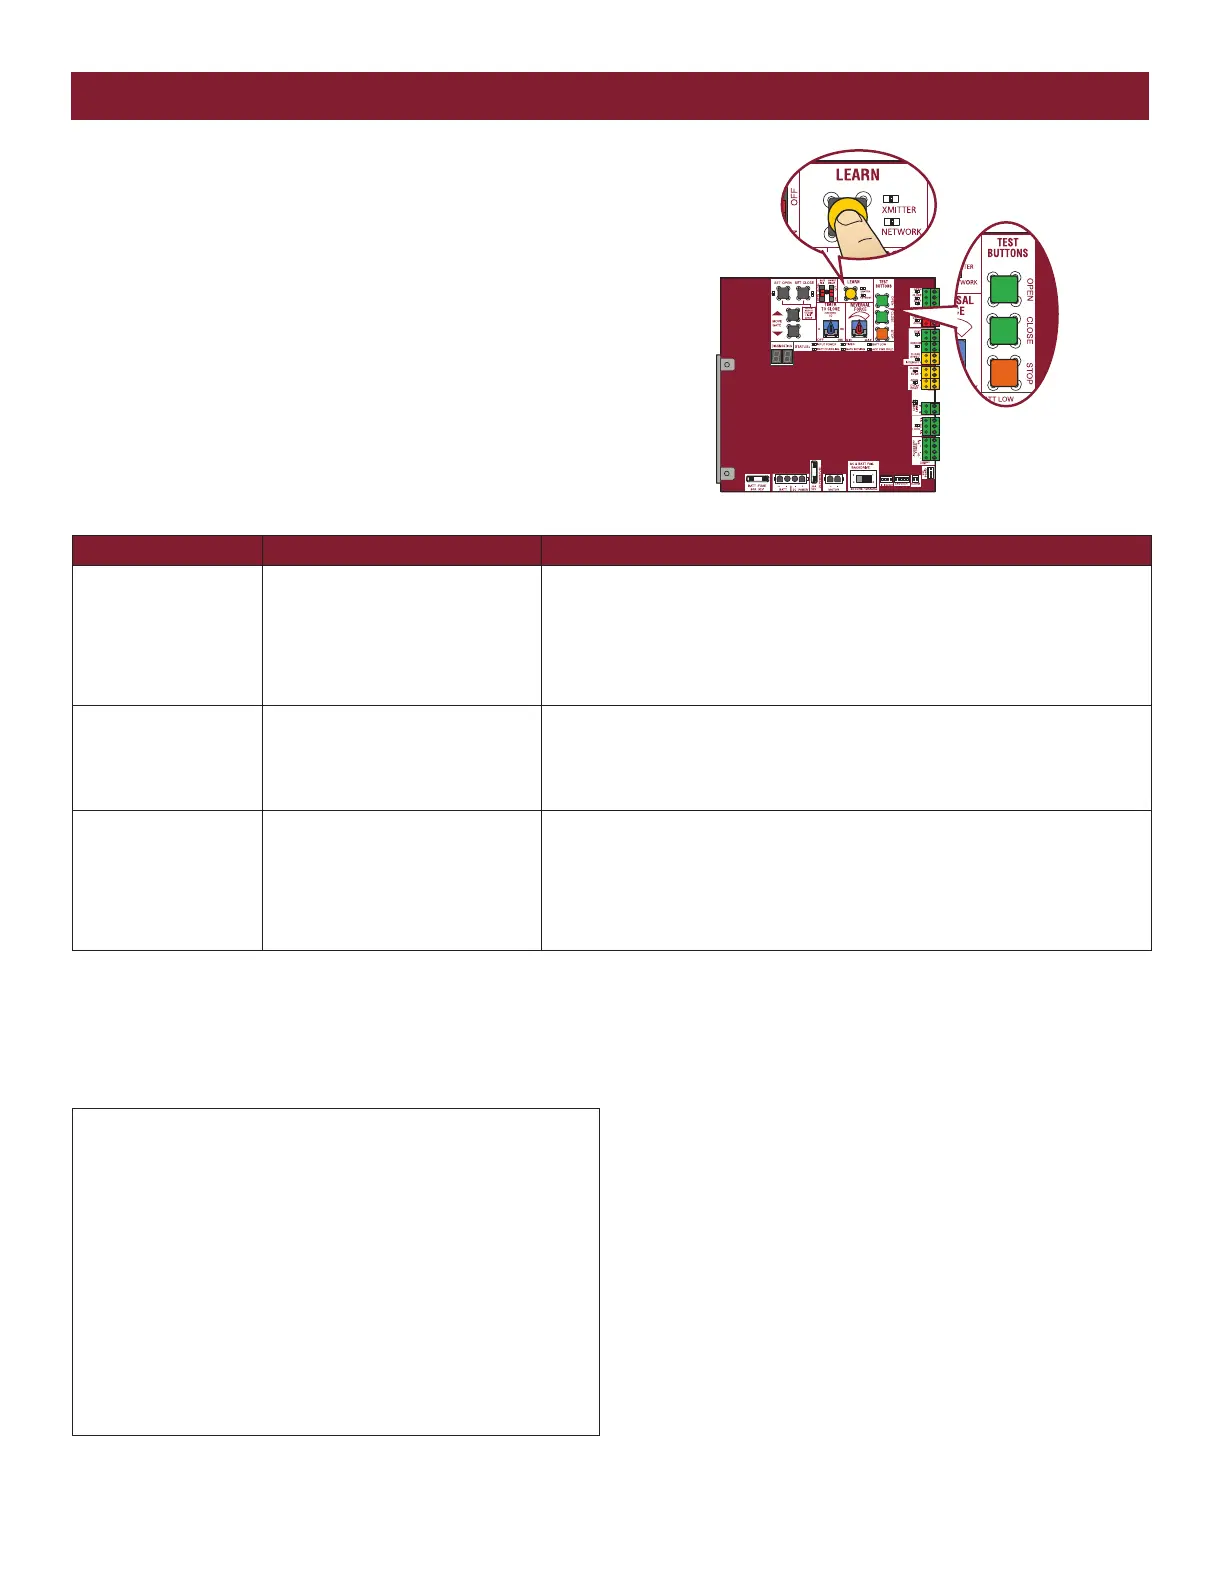
There are 3 different options for programming the remote control
depending on how you would like the remote control to function.
Choose a programming option:
The operator will automatically exit learn mode (operator will beep and
green XMITTER LED will go out) if programming is successful. To
program additional Security+ 2.0
®
remote controls or remote control
buttons, repeat the programming steps above.
OPTION DESCRIPTION PROGRAMMING STEPS
Single button as OPEN
only
Program a single button on the
remote control for open only. The
Timer-to-Close can be set to close
the gate.
1. Press and release the LEARN button (operator will beep and green XMITTER
LED will light). NOTE: The operator will time out of programming mode after 30
seconds.
2. Press the OPEN button.
3. Press the remote control button that you would like to program.
Single button (SBC) as
OPEN, CLOSE, and
STOP
Program one remote control button
as an open, close, and stop.
1. Press and release the LEARN button (operator will beep and green XMITTER
LED will light). NOTE: The operator will time out of programming mode after 30
seconds.
2. Press the remote control button that you would like to program.
Three separate buttons
as OPEN, CLOSE, and
STOP
Program each remote control button
as an open, close, and stop.
1. Press and release the LEARN button (operator will beep and green XMITTER
LED will light). NOTE: The operator will time out of programming mode after 30
seconds.
2. Press the OPEN, CLOSE, or STOP button, depending on the desired function.
3. Press the remote control button that you would like to program.
PROGRAMMING
REMOTE CONTROLS (NOT PROVIDED)
NOTICE: This device complies with Part 15 of the FCC rules and Industry Canada’s license-exempt RSSs.
Operation is subject to the following two conditions: (1) this device may not cause harmful interference,
and (2) this device must accept any interference received, including interference that may cause undesired
operation.
Any changes or modifi cations not expressly approved by the party responsible for compliance could void
the user’s authority to operate the equipment.
This device must be installed to ensure a minimum 20 cm (8 in.) distance is maintained between users/
bystanders and device.
This device has been tested and found to comply with the limits for a Class B digital device, pursuant
to part 15 of the FCC rules and Industry Canada ICES standard. These limits are designed to provide
reasonable protection against harmful interference in a residential installation. This equipment generates,
uses and can radiate radio frequency energy and, if not installed and used in accordance with the
instructions, may cause harmful interference to radio communications. However, there is no guarantee that
interference will not occur in a particular installation. If this equipment does cause harmful interference
to radio or television reception, which can be determined by turning the equipment off and on, the user is
encouraged to try to correct the interference by one or more of the following measures:
• Reorient or relocate the receiving antenna.
• Increase the separation between the equipment and receiver.
• Connect the equipment into an outlet on a circuit different from that to which the receiver is connected.
• Consult the dealer or an experienced radio/TV technician for help.