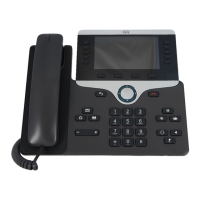
2
3
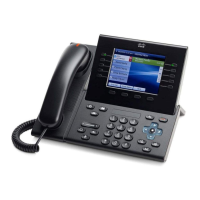
Softkey buttons
Allow you to access the softkey options – phone features (for the selected call
or menu item) displayed on your phone screen.
4
Back button
Returns to previous screen or menu.
5
Release button
Ends a connected call or session.
6
Navigation pad and Select
button
The four-way Navigation pad allows you to scroll through menus, highlight items, and
move within a text input field. The Select button (center of the Navigation pad) allows
you to select a highlighted item, disable the phone screen for cleaning, or enable the
phone screen if it is in power-save mode. The Select button is lit (white) when the
phone is in power-save mode.
7
Conference button
Creates a conference call.
8
Hold button
Places a connected call on hold.
9
Transfer button
Transfers a call.
10
Key pad
Allows you to dial phone numbers, enter letters, and choose menu items (by
entering the item number).
11
Speaker button
Selects the speakerphone as the default audio path and initiates a new call,
picks up an incoming call, or ends a call. During the call, the button is lit
green. The speakerphone audio path does not change until a new default audio
path is selected (for example by picking up the handset).
12
Mute button
Toggles the microphone on or off during a call. When the microphone is
muted, the button is lit red.
13
Headset button
Selects the wired headset as the default audio path and initiates a new call,
picks up and incoming call, or ends a call. During a call, the button is lit green.
A headset icon
in the phone screen header line indicates the headset is the
default audio path.
14
Volume button
Allows you to dial phone numbers, enter letters, and choose menu items.
15
Messages button
Auto-dials your voicemail system.
16
Applications button
Opens/closes the Applications menu. Depending on how your system
administrator sets up the phone, use it to access applications such as call
history, preferences, and phone information.
17
Contacts button
Opens/closes the Contacts menu. Depending on how your system
administrator sets up the phone, use it to access personal directory, corporate
directory, or call history.
18
Phone Display Can be positioned to your preferred viewing angle.
19
Programmable feature
buttons
Correspond to phone lines, speed dials, and calling features (example, Page
button, Call Pickup)
Press a button for a phone line displays the active calls for that line.
Color LEDs indicate the line state:
- Amber
Ringing call on this line
- Green
Active or held call on this line
- Red
Shared line in-use remotely
20
Handset with light strip
The handset light strip lights up to indicate a ringing call (flashing red) or a
new voice message (steady red)
 Loading...