24
P/N 192047138 Rev AA November 2017
3. Feed a short length of soft wire through the opening in the
chain guide/stripper until it comes out of the hoist. Attach
“new” chain to end of the wire which is in the center of the
hoist. Position the chain so that the welds will be down and
towards the liftwheel as shown above in Figure 26.
4. Jog the UP push button while pulling on the free end of wire
until the chain comes out of the hoist. Remove the wire and
attach the chain stop as shown in Figure 28. On units with
chain container, place chain stop and loose end of chain in
chain container. Attach chain container to chain guide.
5. On the 250, 300 and 500 lbs (single reeved), (113, 136 and 226
kg) units, remove the hook block from the old chain and attach
it to the new chain by reusing the chain pin. On the 500, 600
and 1000 lbs (226, 272 and 453 kg) units:
• Remove dead end plate from hoist.
• Remove dead end pin from the last link of chain and pull chain
out of dead end plate.
• Pull old chain out of hook block and disassemble the hook block.
• Make sure the new chain is not twisted and wrap the chain
around the sheave wheel with welds down and towards the
sheave wheel.
• Reassemble hook block and pull the new chain through the
hook block.
• Slide the dead end plate over the last link and secure it using the
dead end pin.
24
192047138 Rev AA November 2017
3. Feed a short length of soft wire through the opening in the
chain guide/stripper until it comes out of the hoist. Attach
“new” chain to end of the wire which is in the center of the
hoist. Position the chain so that the welds will be down and
towards the liftwheel as shown above in Figure 26.
4. Jog the UP push button while pulling on the free end of wire
until the chain comes out of the hoist. Remove the wire and
attach the chain stop as shown in Figure 28. On units with
chain container, place chain stop and loose end of chain in
chain container. Attach chain container to chain guide.
5. On the 250, 300 and 500 lbs (single reeved), (113, 136 and 226
kg) units, remove the hook block from the old chain and attach
it to the new chain by reusing the chain pin. On the 500, 600
and 1000 lbs (226, 272 and 453 kg) units:
• Remove dead end plate from hoist.
• Remove dead end pin from the last link of chain and pull chain
out of dead end plate.
• Pull old chain out of hook block and disassemble the hook block.
• Make sure the new chain is not twisted and wrap the chain
around the sheave wheel with welds down and towards the
sheave wheel.
• Reassemble hook block and pull the new chain through the
hook block.
• Slide the dead end plate over the last link and secure it using the
dead end pin.
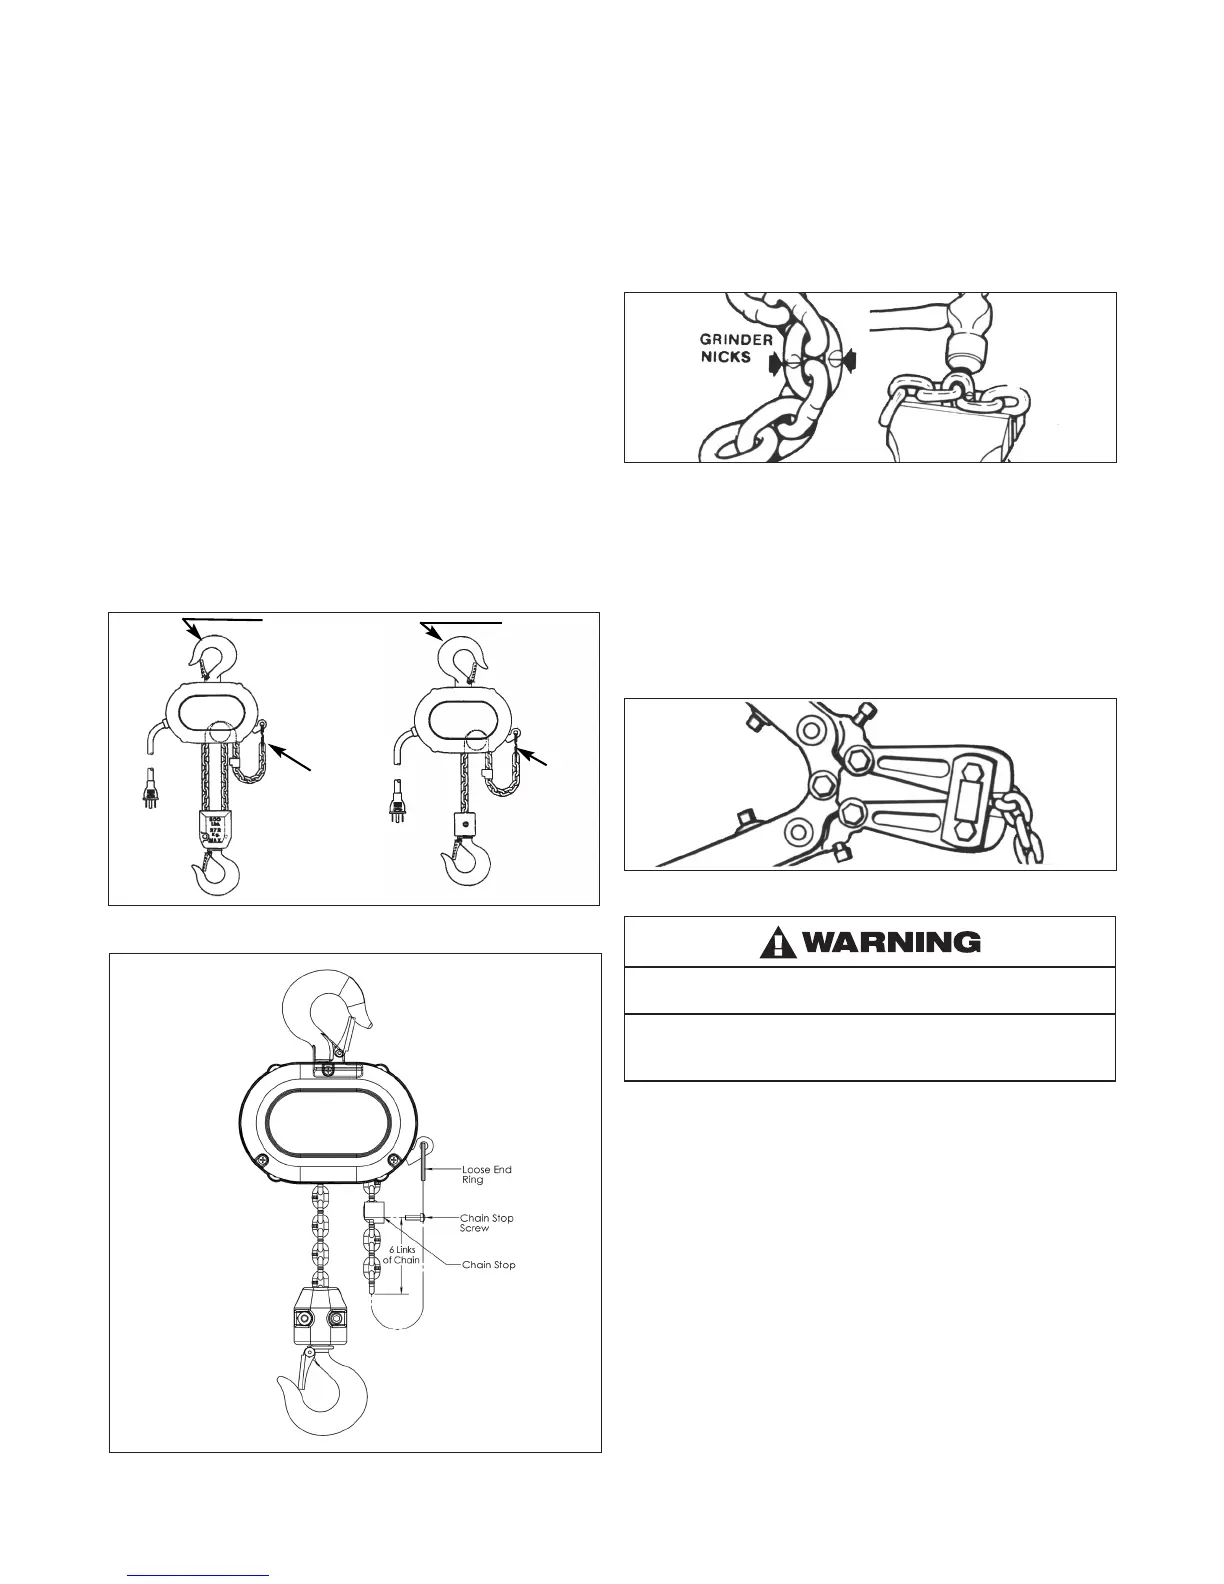
Figure 27 - Chaining Diagram
Figure 28 - Chain Stop
• Making sure the chain is not twisted between the hook block and
hoist, attach the dead end plate to the chain guide/stripper.
• Retrace the new chain and check for twists. If chain is twisted,
start over.
IMPORTANT: Do not use “old” chain for other purposes such as
lifting or pulling. Load chain may break suddenly without visual
deformation. For this reason, cut the “old” chain into short lengths
to prevent use after disposal.
CUTTING CHAIN
Figure 29 - Cutting Chain by Nicking
Hoistaloy® load chain ishardened and it is difcult to cut. The
following methods are recommended when cutting a length of
new chain from stock or cutting off worn chain. Always wear eye
protection when cutting chain.
1. Use a grinder and nick the link on both sides (see right), then
secure the link in a vise and break off with a hammer.
2. Use a 7” (177 mm) minimum diameter by 1/8” (3.1 mm) thick
abrasive wheel (or type recommended by wheel supplier) that
will clear adjacent links.
Figure 30 - Cutting Chain with a Bolt Cutter
Cutting chain can produce ying particles.
TO AVOID HEALTH PROBLEMS:
• Wear eye protection.
• Place a shield over chain to prevent ying objects.
3. Use a bolt cutter (see right) with special cutter jaws for cutting
hardened chain. Jaws should be 1 inch (25.4 mm) long.
TESTING
Before using, all altered, repaired or used hoists that have not been
operated for the previous 12 months must be tested by the user for
proper operation. First, test the unit without a load and then with a
light load of 50 pounds (23 kg) times the number of load supporting
parts of load chain to be sure that the hoist operates properly and
that the brake holds the load when control is released. Next test with
a load of *125% of rated capacity. In addition hoists in which load
sustaining parts have been replaced should be tested with *125% of
rated capacity by or under the direction of an appointed person and
written report prepared for record purposes. After this test, check
that the Protector functions. If the Protector permits lifting a load in
excess of 200% of rated load, it should be replaced.
*If the Protector prevents lifting of a load of 125% of rated capacity,
reduce load to rated capacity.
Hook Opening
Away From
Loose End
Loose
End
Hook
Opening
Towards
Loose End
Loose
End
ShopStar
ShopStar
Figure 27 - Chaining Diagram
Figure 28 - Chain Stop
• Making sure the chain is not twisted between the hook block and
hoist, attach the dead end plate to the chain guide/stripper.
• Retrace the new chain and check for twists. If chain is twisted,
start over.
IMPORTANT: Do not use “old” chain for other purposes such as
lifting or pulling. Load chain may break suddenly without visual
deformation. For this reason, cut the “old” chain into short lengths
to prevent use after disposal.
CUTTING CHAIN
Figure 29 - Cutting Chain by Nicking
Hoistaloy® load chain ishardened and it is difcult to cut. The
following methods are recommended when cutting a length of
new chain from stock or cutting off worn chain. Always wear eye
protection when cutting chain.
1. Use a grinder and nick the link on both sides (see right), then
secure the link in a vise and break off with a hammer.
2. Use a 7” (177 mm) minimum diameter by 1/8” (3.1 mm) thick
abrasive wheel (or type recommended by wheel supplier) that
will clear adjacent links.
Figure 30 - Cutting Chain with a Bolt Cutter
Cutting chain can produce ying particles.
TO AVOID HEALTH PROBLEMS:
• Wear eye protection.
• Place a shield over chain to prevent ying objects.
3. Use a bolt cutter (see right) with special cutter jaws for cutting
hardened chain. Jaws should be 1 inch (25.4 mm) long.
TESTING
Before using, all altered, repaired or used hoists that have not been
operated for the previous 12 months must be tested by the user for
proper operation. First, test the unit without a load and then with a
light load of 50 pounds (23 kg) times the number of load supporting
parts of load chain to be sure that the hoist operates properly and
that the brake holds the load when control is released. Next test with
a load of *125% of rated capacity. In addition hoists in which load
sustaining parts have been replaced should be tested with *125% of
rated capacity by or under the direction of an appointed person and
written report prepared for record purposes. After this test, check
that the Protector functions. If the Protector permits lifting a load in
excess of 200% of rated load, it should be replaced.
*If the Protector prevents lifting of a load of 125% of rated capacity,
reduce load to rated capacity.