14
Installing the main unit
* This manual explains the installation procedure using an installation to a windshield
as an example.
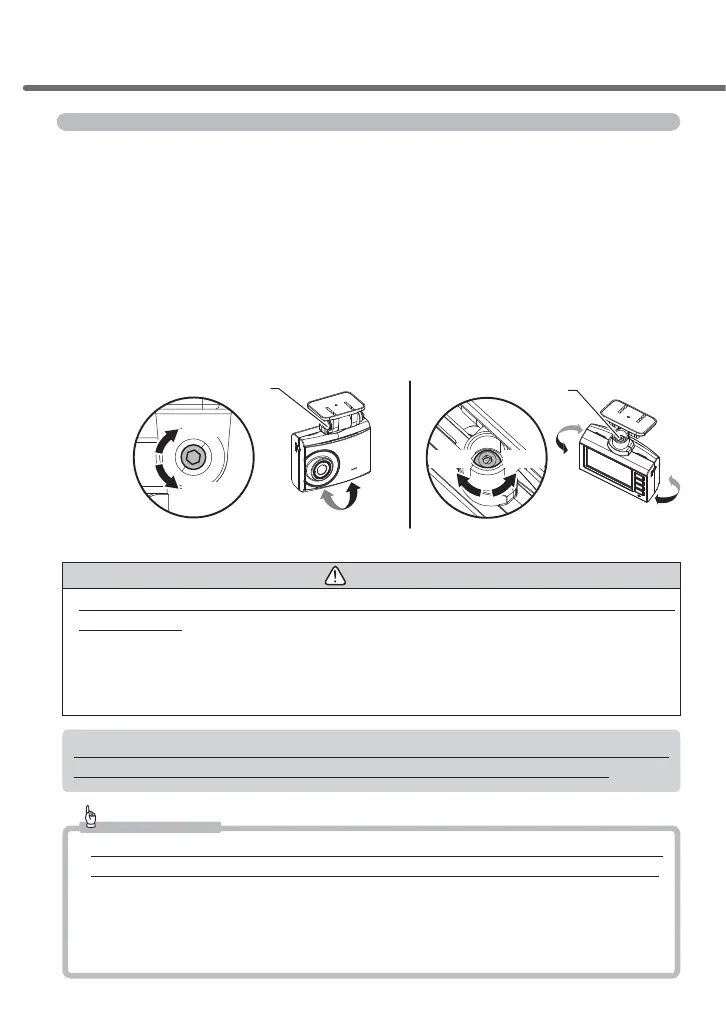
7HPSRUDULO\¿[WKHSURGXFWZLWKWKHVWD\DQJOHDGMXVWLQJVFUHZORRVHQHG
and then adjust the installation angle of the main unit. Tighten the
screw with the attached hexagonal wrench after adjustment.
・
Temporarily attach the stay of the main unit to the windshield, and adjust the
angle to make the main unit perpendicular to the ground surface by checking the
video footage on the LCD.
・
To make adjusting the angle easier, adjust the angle before sticking the mounting
stay to the windshield.
Angle adjustment screw
ngle adjustment screw
■Horizontal adjustment■Backward and forward adjustment
Tighten
Loosen
Tighten
Loosen
Caution
• Be sure to adjust the angle with the angle adjusting screw loosened. Failure to do so may
cause damage.
• Make sure you tighten the angle adjusting screw after adjusting the angle. Loose screws
may detach while the vehicle is running.
• Be aware that overtightened stay angle adjusting screws may cause damage.
• Periodically check that there is no loosened screws.
%HDZDUHWKDWDGMXVWLQJWKHDQJOHZLWKWKHSRZHUVRXUFHFRQQHFWHGPD\FDXVHDFFLGHQWDO
recording of the video footage by detection of impacts or by pressing the switch.
Advice
• If the display on the LCD disappears owing to the settings of the screen display, shortly
pressing the [Menu/Return] switch allows the LCD to turn on for 30 seconds. (=> P 53)
• If the recorded video footage is dark, change the settings of the camera brightness ad-
justment or adjust the angle of the product to move it slightly downward.
• Since touching the camera lens causes the lens to become foggy which results in to
out-of-focus video footage, be careful not to touch the lens when installing the product.
Installation method