This document is an installation manual for the Cornelius KIT BASE UNIT ED175, a component designed to enhance beverage dispensing units, specifically for adding flavor shots. The manual, identified by Publication Number 629097525INS and released on July 08, 2016, with Revision A, provides detailed instructions for the installation, electrical hook-up, testing, and start-up of the unit, particularly focusing on its integration into existing Cornelius beverage dispensers.
Function Description:
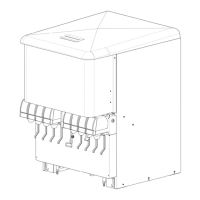
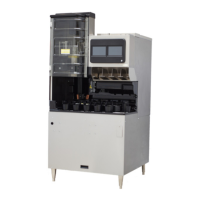
The KIT BASE UNIT ED175 serves as an upgrade or conversion kit for Cornelius beverage dispensers, enabling the addition of flavor shot capabilities. It integrates a flavor shot control board, solenoid valves, and associated plumbing and electrical components to allow users to select and dispense flavor shots into their beverages. The unit is designed to be installed into an existing dispenser, converting a standard unit into one capable of offering flavored drinks. The installation process involves removing dummy merchandiser components, installing new electrical and plumbing harnesses, and integrating a flavor shot control board and keypad. The system is designed to work with Bag-in-Box (BiB) syrup systems, delivering a precise dose of flavor based on cup size selection.
Important Technical Specifications:
- Flavor Shot Timing: The manual specifies a default flavor shot dispense time of 1 second.
- Flow Rate: The system is calibrated for a flavor shot flow rate of 0.3 Oz/sec (9 ml or 9 gm).
- BiB Pressure: Optimal Bag-in-Box (BiB) pressure for the flavor shot system is between 30 to 45 psig.
- Electrical Requirements: The unit requires a 24-volt power supply for the PC board. The electrical hook-up involves connecting a 2-pin connector on the power harness to the control board and routing low voltage harnesses through a grommet in the electrical box. Line voltage of the power supply connects to a terminal block. High and low voltage wires must be separated by at least 8mm.
- Dosing Instructions: The system supports variable dosing based on cup size:
- 1 press for 12-24 Ounces
- 2 presses for 25-48 Ounces
- 3 presses for 49-72 Ounces
- Components: Key components include a sensor bracket assembly, door switch bracket assembly, 1/8" rivets for installation, a flavor shot control board, solenoid valves, and an LED backlight assembly.
- Wiring: The wiring schematic (Figure 9) illustrates connections for the transformer, keyswitch, power harness, and beverage valves, indicating YEL (Yellow), BLK (Black), and WHT (White) wire colors.
Usage Features:
- Flavor Shot Selection: The unit features a keypad with buttons (1, 2, 3, 4) corresponding to different flavor shot options. The top left button corresponds to hook-up 1, with subsequent buttons following right to left down for 2, 3, and 4.
- Customizable Dosing: Users can select the appropriate number of presses on the keypad to dispense a flavor shot quantity suitable for their cup size, ensuring consistent flavor delivery.
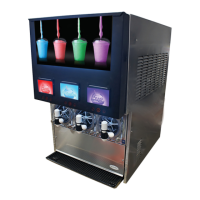
- Merchandiser Integration: The kit is designed to integrate seamlessly with a new merchandiser, which will display the flavor shot options and branding (e.g., "MIX IT UP WITH FLAVOR SHOTS" with Pepsi branding shown in Figure 22).
- ADA Keypad Compatibility: The installation process includes fitting and plugging an ADA (Americans with Disabilities Act) compliant keypad into the control module, enhancing accessibility.
Maintenance Features:
- Troubleshooting Guide: The manual includes a troubleshooting section to address common issues such as "Flavor Syrups Do Not Dispense," "Flavor Dispenses For More Than 1 Sec," and "Flavor Dispenses More Than .5 Oz." This section helps identify potential problems like lack of 24-volt power, CO2 pressure issues, empty syrup tanks, kinked tubing, clogged nozzles, or defective components (PC board, harnesses, flow control, keypad, dip switch settings).
- Qualified Service Personnel: The manual explicitly states that only trained and certified electrical, plumbing, and refrigeration technicians should service the unit, emphasizing adherence to national and local codes to prevent injury, death, or equipment damage.
- Pre-Service Disconnection: Before any servicing, it is mandatory to disconnect electrical power and turn off the primary regulator on the CO2 tank, following all lock-out/tag-out procedures.
- Sanitization: Prior to operation, the Shots & Renew units must be sanitized, with reference to operator's manual 620062762OPR for the procedure.
- Shipping and Storage: Before shipping, storing, or relocating the unit, it must be sanitized, and all sanitizing solution and water must be drained to prevent freezing damage in ambient environments.
- Component Accessibility: The installation process involves removing baffles and metal covers to access internal components for wiring and solenoid valve installation, indicating that these areas are accessible for maintenance.
- Wire Management: The instructions emphasize neat wire management using cable ties and securing harnesses to prevent damage and ensure proper operation.
- Leak Checks: During start-up, it is crucial to check for leaks at syrup connections, elbow fittings, and inner nozzle connections to ensure system integrity.