EasyManua.ls Logo

Cornelius SPIRE 4.2 User Manual

Cornelius SPIRE 4.2
14 pages
To Next Page IconTo Next Page
Page #1 background imageLoading...
Page #1 background image
Manual Installation Conversion Kit 4.1 To 4.2
©2019, Cornelius Inc. - 1 - Publication Number: 629097805INS
MANUAL INSTALLATION CONVERSION KIT
SPIRE 4.1 TO 4.2
SAFETY OVERVIEW
• Read and follow ALL SAFETY INSTRUCTIONS in this manual and any warning/caution labels on the unit
(decals, labels or laminated cards).
• Read and understand ALL applicable OSHA (Occupational Safety and Health Administration) safety regula-
tions before operating this unit.
SAFETY ALERT SYMBOL
Types of Alerts
SAFETY TIPS
Carefully read and follow all safety messages in this manual and safety signs on the unit.
Keep safety signs in good condition and replace missing or damaged items.
Learn how to operate the unit and how to use the controls.
Do not let anyone operate the unit without proper training. This appliance is not intended for use by very
young children or infirm persons without supervision. Young children should be supervised to ensure that
they do not play with the appliance.
Keep your unit in proper working condition and do not allow unauthorized modifications to the unit.
Safety Instructions
!
WARNING:
Before starting installation, read and understand all safety label and warnings on the machine. Also review and
understand all safety instructions in the owners, installation and service manuals.
Failure to comply could result in serious injury, death or damage to the equipment.
This is the safety alert symbol. When you see this in the manual or on the unit, be alert to the
potential of personal injury or damage to the unit.
!
DANGER:
Indicates an immediate hazardous situation which if not avoided WILL result in serious
injury, death or equipment damage.
!
WARNING:
Indicates a potentially hazardous situation which, if not avoided, COULD result in serious
injury, death, or equipment damage.
CAUTION:
!
Indicates a potentially hazardous situation which, if not avoided, MAY result in minor or
moderate injury or equipment damage.
!
Revision Date: June 7, 2019 www.cornelius.com Revision: B
Question and Answer IconNeed help?

Do you have a question about the Cornelius SPIRE 4.2 and is the answer not in the manual?

Cornelius SPIRE 4.2 Specifications

General IconGeneral
BrandCornelius
ModelSPIRE 4.2
CategoryDispenser
LanguageEnglish

Summary

Safety Overview and Instructions

Safety Overview

General instructions to read and follow all safety instructions and applicable OSHA regulations.

Safety Alert Symbol

Explanation of the safety alert symbol and its meaning regarding potential injury or damage.

Types of Alerts

Definitions for Danger, Warning, and Caution alerts indicating hazard severity and potential outcomes.

Safety Tips

Guidelines for safe operation, including reading messages, maintaining signs, and proper training.

General Safety Instructions

Mandatory safety reading before installation, covering labels, manuals, and potential consequences.

Service Personnel and Precautions

Qualified Service Personnel

Requirement for trained and certified technicians for unit servicing, adhering to codes.

Safety Precautions

Essential precautions before servicing: disconnect power, lockout/tagout, and maintain a clean area.

Installation Instructions

Kit Part List and Tools Required

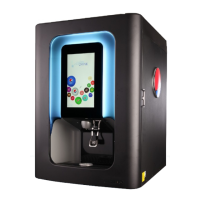
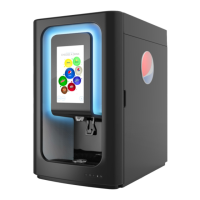
Lists all components included in the conversion kit and the necessary tools for installation.

Initial Shutdown and Power Disconnection

Step 1-2: Shut down the unit per procedure and unplug from AC power source.

Power Cord and Panel Modification

Step 3-4: Attach ferrite to power cord and remove translucent door service panel.

Display Connections and Ebox Cover Removal

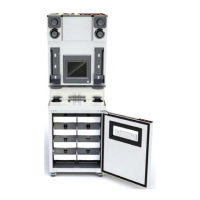
Step 5-6: Unplug display connections and remove the ebox cover.

MFV Board Replacement and Wire Management

Step 7-10: Replace MFV board, remove wire clips, and extract specific cables.

Circuit Breaker and Cable Clip Installation

Step 12-13: Install new circuit breaker bracket and cable clips using provided hardware.

Circuit Breaker Wiring and Wire Bundling

Step 14-16: Wire the circuit breaker and bundle various cables using wire ties.

Display Assembly Removal and Disassembly

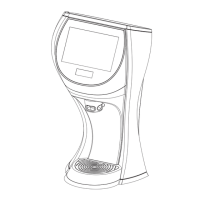
Step 17-19: Remove NUC panel and display assembly, placing it aside for lens/lighting work.

Lens/Lighting Reassembly and Mounting

Step 20-21: Remove old lens/lighting, reassemble with new parts, and route lighting harness.

New Display Assembly Mounting and Bracket Installation

Step 22-23: Mount new display assembly and install LX3 mounting bracket on the door.

Harness Connections to Terminal Block

Step 24: Connect display power harness and cove lighting harness to the terminal block.

Ground Bond Jumper Installation

Step 25-26: Attach ground bond jumpers from LX3 plate to display and ebox ground.

LTE Antenna Installation

Step 27: Install two adhesive LTE antennas and secure their cables using supplied clips.

Old Modem Antenna Cable and ADA Cable Routing

Step 28-29: Secure old modem cable and route the new ADA cable with ferrite.

Final Connections and Cable Bundling

Step 30: Make final connections to the display and bundle all cables neatly.

Final Assembly and Power Up

Step 31-33: Install service panel, ebox cover, wiring diagram, and power up the unit.

Related product manuals