Do you have a question about the Cornelius pbd175 and is the answer not in the manual?
Covers general safety instructions, alert symbols, and how to recognize them.
Provides safety tips for operation and defines requirements for qualified service personnel.
Details precautions for servicing, shipping, storage, CO2, and product usage.
Provides procedures for unit decommissioning and safe transportation.
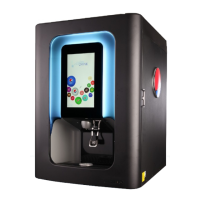
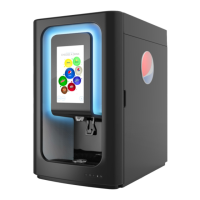
Outlines the manual's organization and describes the dispenser's system.
Lists specific storage temperature ranges for critical dispenser components.
Details the process for marking and cutting the counter for unit installation.
Explains the control system, its interface, and diagnostic capabilities.
Describes the service screen for performing maintenance and troubleshooting.
Details the unit's computer and its 30V and 12V/24V power supplies.
Covers Valve Control Board, ADA Console, LX3 Board, and Powered USB Hub.
Explains the function and types of valves (water, syrup, flavor shots) in the dispenser.
Details the LX3 Board and Valve Control Board, including their location and power.
Explains the function and power input of the Agitator/Carbonator Control Board.
Provides further details on the ADA console's function and location.
Provides steps for powering on the dispenser and its initial startup sequence.
Details the dispenser's icemaker adapter specifications and installation notes.
Covers shutdown procedures, cleaning warnings, and required cleaning solutions.
Provides instructions for daily cleaning of the cup pedestal, exterior, and nozzles.
Lists daily checks for product temperature, ice level, pressure, carbonation, and CO2 supply.
Outlines monthly cleaning requirements, in addition to daily procedures.
Details the step-by-step process for sanitizing syrup lines and the BIB system.
Guides the technician through the sanitization cycle, including pre-rinse, sanitize, soak, and post-rinse.
Explains how to access the service menu via PIN entry and its functions.
Explains how to open a valve for an unlimited time to purge lines.
Provides instructions for shutting down and rebooting the computer using the NUC power button.
Explains how to lock a brand or flavor from dispensing, e.g., for a leaking valve.
Allows changing the brand/flavor displayed on the UI, mapping brands to valves.
Details the steps to map valves, including picking new assignments and confirming changes.
Explains how to view the valve layout and assignment on the screen.
Describes the options available after selecting a brand or flavor for assignment.
Explains how to dispense a 4-second pour for checking syrup volumes or dispensing accuracy.
Guides the technician through the sanitization cycle with graphical prompts.
Shows the mapped valves and how they appear on the user screen.
Lists selections for navigating different options available to the service technician.
Provides detailed steps for adjusting the water to syrup ratio (BRIX) of the dispenser.
Allows inputting flow rates for water, carbonated water, and flavor shots.
Accesses diagnostics screens to check component and system status (Green/Red indicators).
Monitors computer temps and validates communication for controllers and display.
Acts as a reminder for scheduled maintenance tasks like filter and fan cleaning.
Provides step-by-step instructions for removing the unit's cladding.
Details the procedure for shutting down, unplugging, and replacing the touch screen display.
Covers loosening mounting screws, removing cable connections, and lifting the display.
Details tightening screws, reconnecting cables, and replacing the rear door panel.
Provides instructions for shutting down, depressurizing, and replacing a unit valve.
Guides on priming new valves, sanitizing, and Brixing after replacement.
Details procedures for disconnecting CO2, bleeding pressure, and replacing the backblock.
Explains how to diagnose computer malfunctions by checking cables, power, and LEDs.
Provides step-by-step instructions for removing and replacing the unit's computer.
Covers removing the E-box cover, disconnecting connections, and removing the computer.
Details installing a new computer, reconnecting connectors, and closing the unit.
Explains how to diagnose issues with the Valve Control board by checking LEDs and connections.
Provides instructions for removing and replacing the Valve Control board.
Covers removing the E-box cover and disconnecting cables from the board.
Details installing the new Valve Control board and reconnecting connectors.
Explains how to determine if the ADA board is faulty by testing its functionality.
Provides step-by-step instructions for removing and replacing the ADA control board.
Covers removing the service cover, unplugging harness, and installing the new board.
Details testing all buttons and functions, then reinstalling the service cover.
Provides instructions for shutting down, unplugging, and replacing the LED spot light assembly.
Details opening the door, removing ice slide/splash panel, and marking enclave screws.
Covers loosening screws and carefully removing the enclave.
Details routing lines and installing the drip tray drain tube on the enclave.
Emphasizes proper line routing and drain tube installation for correct fit.
Provides instructions for pushing, tightening, and securing the enclave.
Details checking door closure to ensure it doesn't grab or rub the gasket on the enclave.
Explains how to adjust enclave screws if the door has difficulty closing.
Covers reinstallation of the splash panel and final verification of unit function.
Explains how to diagnose issues with the carbonator sensor.
Provides step-by-step instructions for removing and replacing the carbonator sensor.
Details the procedure for shutting down, removing, and replacing the ice bin agitator assembly.
Provides instructions for removing and replacing the agitator timer board.
Details the procedure for unplugging, removing, and installing a new agitator motor.
Explains the importance of setting ON/OFF times for ice agitation.
Details how to adjust the ice chute opening for different ice types and flow rates.
Covers checks for proper ice maker and dispenser function and mounting the bracket.
Details placing the ice maker, centering it, and securing the bracket with screws.
Covers sealing the ice maker, making connections, and installing the manual fill lid.
Details installing the filler panel and checking for fit and function.
Flowchart to diagnose and resolve low syrup flow problems.
Flowchart for diagnosing issues when some valves activate unexpectedly.
Flowchart to diagnose issues when there is no valve activity.
Flowchart for diagnosing issues when one or two valves activate unexpectedly.
Flowchart for diagnosing and resolving a locked-up display screen.
Flowchart for diagnosing why the UI screen is black.
Continues the flowchart for diagnosing a black UI screen.
Flowchart for diagnosing 'NO SIGNAL' message on the UI screen.
Flowchart for diagnosing 'Out of Service' messages on the UI.
Flowchart for diagnosing power issues with the display.
Flowchart for diagnosing power issues with the computer.
Flowchart for diagnosing issues related to low or no carbonation.
Flowchart for diagnosing issues with high water temperature.
Flowchart for diagnosing low carbonation water flow.
Flowchart for diagnosing issues when ADA buttons do not function.
Diagrams showing wiring for the PEPSI SPIRE 3.0 INTERNAL and EXTERNAL EBOX.
Diagram illustrating chilled lines, including a legend for identification.
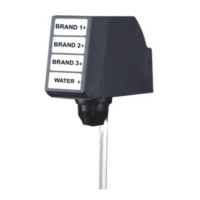
Diagram of the valve board showing connector layout for flavor, brand, and water banks.
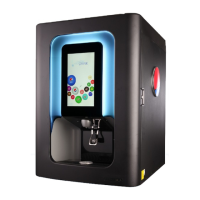
| Model | PBD175 |
|---|---|
| Brand | Cornelius |
| Voltage | 115V |
| Material | Stainless Steel |
| Type | Post-Mix Beverage Dispenser |