Do you have a question about the Creality CR-10 Smart Pro and is the answer not in the manual?
Instructions for downloading and installing firmware from the official website.
General warnings and precautions for safe operation and to prevent damage.
Precautions regarding handling during operation, touching hot parts, and avoiding entanglement.
Guidelines for child supervision and warnings about manually moving the printer mechanism during startup.
Emphasis on complying with local laws and prohibiting illegal use of the product.
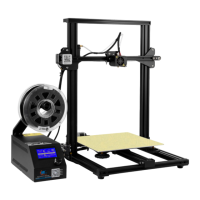
Identification and labeling of key components of the 3D printer.
Detailed list and description of printer components and their functions.
Detailed technical specifications including model, size, tech, and material compatibility.
List of all accessories and parts included in the printer package.
Contents of the provided tool kit for printer assembly and maintenance.
Steps for connecting the gantry frame to the base frame using screws.
Guidance on adjusting the coupling to raise the X-axis to the correct position.
Instructions for installing pull rods using M5x12 and M5x20 screws and flat gaskets.
Procedure for installing the nozzle kit onto the printer's carriage.
Instructions for mounting the filament holder and placing the spool on it.
Steps for connecting the FFC cable and securely mounting the touch screen.
Warning to handle the touch screen assembly and disassembly carefully to avoid damage.
Diagram and instructions for connecting X/Z axis motors, limit switches, and sensors.
Procedure for connecting the power cord and initiating the printer's startup.
Specific instruction on how to properly insert the FFC cable into its connector.
Guide to select 'Level' and start the automatic bed leveling process.
Overview of the touch screen interface for manual leveling adjustments.
Instructions for adjusting platform height using leveling screws and checking nozzle distance with paper.
Visual examples showing correct, too high, and too low nozzle positions relative to the print bed.
Using A4 paper as a gauge for fine-tuning nozzle height and ensuring slight resistance.
Steps for completing auto leveling and adjusting Z-axis compensation based on print adhesion.
Using axis movement controls to manually preheat the nozzle and bed.
Using the interface to set nozzle and bed temperatures for preheating.
Utilizing specific preheating presets for PLA/ABS and controlling fan speed.
Factory preheating standards and tips for changing filament, including heating the nozzle.
Instructions for hanging filament on the holder and preparing its end for smooth loading.
Procedure for inserting filament through the extruder to the nozzle and checking for flow.
Guide on how to adjust the extrusion spring tightness for proper filament feeding.
Two methods provided for replacing filament, including cutting and advancing.
Steps for downloading the app, registering an account, and logging in.
Connecting the printer to Bluetooth and then to local WiFi.
Selecting the printer model, machine, and initiating the printing process via the app.
Step-by-step guide for connecting the printer to Creality Cloud via Bluetooth and WiFi.
Steps for downloading app, registering, logging in, and scanning QR code.
Configuring network settings and connecting to machine/local WiFi.
Selecting model, machine, and starting the print job through the app.
Comprehensive guide for setting up Creality Cloud connection using Method 2.
Instructions for downloading and installing the Creality 3D slicer software.
Steps to configure the slicer, select the printer model, and load a print file.
Process of generating G-code and saving it to the storage card.
Instructions for inserting the storage card into the printer.
Notes on file naming conventions and saving files to the SD card root directory.
Crucial warning against inserting or removing the storage card while printing.
Essential checks for the printer when turned off and on before starting a print.
How to set the 'Auto power-off' function for automatic cooling and shutdown after printing.
Interface for controlling the print job and selecting the file to be printed.
Steps to access and initiate the network reset function on the printer.
The confirmation screen asking if the user wants to reset the WiFi connection.
Note on clearing owner information and re-scanning/connecting after reset.
Instructions for manually adjusting belt tightness using knobs, avoiding over-tightening.
Guidance on cleaning the print bed using clean water.
Procedure after power interruption, including clearing filament before resuming.
Diagram of the main board showing labeled ports for various connections.
Detailed labels for power, motor, sensor, and interface ports on the main board.
Troubleshooting steps for storage card errors and file identification problems.
Solutions for issues related to motor movement, limit switches, and extrusion gear.
Troubleshooting steps for bed/nozzle heating failures and filament feeding problems.
Flowchart for diagnosing issues related to storage cards and file recognition.
Troubleshooting steps for motor, limit switch, and heating system malfunctions.
Diagnosis and solutions for extrusion gear, filament feed, and motor issues.
Information on warranty periods for the printer and its parts.
Details on what defects are covered and specific exclusions from warranty service.
Information on lifetime technical support and how to contact for assistance.
Conditions and timeframes for returning or exchanging products, including product condition requirements.
Specifics on warranty periods, coverage for vulnerable parts, and exceptions.
Guidelines for shipping costs associated with returns, exchanges, and repairs.
List of conditions and damages that void the product's warranty.
Details on accessing lifetime technical support and contact methods.
Key reminders for users before using the machine and applying for service.
Warnings regarding unauthorized modifications and operating conditions for FCC compliance.
Information on potential interference and measures users can take to correct it.
Statement on compliance with FCC radiation exposure limits and minimum installation distance.
Conditions for compliance with Industry Canada's licence-exempt RSSs.
Compliance with RF exposure guidelines, specifying minimum installation distance.
Warnings about accessible outlets, avoiding water, and using dry cleaning methods.
Using only manufacturer-specified accessories and referring all servicing to qualified personnel.
Precautions regarding power cord handling, voltage selection, earthing, and component replacement.
Cautionary note to reduce electric shock risk by not removing covers or accessing internal parts.
Contact information including address, website, phone numbers, and email for the manufacturer.
Display of various certifications and logos related to product compliance and quality.
| Build Volume | 300 x 300 x 400 mm |
|---|---|
| Layer Resolution | 0.1-0.4 mm |
| Filament Diameter | 1.75 mm |
| Print Speed | up to 180 mm/s |
| Touch Screen | 4.3-inch color touch screen |
| Bed Temperature | up to 100°C |
| Nozzle Temperature | up to 260°C |
| Printing Technology | FDM (Fused Deposition Modeling) |
| Machine Dimensions | 578 x 522 x 648 mm |
| Resume Printing Function | Yes |
| Filament Runout Sensor | Yes |
| Nozzle Diameter | 0.4 mm |
| Connectivity | Wi-Fi, USB |
| Supported Materials | PLA, ABS, PETG, TPU |
| Bed Leveling | Automatic Leveling |