4 Unit installation
Installation manual
12
EBSH/X(B)11+16P50D
Daikin Altherma 3 R ECH₂O
4P759878-1 – 2024.01
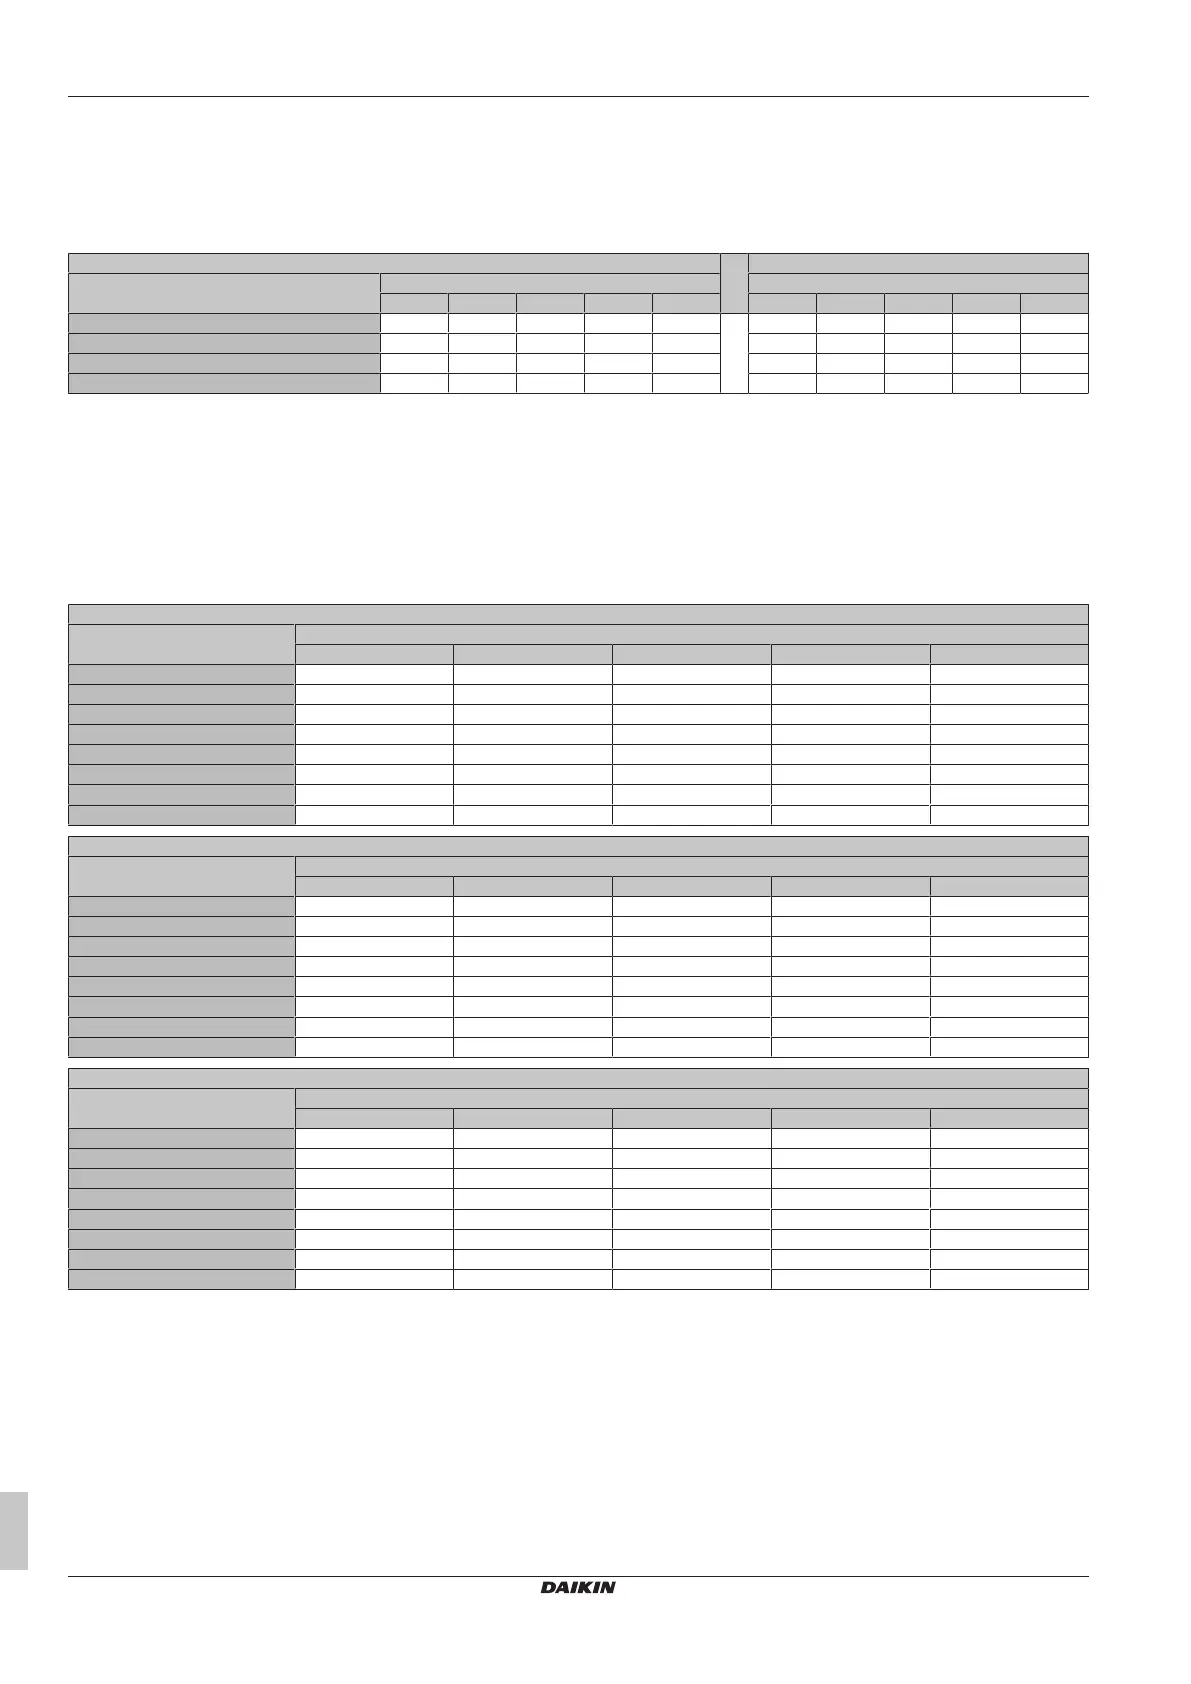
Table 3: Maximum chimney length
When installing a chimney, the chimney length must be less than the maximum chimney length.
• Use the columns with the correct refrigerant charge. For intermediate refrigerant charges, use the columns with the higher value. Example: If
the refrigerant charge is 4.0kg, use the columns of 5.8kg.
• For intermediate diameters, use the column with the lower value. Example: If the diameter is 23mm, use the column of 22mm.
• X: Not allowed
Maximum chimney length (m) – In case of Refrigerant charge=3.8kg (and T=60°C) In case of Refrigerant charge=5.8kg (and T=60°C)
Chimney Inside diameter of chimney (mm) Inside diameter of chimney (mm)
20mm 22mm 24mm 26mm 28mm 20mm 22mm 24mm 26mm 28mm
Straight pipe 19.03m 33.90m 55.16m 84.54m 124.06m 3.37m 9.47m 18.40m 30.91m 47.91m
1× 90° elbow 17.23m 31.92m 53.00m 82.20m 121.54m 1.57m 7.49m 16.24m 28.57m 45.39m
2× 90° elbow 15.43m 29.94m 50.84m 79.86m 119.02m X 5.51m 14.08m 26.23m 42.87m
3× 90° elbow 13.63m 27.96m 48.68m 77.52m 116.50m X 3.53m 11.92m 23.89m 40.35m
Table 4: Minimum bottom opening area for natural ventilation
Take the following into account:
• Use the correct table. For intermediate refrigerant charges, use the table with the higher value. Example: If the refrigerant charge is 4.3kg,
use the table of 4.8kg.
• For intermediate floor areas, use the column with the lower value. Example: If the floor area is 12.50m², use the column of 10.00m².
• For intermediate release height values, use the row with the lower value. Example: If the release height is 1.95m, use the row of 1.90m.
• A
nv
: Bottom opening area for natural ventilation.
• A
nv-min
: Minimum bottom opening area for natural ventilation.
• (*): Already OK (no ventilation openings needed).
A
nv-min
(dm²) – In case of Refrigerant charge=3.8kg
Release height (m) Floor area of room A (m²) [! NOT room A + room B !]
5.00m
2
10.00m
2
15.00m
2
20.00m
2
25.00m
2
1.89m 3.698dm
2
0.987dm
2
(*) (*) (*)
1.90m 3.645dm
2
0.914dm
2
(*) (*) (*)
2.00m 3.318dm
2
0.467dm
2
(*) (*) (*)
2.20m 2.677dm
2
(*) (*) (*) (*)
2.40m 2.098dm
2
(*) (*) (*) (*)
2.60m 1.568dm
2
(*) (*) (*) (*)
2.80m 1.080dm
2
(*) (*) (*) (*)
3.00m 0.626dm
2
(*) (*) (*) (*)
A
nv-min
(dm²) – In case of Refrigerant charge=4.8kg
Release height (m) Floor area of room A (m²) [! NOT room A + room B !]
5.00m
2
10.00m
2
15.00m
2
20.00m
2
25.00m
2
1.89m 5.977dm
2
3.560dm
2
1.753dm
2
(*) (*)
1.90m 5.914dm
2
3.476dm
2
1.652dm
2
(*) (*)
2.00m 5.534dm
2
2.969dm
2
1.037dm
2
(*) (*)
2.20m 4.790dm
2
1.969dm
2
(*) (*) (*)
2.40m 4.120dm
2
1.060dm
2
(*) (*) (*)
2.60m 3.511dm
2
0.226dm
2
(*) (*) (*)
2.80m 2.952dm
2
(*) (*) (*) (*)
3.00m 2.436dm
2
(*) (*) (*) (*)
A
nv-min
(dm²) – In case of Refrigerant charge=5.8kg
Release height (m) Floor area of room A (m²) [! NOT room A + room B !]
5.00m
2
10.00m
2
15.00m
2
20.00m
2
25.00m
2
1.89m 8.256dm
2
6.132dm
2
4.600dm
2
2.963dm
2
1.289dm
2
1.90m 8.184dm
2
6.038dm
2
4.488dm
2
2.835dm
2
1.146dm
2
2.00m 7.750dm
2
5.470dm
2
3.806dm
2
2.053dm
2
0.274dm
2
2.20m 6.902dm
2
4.354dm
2
2.461dm
2
0.508dm
2
(*)
2.40m 6.143dm
2
3.343dm
2
1.237dm
2
(*) (*)
2.60m 5.454dm
2
2.419dm
2
0.115dm
2
(*) (*)
2.80m 4.825dm
2
1.568dm
2
(*) (*) (*)
3.00m 4.245dm
2
0.776dm
2
(*) (*) (*)