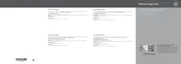
Figure 73. Cabling diagram—Four 3.5-inch hot swappable SAS/SATA hard drive backplane
1
power supply unit 2 signal connector on the system board
3 hard drive/optical drive power connector on the system
board
4 system board
5 SATA/optical drive connector on the system board 6 mini-SAS connector for SATA hard drives
7 cable routing clip 8 optical drive
9 SATA connector on the hard drive backplane 10 hard drive backplane
11 signal connector on the hard drive backplane 12 power connector on the hard drive backplane
Next steps
1 Install the hard drive backplane.
2 Follow the procedure listed in After working inside your system.
Related links
Removing a hot swappable hard drive carrier
Installing the hard drive backplane
118
Installing and removing system components