CAUTION: To prevent damage to the HDDs and HDD backplane, you must remove the HDDs from
the system before removing the HDD backplane.
CAUTION: You must note the number of each HDD and temporarily label them before removal so
that you can replace them in the same locations.
Steps
1. Disconnect the SAS/SATA/SSD data cable(s) and power cable from the backplane.
2. Press the release tabs and lift the backplane upward and slide it toward the back of the chassis.
NOTE: To prevent damage to the control panel flex cable, unlatch the blocking tab on the
connector before removing the flex cable. Do not bend the flex cable at the connector. For the
x2 backplanes, rotate the locking tab 90 degrees clockwise.
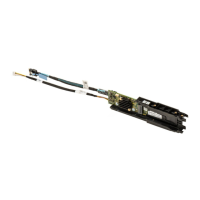
Figure 49. Removing and installing the 3.5 inch (x12) SAS/SATA backplane—NX3230
1. release tab (2) 2. SAS cable A2
3. SAS cable A1 4. left ear control panel cable
5. backplane signal cable 6. backplane power cable (2)
7. SAS cable A0/B0 8. USB cable
107
 Loading...