25 95-87142.2
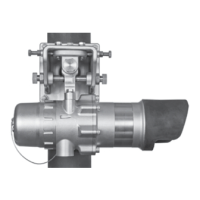
11. Verify alignment using the Alignment Tool.
The Vertical alignment may have shifted
slightly due to tightening of the 4 Horizontal
locking bolts pulling the Detector Mounting
Assembly up. Adjust the vertical alignment if
needed using the Vertical Adjustment Bolts.
12.
When proper alignment has been achieved,
tighten the Vertical Adjustment Bolts
and Locking Nuts to 90 ft-lbs (122 N•m)
maximum, being careful to tighten each
bolt evenly against each other to prevent
torquing of the Detector Mounting Assembly.
The Receiver is now secured vertically and
aligned with the Transmitter.
13. Repeat the alignment procedure for the
transmitter module (steps 3 to 12).
14. Re-check the alignment one final time using
the alignment tool and adjust as needed.
15. Remove the Alignment Tool and re-install the
brow.
16. Bypass all external gas alarm devices that
are connected to the receiver outputs, and
then apply 24 Vdc power to the modules.
17. Upon completion of warm-up mode
(approximately 2 minutes or less), the
receiver should produce a 4 mA output
signal and a green LED indication. If not,
the required zero calibration step below may
resolve this issue.
18. For installations with module separation
distances between 5 and 40 meters, install
the aperture as described in the “Aperture Kit
for Short Range Applications” section.
19. Perform a zero calibration. (Refer to “Zero
Calibration” in the Calibration section of this
manual.) Any faults that may be present as
a result of the alignment process should be
cleared.
NOTE
The LS2000 transmitter lamp output
intensity is automatically optimized
during the zero calibration process if the
communication link wires are attached
between transmitter and receiver. If
no communication link is installed, the
transmitter lamp output can be adjusted
via MODBUS or HART connection to
the transmitter. This adjustment is rarely
needed. (See “Transmitter Lamp Voltage”
section for more information.)
20. Proper operation should be confirmed by
bypassing all system alarms, then placing
an optical test film (sold separately) into the
light beam and checking for the appropriate
4-20 mA output level or relay actuation.
The LS2000 test film packet consists
of five separate test films. Table 7 shows
the response of the different LS2000 gas
settings to each of the five test films. Alarm
conditions, if present, should clear when the
test film is removed from the beam.
21.
Confirm proper operation by completely
blocking the light beam with a solid object
such as a piece of cardboard until a beam
block fault is signaled by the appropriate
4-20 mA output level or relay action (default
delay is 60 seconds). The fault should clear
when the blocking device is removed from
the beam.
22. When Basic Alignment and Zero Calibration
have been successfully completed, a green
LED should be displayed on the receiver
module and the analog signal output level
should be 4.0 milliamperes.
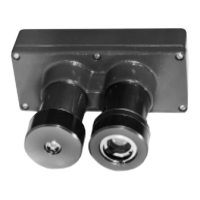
APERTURE KIT FOR SHORT RANGE
APPLICATIONS
The Short Range Aperture Kit enables
successful application of the LS2000 gas
detector at short separation distances (5-15
meters for the short range model and 30-40
meters for the long range model). The aperture
is made of aluminum and is included with the
LS2000.
Table 7—Typical System Response
*
in LFL-M (% Full Scale)
Using Gas Test Films
Test Film Methane Butane Propane
1
0.6
(12%)
1.1
(22%)
1.3
(26%)
2
1.5
(29%)
2.3
(46%)
2.6
(52%)
3
2.5
(50%)
3.6
(72%)
3.9
(78%)
4
3.7
(74%)
4.9
(98%)
5.4
(108%)
5**
5.0
(100%)
6.0
(120%)
6.0
(120%)
*Accuracy = ±0.2 LFL-M or ±15% LFL-M from typical system
response, whichever is greater.
**A HART handheld device is needed to read over-range values.