15
2.Removeoilfill/dipstickandwipeclean.
3.Reinsertoilfill/dipstickfullyintooilfillport
PATTERNS
PATTERNS
and tighten. Allow oil to collect on the
dipstickforafewseconds.
4.Remove oilfill/dipstick toreadoillevel. If
oil falls below top of pattern on dipstick,
add oil.
NOTE: When filling the crankcase, allow
theoiltoflowveryslowly.Iftheoilisaddedtooquickly,itwilloverflowandappeartobe
full.
5.Replacedipstickandtightensecurely.
TO CHANGE OIL
NOTE: Engine oil contains substances that are regulated and must be disposed of in
accordance with local, state, provincial and federal laws and regulations.
1.Disconnectsparkplugwire.
2.Locateasuitablecontainerunderoildrainplug(Q9).
3.Removetheoilfill/dipstick(J9)fromcrankcase.
J9
Q9
4. Remove the oil drain plug.
5. Allow ample time for all oil to drain out.
6. Install the oil drain plug and tighten securely.
7. Fill with recommended oil. Refer to the Viscosity-
Ambient Temperature Chart for recommended oil.
NOTE: Synthetic oil is NOT recommended.
˚F -20 0 20 40 60 80 100
˚C -28.8 -17.7 -6.6 4.4 15.5 26.6 37.7
5W-30
10W-30
30
VISCOSITY-AMBIENT TEMPERATURE CHART
8.Replacedipstickandtightensecurely.
9.Reconnectsparkplugwire.
10. Dispose of oil according to local, state, provincial and federal laws and regulations.
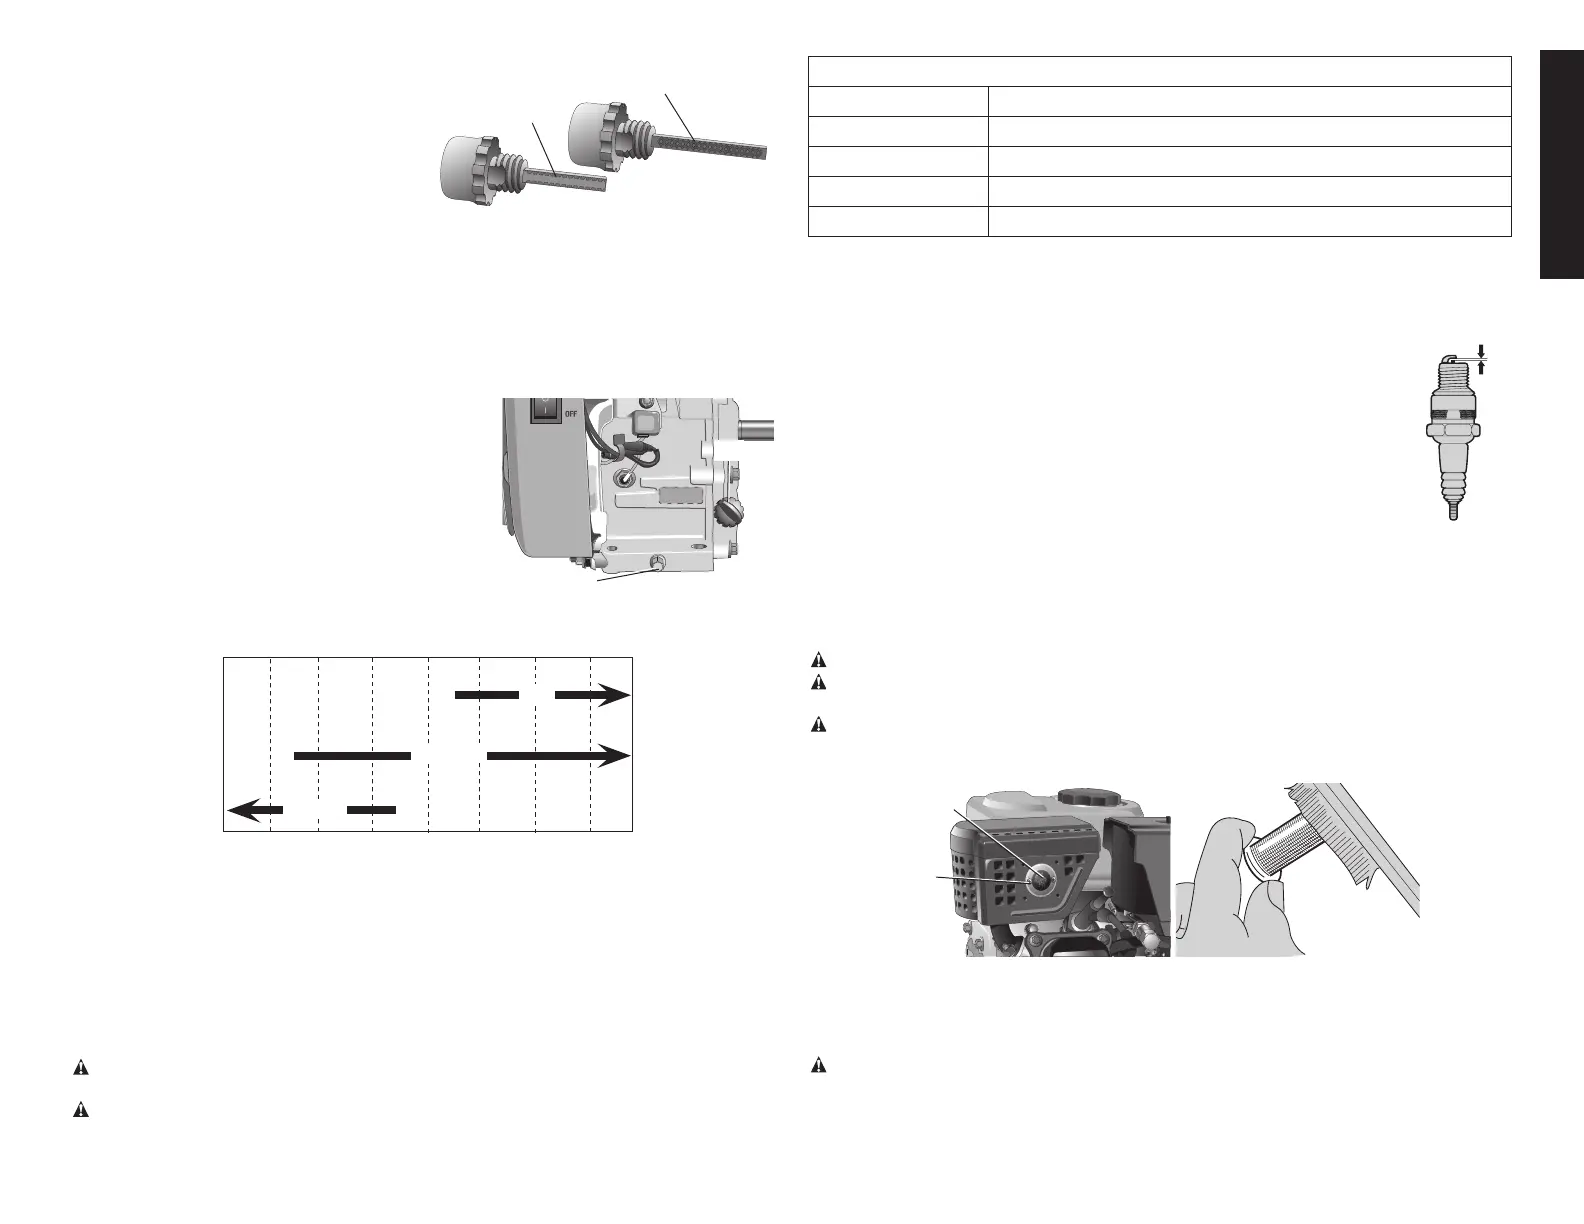
Userecommendedsparkplugs,seeSparkPlugCrossReferenceforcorrectsparkplug.
Toensureproperengineoperation,thesparkplugmustbeproperlygappedandfreeof
deposits.
WARNING: If the engine has been running, the muffler and spark plug will be very hot.
To reduce the risk of injury, allow cooling before proceeding.
WARNING:
Always wear certified safety equipment: ANSI Z87.1 eye protection (CAN/CSA
Z94.3) with side shields.
SPARK PLUG CROSS REFERENCE
BRAND PART NUMBER
NGK BP6ES, BPR6ES
AUTOLITE 63
AC DELCO R41XL,R42XLS, R43FS,R43XL, R43XLS, R44XLS, R45XLS
CHAMPION RJ14YC
1.Removethesparkplugboot.
2.Cleananydirtfromaroundthesparkplugbase.
3.Useasparkplugwrench(notsupplied)toremovethesparkplug.
4.Visuallyinspectthesparkplug.Replaceitiftheinsulatoriscrackedorchipped.Clean
thesparkplugwithawirebrushifitisgoingtobereused.
5. Measure the plug gap with the feeler gauge. Correct as necessary by
carefully bending the side electrode. The gap should be: 0.70-0.80 mm
(0.028-0.031in).
6.Makesurethespark plug washerisingoodcondition.Thread the spark
plug in by hand to prevent cross threading.
7.Afterthesparkplugisseated,tightenwithasparkplugwrenchtocompress
thewasher.Ifinstallinganewsparkplug,tightenthesparkplug1/2turn
after it seats to compress the washer. If reinstalling a used spark plug,
tighten1/8–1/4turnafterthesparkplugseatstocompressthewasher.Do
not overtighten.
NOTE: Thesparkplug must be securely tightened. Animproperlytightenedspark plug
canbecomeveryhotandcoulddamagetheengine.Neverusesparkplugswhichhavean
improperheatrange.Useonlytherecommendedsparkplugsorequivalent.
WARNING: DO NOT operate engine without muffler cover or spark arrestor.
WARNING: If the engine has been running, the muffler will be very hot. To reduce the
risk of injury, allow engine to cool before proceeding.
WARNING:
Always wear certified safety equipment: ANSI Z87.1 eye protection (CAN/CSA
Z94.3) with side shields when removing carbon deposits.
NOTE:Thesparkarrestermustbeservicedevery100hourstomaintainitsefficiency.
R12
CC
1.Removethesparkarrestorscrews(R12)andremovethesparkarrestor(CC).
2.Usebrushtoremovecarbondepositsfromthesparkarresterscreen.Inspectthespark
arresterscreenforholesortears.Replacethesparkarresterifnecessary.
WARNING: Hot surfaces. Risk of burn. Engine and surrounding parts are very hot, do not
touch. Allow engine to cool prior to servicing.
NOTE: Enginemustbecoldtocheckthevalveclearance.
1. Remove the cylinder head cover.